Here’s how to downgrade iOS 13.3.1 / iPadOS 13.3.1 to iOS 13.3 / iPadOS 13.3 for checkra1n jailbreak on your compatible iPhone or iPad device. If you have inadvertently upgraded to the latest iOS/iPadOS release but want to jailbreak, then you will need this process.
Without wasting any more time, let’s simply jump right in and take a look at the process. You’ll need your device, a PC or a Mac, a USB cable, and some patience.
Step 1: Before you dive fully into the process, you will need to make sure that you have the latest version of iTunes installed on your computer. If you have a Mac and have upgraded to macOS Catalina, then you don’t need to worry as iTunes has been deprecated and the functionality is now built into the Finder app.
Step 2: With iTunes at the latest version, you will also need to download the IPSW file for iOS 13.3 or iPadOS 13.3 compiled for your specific device. You can grab that from here.
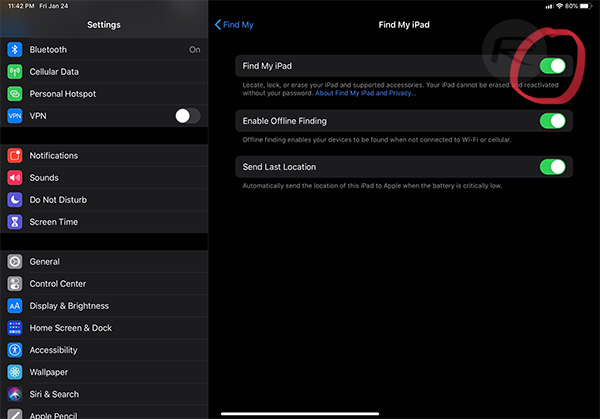
Step 3: Next, you will need to turn off the Find My service on your iPhone or iPad. Go to Settings > iCloud > Find My and then flick the Find My iPhone / iPad switch into the Off position. You will be asked to confirm the password associated with the Apple ID that you are currently signed in with.
Step 4: Grab your trusty USB cable and connect the iPhone or iPad to your PC or Mac. Make sure iTunes or the Finder window (macOS Catalina) is open and put your device into DFU mode. If you do not know what DFU mode is, or just need a little guidance, then you can find out a little more about that below:
- iPhone 8 / 8 Plus, iPhone X / XR / XS / XS Max / 11 / 11 Pro / 11 Pro Max, or 2018 iPad Pro owners can follow this guide.
- iPhone 7 / 7 Plus owners: Enter DFU Mode On iPhone 7 Or iPhone 7 Plus, Here’s How
- If you have an iPhone 6s / 6s Plus or any other iPad, then follow the instructions here.
Step 5: With your device in DFU mode, you will be prompted by iTunes or Finder to start the restoration process. Press and hold the Option key on a Mac or the Shift key on a PC, and click the Restore iPhone/iPad option.
Step 6: When asked, select the IPSW file for iOS 13.3 or iPadOS 13.3 that you downloaded earlier on in the process. Hopefully, you saved the file in a safe place on your PC or Mac and you should be able to retrieve it with ease.
Step 7: With all of the above steps completed, it is now up to iTunes or Finder to complete its end of the deal. The connected device may reboot a few times during the process. Rest assured that this is entirely normal. When the whole process has finished, you will be left with an iPhone or iPad running iOS 13.3 or iPadOS 13.3.
Checkra1n should be back on your mind now. You are back on iOS 13.3 / iPadOS 13.3 and are therefore able to jailbreak with the currently available version of the checkm8-based jailbreak tool.
For a step-by-step guide on how to jailbreak iOS 13.3.1, you can check out our video tutorial below:
Subscribe to our YouTube channel for more videos.
You may also like to check out:
- Checkra1n For Windows Alternative: How To Use Ra1nUSB For iOS 13.3 Jailbreak
- Download: iOS 13.3.1 Final IPSW Links, OTA Update And iPadOS 13.3.1 Released For Compatible Devices
- Download: iOS 13.3.1 Beta 3 IPSW Links, OTA Update Out Now
- Downgrade iOS 13.3 To iOS 13.2.3 For Checkra1n Jailbreak, Here’s How
- Jailbreak iOS 13.3 Using Checkra1n, Here’s How [Guide]
- Jailbreak iOS 13.3 / 13.3.1 On iPhone 11, 11 Pro Max, XS, More With New tfp0 Exploit Will Be Possible Soon
- iOS 13 / 13.2.2 Jailbreak Tweaks Compatibility List For Checkra1n
- Apple Watch ECG App Hack: Enable Outside US In Unsupported Country On Series 5 & 4 Without Jailbreak
You can follow us on Twitter, or Instagram, and even like our Facebook page to keep yourself updated on all the latest from Microsoft, Google, Apple, and the Web.
