Here’s how to clean install macOS 12 Monterey on Mac via USB drive the right way. And by the right way, we mean by using this guide, of course.
Following on from last year’s big macOS release, Apple has followed its own newly-set tradition by delaying the release of macOS longer than most expected. Still, the OS is now here in all of its glory, and available for all to download and install.

Sure, you can download and install it via the App Store over the top of your current installation if you wish but many will prefer to get up and running with a clean installation.
Prerequisites
- Make sure that everything is fully backed up. You can use the Time Machine feature or make a clone of your drive. If you aren’t going to go through that process, then at least make sure that you have everything important saved elsewhere.
- You’ll need to have a Mac that supports macOS 12 Monterey. You can check the compatibility of macOS with Mac models here: macOS 12 Monterey Compatibility: Full List Of Macs Compatible With Apple’s Latest Desktop OS
Now, with that important stuff out of the way, let’s get down to business.
How To Do A Clean Install Of macOS 12 Monterey
Step 1: Before you start the installation, you need to have the installation file for this particular version of macOS. You can download the installer for macOS 12 Monterey from here.
Step 2: Now, with that installation file, we need to make a bootable USB drive with this version of macOS. We have a guide for that, so make sure to follow along before you continue: Create macOS Monterey Bootable USB Flash Drive Installer, Here’s How.
Step 3: Power down your Mac and insert the USB drive into an available USB port. Turn the Mac back on while holding the Option key. You should be taken to the boot menu.
Note: If you have a T2-chip enabled Mac, you will first need to enable booting from external storage via macOS Recovery. Nothing is going to work otherwise.
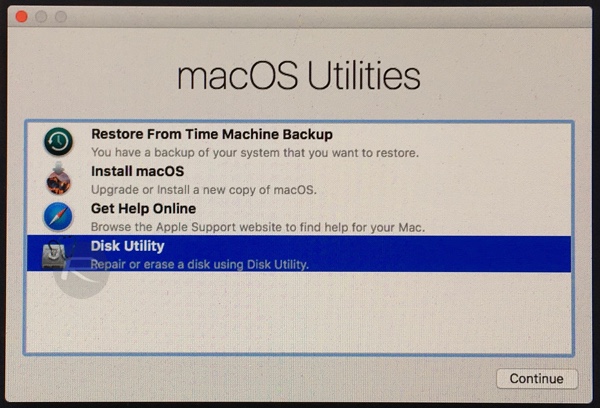
Step 4: Once everything boots up, you’ll be taken to the macOS Utilities menu. Select Disk Utility and then click Continue.
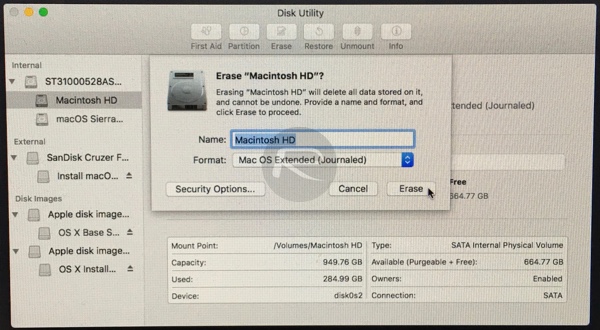
Step 5: Ensure your Mac’s main drive is selected and then click Erase. Keep the name of the new drive as Macintosh HD and make sure that the format is set as either “APFS (Encrypted)” (if you have a modern Mac with faster SSD) or “Mac OS Extended (Journaled)”. Select the Erase option to get this show on the road.
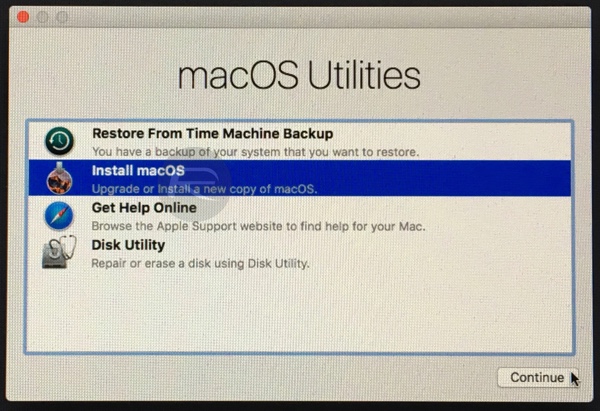
Step 6: With that drive erased, you are back to a clean slate. To continue, the next step is to fill it back up again. Select Install macOS and then click Continue. Make sure that your newly formatted drive is selected and follow the prompts.
Once you have followed the prompts through, that should be all that she wrote and you should be up and running once the process has been completed.
You may also like to check out:
- Download Windows 11 Pro ISO File Without Product Key From Microsoft
- Force Download Windows 11 Free Upgrade Right Now, Here’s How [Tutorial]
- How To Install Windows 11 On A Mac Using Boot Camp Today
- Download Windows 11 Installation Assistant For Your PC
- How To Upgrade To Windows 11 From Windows 10 For Free
- How To Create Bootable Windows 11 USB Flash Drive [Guide]
- Download: iOS 15.1 Final IPSW Links, OTA Profile File Along With iPadOS 15.1 Out Now
- Jailbreak iOS 15.1 On iPhone And iPad Status Update
- How To Install macOS 12 Monterey Hackintosh On PC [Guide]
- Best iPhone 13, 13 Pro Tempered Glass Screen Protectors Available Today [List]
- Best iPhone 13, Pro Max 20W USB-C Chargers [List]
- Top iPhone 13 Pro Max Screen Protectors Available To Buy [List]
- Best iPhone 13 / Pro Cases For Protection Available Right Now
- How To Fix Bad iOS 15 Battery Life Drain [Guide]
- Apple Watch ECG App Hack: Enable Outside US In Unsupported Country On Series 5 & 4 Without Jailbreak
You can follow us on Twitter, or Instagram, and even like our Facebook page to keep yourself updated on all the latest from Microsoft, Google, Apple, and the Web.
