A few days ago, we started to hear about Google starting to block the use of uncertified Android devices from being able to install apps and services via the Google Play Store.
This meant that apps like Gmail or even Google Maps were out of reach for anyone using a device that has not been blessed by Google, and while you may think that just covers hardware built by no-name Chinese brands, it also includes anything carrying the Amazon Kindle/Fire name, too.
If you have a device that presents a “Device is not certified by Google” warning, then your options are limited, but that does not mean they are non-existent. To start off with, let’s check whether your device is certified or not. It’s a simple process, so here goes.
Check If Your Device Is Google-Certified:
Step 1: Open the Google Play Store on your device.
Step 2: Open the sidebar menu.
Step 3: Tap on the Settings option.
Step 4: Scroll all the way down to the “About” section. Your device’s status is shown under, obviously enough, “Device certification.”
While Google does have a webpage up that will allow people to apply to have their system’s granted access, this is mainly for use by ROM creators rather than end users. However, that doesn’t mean that you cannot jump on the bandwagon, too.
How To Register For Certification To Fix This Problem:
Step 1: Find your device’s GSF Device-ID. You can do that by downloading an app called “Device ID,” which will no doubt need to come from a mirror such as the link here, seeing as you likely cannot access the Play Store if you’re reading this!
Step 2: Open the app and copy the code that it shows under “Google Service Framework (GSF).”
Step 3: Convert the hexadecimal ID to decimal using any online converter such as the on at rapidtables.com/convert/number/hex-to-decimal.html.
Step 3: Go to Google’s website for registering devices.
Step 4: Enter your newly found GSF Device-ID into the Android ID box on the website.
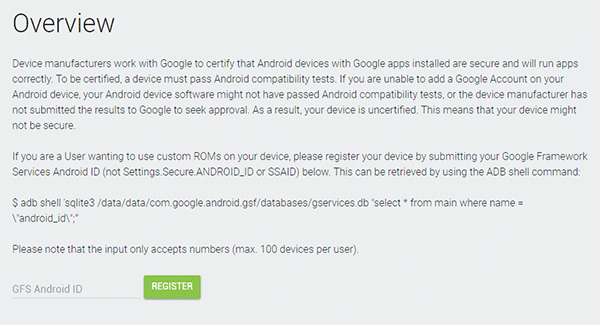
Step 5: Tap the Register button and your ID should appear on the page.
This should get you rocking and rolling again, although it’s still early days for this process, so your mileage may, unfortunately, vary.
You may also like to check out:
- PUBG Mobile System Requirements For Android And iOS Devices
- PUBG Mobile Update 0.4.0 Patch Notes For English USA Market On Android, iOS Released
- iOS 11.3 Download Final IPSW Version For iPad 6 Released
- PUBG Mobile Tips And Tricks For Android And iOS [Guide]
- PUBG Mobile Mod APK Download For Android Now Available, Here’s What You Need To Know
- Download iOS 11.2.6 IPSW Links And OTA With Fix For Messages Crashing Bug
- Jailbreak iOS 11.2.6 / 11.2.5 / 11.2.2 On iPhone And iPad [Status Update]
- Jailbreak iOS 11 / 11.1.2 On iPhone X, 8, 7, iPad Using Electra Or LiberiOS [Updated]
You can follow us on Twitter, add us to your circle on Google+ or like our Facebook page to keep yourself updated on all the latest from Microsoft, Google, Apple and the Web.
