Here’s a full tutorial on how to jailbreak iOS 13.2.3 using Checkra1n on Mac on a compatible iPhone, iPad or iPod touch device.
The latest version the checkm8-based checkra1n jailbreak is out now offering support for iOS 13.2.3 devices. Let’s dive right in and take a look at how to use it.
Requirements to jailbreak iOS 13.2.3: Like with most jailbreaks, there are certain requirements that you need to have in place to have any chance of being successful.
- A5-A11 iPhone or iPad. (iPhone XS/XR and above aren’t supported by checkm8 exploit)
- A supported device running iOS 13.2.3, which you can download from here.
- A computer running macOS. (macOS only at the moment; Windows and Linux support are coming at a later date)
- The latest version of iTunes installed if you are using a Mac. Don’t worry, if you are running macOS Catalina then Finder has you covered
- Checkra1n jailbreak app. (Download from here)
How to jailbreak iOS 13.2.3 using checkra1n: If you have all of your ducks in a row above, then you should be good to go. Follow the instructions below.
Step 1: Connect your compatible iPhone or iPad device to the computer via USB and launch the checkra1n jailbreak app by right-clicking on the app icon and then selecting on “Open”. Make sure you give full permissions to the application.
Step 2: Once checkra1n has detected the connected device, click on the “Start” button in the app. Select “Next” to continue the jailbreaking process using checkra1n.
Step 3: Once you get to the next screen, the checkra1n app will provide you instructions on how to put the device into DFU mode. This is a necessary step in order for the jailbreak to carry on. Follow the on-screen instructions. If those steps are giving you trouble, then you can follow our own instructions on how to put your device into DFU mode here:
- iPhone 8 / 8 Plus, iPhone X / XR / XS / XS Max / 11 / 11 Pro / 11 Pro Max, or 2018 iPad Pro owners can follow this guide.
- iPhone 7 / 7 Plus owners: Enter DFU Mode On iPhone 7 Or iPhone 7 Plus, Here’s How
- If you have an iPhone 6s / 6s Plus or any other iPad, then follow the instructions here.
Note: It is worth knowing that it’s an extremely important step and if you fail the DFU mode step, then the jailbreak app will restart and have you try the process again. This will repeat over and over until you get it right.
Step 4: Once the device is successfully put in DFU mode, the jailbreaking process will begin. During this time, your device will show a verbose log of the whole jailbreak process. Don’t tamper with the device or do anything with it.
Step 5: Once done, your device will respring and you will see the checkra1n application on the Home screen of your device. Presuming everything has worked as expected, of course.
Step 6: Run this app and the brand new Loader screen will launch. Select to Install Cydia and let it go through its process of putting the Cydia app onto your newly jailbroken device.
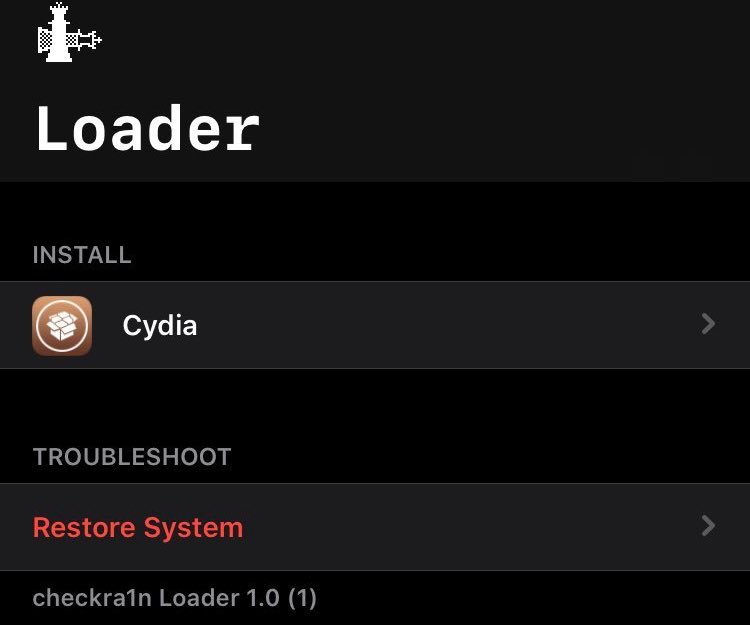
Once done, the device will respring and you will have Cydia installed on the Home screen, which you can of course launch to start installing your favorite jailbreak tweaks.

It’s of course important to note that checkra1n is a semi-tethered jailbreak. What this means is that if you reboot your device, you will have to put it back into jailbreak mode every time by connecting your device to your computer, running checkra1n app, putting the device into DFU mode and then letting the app put it back into jailbreak mode.
Check out our video tutorial below on how to jailbreak iOS 13.2.3:
Subscribe to our YouTube channel for more videos.
You may also like to check out:
- Download: iOS 13.2.3 IPSW Links, OTA Update Released For iPhone And iPad
- Download: iOS 13.3 Beta 2 IPSW Links, OTA Update File Along With iPadOS 13.3 Beta 2 Released
- Jailbreak iOS 13.2.2 Using Checkra1n On Mac, Here’s How [Tutorial]
- Download Checkra1n iOS 13.2.3 Jailbreak IPA On Mac [0.9.6 beta]
- iOS 13 / 13.2.2 Jailbreak Tweaks Compatibility List For Checkra1n
- Fix Cydia Crashing On Checkra1n iOS 13 Jailbreak, Here’s How
- Gold iPhone 11 Pro Max: Case, Lightning Cable, Wireless Charger, Band, Speaker, More
- Red iPhone 11 Accessories: Case, Lightning Cable, Wireless Charger, Band, Speaker, Much More
- Yellow iPhone 11 Accessories: Case, Lightning Cable, Qi Wireless Charger, Band, Speaker, Much More
- Purple iPhone 11 Accessories: Case, Lightning Cable, Qi USB Charger, Band, Speaker, Much More
- Green iPhone 11 Accessories: Case, Lightning Cable, Qi USB Charger, Band, Speaker, Much More
- Midnight Green iPhone 11 Pro Max: Case, Lightning Cable, Wireless Charger, Band, Speaker, More
- Apple Watch ECG App Hack: Enable Outside US In Unsupported Country On Series 5 & 4 Without Jailbreak
You can follow us on Twitter, or Instagram, and even like our Facebook page to keep yourself updated on all the latest from Microsoft, Google, Apple, and the Web.
