Here’s how to downgrade iOS 13.0 to iOS 12.4.1 on your compatible iPhone model or even iPod touch 7th-generation.
If you have upgraded to iOS 13 and immediately think that you have made a mistake for one reason or another, then here’s how to downgrade your firmware to iOS 12.4.1 on iPhone or iPod touch.
We don’t need to know why you aren’t feeling iOS 13 or why you need to downgrade. You just need to understand that Apple is only signing iOS 12.4.1, so that is as far back in the iOS 12 story as you can go. Right, with that out of the way, let’s get down to this.
Step 1: You are first going to have to make sure that you have the latest version of iTunes installed, which is compatible with iOS 13. You may have upgraded to iOS 13 via an over-the-air update but in order to downgrade, iTunes will need to recognize the device and that means offering iOS 13 support.
Step 2: Next, you will need to have the correct iOS 12.4.1 IPSW file for the device. For reference, if you have an iPhone XR, you will need the IPSW file specifically meant for that device. You can grab the iOS 12.4.1 IPSW file from here.
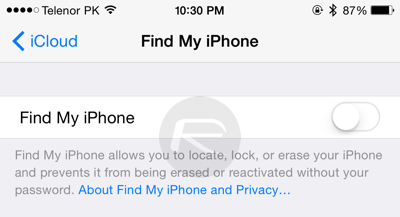
Step 3: On the iPhone itself, you will need to turn off the Find My iPhone feature in order to be able to downgrade. Go to Settings > iCloud > Find My iPhone and make sure the Find My iPhone switch is set to the Off position. You will be asked to confirm the password for the currently signed-in iCloud account.
Step 4: Connect your device to your PC or Mac with the supplied USB cable. If iTunes doesn’t load automatically, then fire it up manually. You’re now going to need to put the connected device into DFU or Recovery mode.
If you are struggling on getting your device into DFU mode, then you can find that information below:
- iPhone 8 / 8 Plus, or iPhone X / XR / XS / XS Max owners: DFU Mode On iPhone X / 8: Here’s How To Enter It
- iPhone 7 or iPhone 7 Plus owners: Enter DFU Mode On iPhone 7 Or iPhone 7 Plus, Here’s How
- If you have an older device, then follow the instructions here.
Once it is in DFU Mode, iTunes will tell you that it has detected that device in Recovery Mode. You’re ready to proceed.
Step 5: Press and hold the Option key (Mac), or Shift key (Windows), and make sure that you select the Restore iPhone… option within iTunes. When asked, navigate to the iOS 12.4.1 IPSW file on your computer and select it.
Step 6: iTunes will now go to work and restore your device to that iOS 12.4.1 file. Once complete, you will find yourself on the setup screen and ready to get your iPhone back into the swing of things running iOS 12.4.1.
You may also like to check out:
- Download: iOS 13 Final IPSW Links, OTA Update For iPhone Released
- Best iPhone 11, 11 Pro Max Case With Slim, Wallet, Ultra-Thin Design? Here Are Our Top Picks [List]
- iPhone 11 / 11 Pro Max Screen Protector With Tempered Glass: Here Are The Best Ones
- iOS 13, iPadOS Compatibility For iPhone, iPad, iPod touch Devices
- Fix iOS 13 OTA Stuck On Preparing Update Issue, Here’s How
- Fix iOS 13 Update Requested Stuck Issue On iPhone And iPad, Here’s How
- 100+ iOS 13 Hidden Features For iPhone And iPad [Running List]
- How To Fix iOS 13 Problems, Crashing Apps Issue And Other Bugs
- Fix iOS 13 Estimating Time Remaining Stuck Issue, Here’s How
- Jailbreak iOS 13 / 13.1 Status Update [Continuously Updated With Latest Info]
- Download iOS 13 IPSW Links & Install On iPhone XS, Max, XR, X, 8, 7, Plus, 6s, SE, iPod [Tutorial]
- Fix iOS 13 Could Not Activate iPhone Activation Error After Update, Here’s How
- Fix iOS 13 No Service Issue After Upgrade, Here’s How
- iOS 13 Photos Camera Roll Missing?: Check “All Photos” Section
You can follow us on Twitter, or Instagram, and even like our Facebook page to keep yourself updated on all the latest from Microsoft, Google, Apple, and the Web.
