Here’s how you can instantly get up and use the built-in iOS 11 Screen Recording feature on an iPhone or iPad device.
For one reason or another, Apple decided to gloss over the fact that iOS 11 comes equipped with native screen recording functionality during its unveil at WWDC back in June. Thankfully, we’re on hand to show you exactly how you can get up and running with it on your iPhone or iPad.

The feature is such a major one that it caused some serious confusions amongst Apple enthusiasts as to why Apple decided to skip over this during the initial reveal of the OS. Fans have been screaming for a native screen recording experience for a while, and with iOS 11, their prayers have finally been answered. Here in this post, we will show you how to go about using this feature on your iPhone or iPad running iOS 11.
Step 1: Launch the Settings app on your device and take a second to look at the new design and changes made within iOS 11. Now, moving on from the aesthetics, pull down on the interface like you would with information that you were trying to refresh in a table. You will get a Search bar. Tap into that and search for Control Center. Alternatively, you can simply scroll down in Settings.app until you find Control Center section.

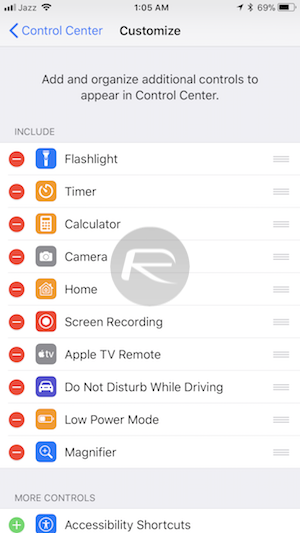
Step 2: Navigate to Control Center > Customize Controls. Scroll down until you find Screen Recording option and then tap on the green “plus” icon to the left of the title. This will essentially add the Screen Recording functionality to the Control Center experience.
Step 3: Exit Settings and go through the usual iOS process of invoking the Control Center (swipe up from the bottom of the display). You will now notice that there is a new Screen Recording icon in the overlay.

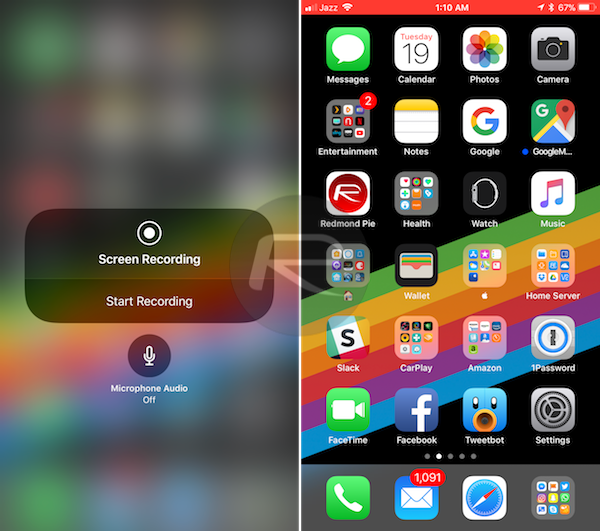
Step 4: If you simply perform a simple touch gesture on the new Screen Recording icon, you will be presented with a nice animation counting down 3, 2, 1 with screen recording starting almost immediately after. Doing a 3D Touch or a long press gesture on the same icon though invokes a new overlay which gives options for starting and stopping recording, as well as the ability to ensure that audio recording is either turned on or off using the microphone button. Tap on Start Recording and then hit the Home button to exit out of this particular display. You can then interact with the device as normal safe in the knowledge that the new recording functionality will actually be recording it all natively. You will even see a 10-pixel red bar underneath the status bar that confirms the recording state.
Step 5: When you have recorded everything that you want to, tap on the aforementioned red header. You can then stop the recording, allowing iOS to save the video directly to the Photos app.
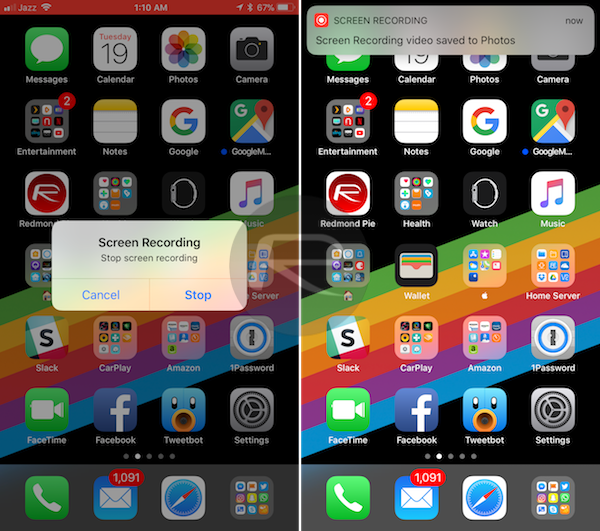
You can now head into the Photos app as you normally would. Locate the saved video and interact with it like any other video file. It should contain everything you looked at, as well as audio if you had that turned on.
You may also like to check out:
- iOS 11 Compatible Apps: Apple Drops Compatibility For 32-bit Apps
- iOS 11 Dark Mode: Enable Smart Invert Feature On iPhone, Here’s How
- How To Downgrade iOS 11 To iOS 10.3.3 / iOS 10 [Tutorial]
- iOS 11 Final Release Notes / Changelog: All Changes In One Place
- iOS 11 Compatibility For iPhone, iPad, iPod touch Devices [Final List]
- Download iOS 11, 11.0.1 Links & Install On iPhone 8, 7 Plus, 6s, 6, SE, 5s, iPad, iPod [Tutorial]
- Jailbreak iOS 11 On iPhone And iPad [Status Update]
You can follow us on Twitter, add us to your circle on Google+ or like our Facebook page to keep yourself updated on all the latest from Microsoft, Google, Apple and the Web.
