Here’s how to downgrade iOS 11.0.3 to iOS 10.3.3 / iOS 10 on a compatible iPhone, iPad or iPod touch device.
Has the excitement of knowing that iOS 11 is out accidentally prompted you to update your iOS device without actually thinking of the consequences? Have you instantly regretted that decision, due to the fact that you’ve moved away from a stable version of iOS 10 and across to a major new version of iOS which may still have bugs, incompatibility issues with apps, and other problems? The decision may not have been the finest one, but fortunately, it is still possible to downgrade from iOS 11/11.0.3 back to iOS 10.3.3 while Apple is still signing the firmware.

You can immediately downgrade to iOS 10.3.3 using iTunes, but it’s important to note that once you go back to iOS 10.3.3 from the iOS 11/11.0.3, you won’t be able to restore any iCloud or iTunes backup to that device which was made using the device with the iOS 11/11.0.3 on. When you actually go through the process, you’ll be given the option of either restore from backup captured on iOS 10.3.3, or setting the device up as an entirely new phone. With that in mind let’s jump straight into the tutorial and get started.
Step 1: First of all you are going to need to make sure that you are sitting on the latest version of iTunes on your Mac or Windows PC. If not, download and install it with immediate effect.
Step 2: You will also need to have the relevant IPSW file for the device that you own. You can download the right iOS 10.3.3 IPSW file for your specific device from here: Download iOS 10.3.3 Final IPSW Links For iPhone, iPad, iPod touch.
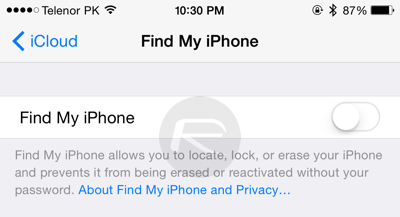
Step 3: On the device, you will now need to turn off the Find My iPhone feature. Navigate to Settings > iCloud > Find My iPhone. Toggle the Find My iPhone switch to the Off position and authenticate with the iCloud password when prompted.
Note: You can bypass DFU mode altogether in Step 4 below and restore to iOS 10.3.3 just like normal restore with iTunes from Step 5 onwards, but we recommend using DFU mode to avoid any potential issues. If
Step 4: Use the provided USB cable to connect your device to the computer and ensure that iTunes launches. You’re now going to need to put the connected device into DFU or Recovery mode. iPhone 7 users should follow our guide here for instructions on how to put the phone in DFU mode. Non-iPhone 7 users should hold down the Power and Home button for 10 seconds, then release the Power button but ensuring that Home button is still pressed. The device will jump into DFU mode and iTunes will provide an alert saying that it has detected a device in Recovery Mode.
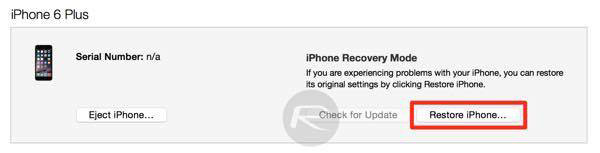
Step 5: Now, in iTunes, press and hold the Option key (Mac), or SHIFT key (Windows), and select the Restore iPhone… option in the main device window. Select the iOS 10.3.3 IPSW file from your computer that you want to downgrade to.
Step 6: iTunes will instantly go about its business and restore the iOS 10.3.3 firmware file to the device.
When it has finished doing what it needs to do, it will present you with the standard Hello! screen of iOS 10 allowing you to set the device up as per your requirements.
Update x1: With Apple’s signing window for iOS 10.3.3 closed for all devices except iPhone 6s, this guide only applies to iPhone 6s now and no other device.
You may also like to check out:
- Download iOS 11.0.3 IPSW Links And OTA For iPhone, iPad, iPod touch Device
- How To Downgrade iOS 10.3.3 / 10.3.2 / 10.3.1 On iPhone Or iPad
- iOS 11 Compatibility For iPhone, iPad, iPod touch Devices [Final List]
- Download iOS 11, 11.0.3, 11.1 Links & Install On iPhone 8, 7 Plus, 6s, 6, SE, 5s, iPad, iPod [Tutorial]
- Jailbreak iOS 11 / 11.0.3 / 11.0.2 On iPhone And iPad [Status Update]
You can follow us on Twitter, add us to your circle on Google+ or like our Facebook page to keep yourself updated on all the latest from Microsoft, Google, Apple and the Web.
