Here’s how to spoof or fake location in iOS 11 on iPhone. No jailbreak is required for this to work on iPhones or iPads.
This little trick can help spoof your location using the stock iOS Maps app and will be extremely handy for individuals who want to be able to teleport to a new location in games like Pokemon Go without having to be liberated from Apple’s walled garden.

If you are still regularly playing Pokemon Go or a similar game which takes the location as a main characteristic of the game, then you will have probably learned by now that location is vitally important. Different locations offer access to different Pokemon types, meaning that you really need to be traveling around in real to fully experience the title. Not great if you stay static. This little trick will allow you to convince the app that you are actually moving about, so carry on reading to find out how. It should also pretty much work in other apps as well for spoofing locations, such as Snapchat, Facebook and more. And yes as mentioned earlier, it doesn’t require jailbreak to work.
Step 1: To begin, you are going to need to connect your iPhone or iPad to your PC or Mac with iTunes installed. If iTunes doesn’t automatically kick into life, then make sure you launch it before going to next step.
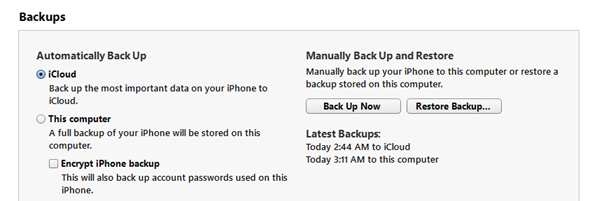
Step 2: Head into the details of the connected device in iTunes by clicking on the device icon. Locate the Manually Back Up and Restore section of the information and click the Back Up Now button. Make sure that Encrypt iPhone backup option is NOT checked or active.
Step 3: You’re now going to need a little bit of additional software called iBackupBot. You can download it for Mac or Windows from the official downloads page here: icopybot.com/download.htm. Obviously, this is a free-of-charge acquisition.
Step 4: Once the software has been downloaded, install and launch it on your Mac or Windows-powered PC. The software will automatically detect the previous backup that you have just created in iTunes, and load all relevant information associated with it. Using the iBackupBot software, you now need to navigate to one of the two locations below. We have listed them below for you to choose which, as you need to access a specific file from there.
- System Files > HomeDomain > Library > Preferences.
- User App Files > com.apple.Maps > Library > Preferences
Once you are in there, locate and open the com.apple.Maps.plist file. As the name suggests, this is the property list associated with the Maps app.
Step 5: Inside that file, you will see a certain file structure. Look for the block of data which starts with the <dict> tag and keyword, and then insert the following two lines directly under it as part of that structure:
<key>__internal__PlaceCardLocationSimulation</key>
<true/>
Step 6: Once you have added this additional information, you can save the edited file and exit out of the iBackupBot software.
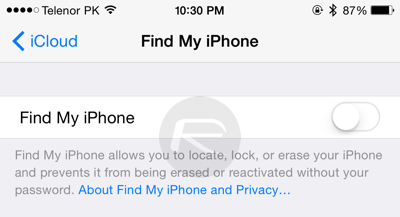
Step 7: You now need to do some tinkering on the iOS device itself. Launch Settings and navigate to iCloud > Find My iPhone/iPad/iPod and make sure that the feature is disabled. You may need to enter your Passcode for that to be successful. Keep the device connected to the computer and head back into iTunes once that has been disabled.
Step 8: Select the Restore Backup option and then make sure that you choose the backup which you have just edited using iBackupBot.
Step 9: When the restore process has completed, launch the Maps app and choose any location that you desire. You will get an information bar at the bottom of the screen which you need to tap on. Inside there you will see an option called Simulate Location. Tapping on that will essentially teleport you to the location that you selected.
Enjoy!
You may also like to check out:
- iNDS iOS 11 IPA Download On iPhone [No Jailbreak Required]
- iOS 11.1 Public Beta 5 Download Not Installing? You’re Not Alone
- Download Kodi 17.5 IPA, APK, DEB File Of Final Version For iOS, Android And More
- Kodi Android Installer App Addon: How To Download And Use It [Guide]
- Downgrade iOS 11 / 11.1 On iPhone Or iPad [How-To Guide]
- Download iOS 11, 11.1, 11.0.3 Links & Install On iPhone 8, 7 Plus, 6s, 6, SE, 5s, iPad, iPod [Tutorial]
- Jailbreak iOS 11 / 11.1 / 11.0.3 On iPhone And iPad [Status Update]
You can follow us on Twitter, add us to your circle on Google+ or like our Facebook page to keep yourself updated on all the latest from Microsoft, Google, Apple and the Web.
