Here’s how to fix Microsoft Exchange database corruption issue using Stellar Repair for Exchange.
What is Stellar Repair for Exchange?
For those of you who don’t know, Stellar’s Repair for Exchange software can help recover dismounted and offline Exchange EDB files the right and easy way. This software has been highly recommended by many Microsoft’s Most Valuable Professionals (MVPs) worldwide in order to recover and fix the aforementioned problem.
Stellar Repair for Exchange is compatible to work with Exchange Server 2019, 2016, 2013, 2010, 2007, 2003, 2000 and even 5.5.
When to Use Stellar Repair for Exchange?
So the next question is, when exactly do you use Stellar Repair for Exchange? Well, if you face any one of the following three issues, Stellar Repair for Exchange can help rescue you out:
- Dirty Shutdown Error
- Failing to Mount Database
- Exchange Server Crash
- ESEUtil Fails
- Logs Are Missing or Deleted
- Backup Is Not Available
How to Use Stellar Repair for Exchange?
System Requirements & Installation:
Processor: Intel compatible (x86, x64)
Memory: 8 GB recommended
Hard Disk: 250 MB of free space
Operating System: Windows 11, 10, 8.1, 8, 7 & Windows Server 2016, 2012, 2008
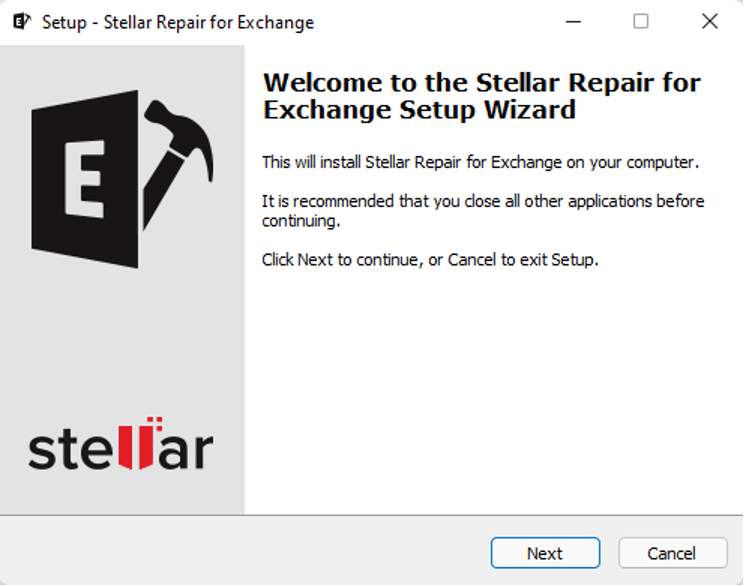
Installation:
- Download an .exe file.
- Some dialog boxes will appear. Follow the instructions to install the software.
Steps:
You can use the following step by step guide to help fix your Exchange server using Stellar Repair for Exchange.
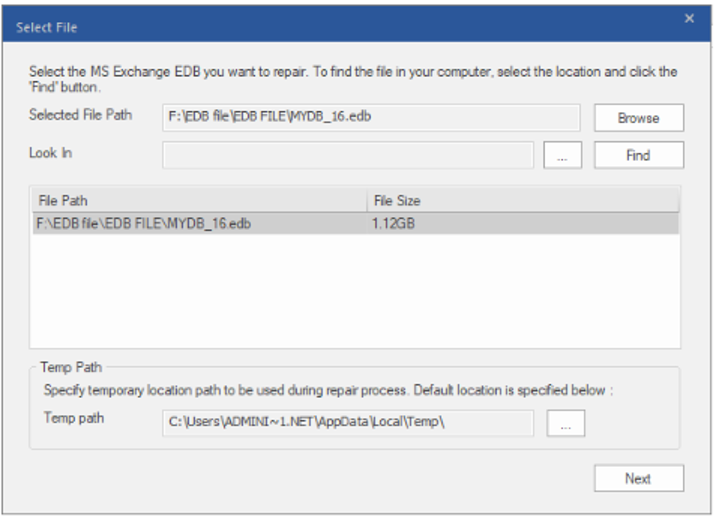
Step 1: Download and run Stellar Repair for Exchange software. From main screen, select the corrupt EDB file you want to fix or recover.
Step 2: Now you need to scan the file. Select ‘Quick Scan’ option if you want to use fast mode to scan and repair the corrupt EDB file or select ‘Extensive Scan’ if you want a comprehensive scan of the corrupt EDB file for better results.

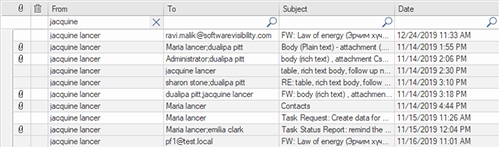
Step 3: After scanning is complete, the recoverable mailboxes will be listed on the left side section. You can see data is visible in Left pane, Middle pane and Right pane:
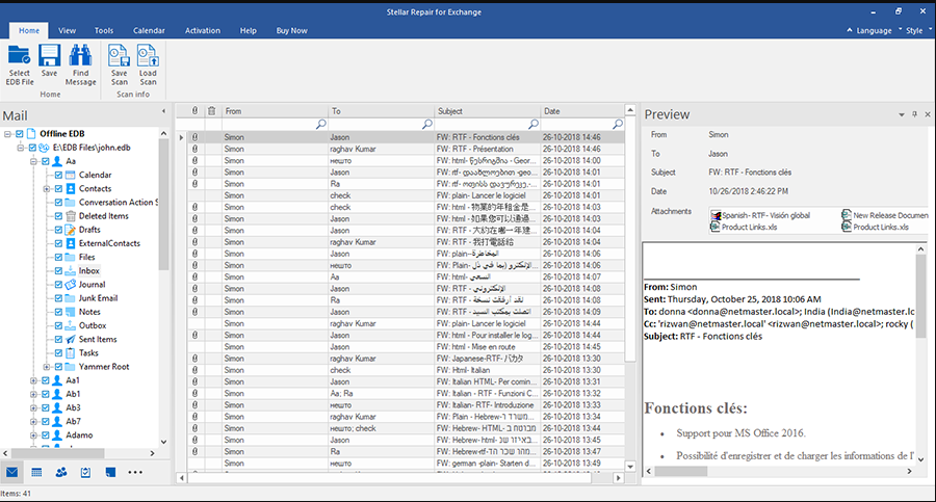
• The left pane shows files with its mailboxes, folders and sub-folders.
• The middle pane provides information of the selected mailbox: Attachments, Deleted Mail Items, From, To, Subject, Date.
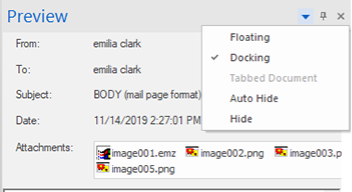
• The right pane provides the preview of selected mail item: From, To, Subject, Date, Attachments, Body.
Additional Advanced Options:
- Quick search: You can quick search for Mails and Media files. You can type the keywords as shown below that support quick search are From, To, Subject, and Date.
- Preview mail options: It provides three preview option Floating/Docking, Pin/Unpin, Close/Hide.
Now Select the mailbox that you want to recover & Click on “Save”.
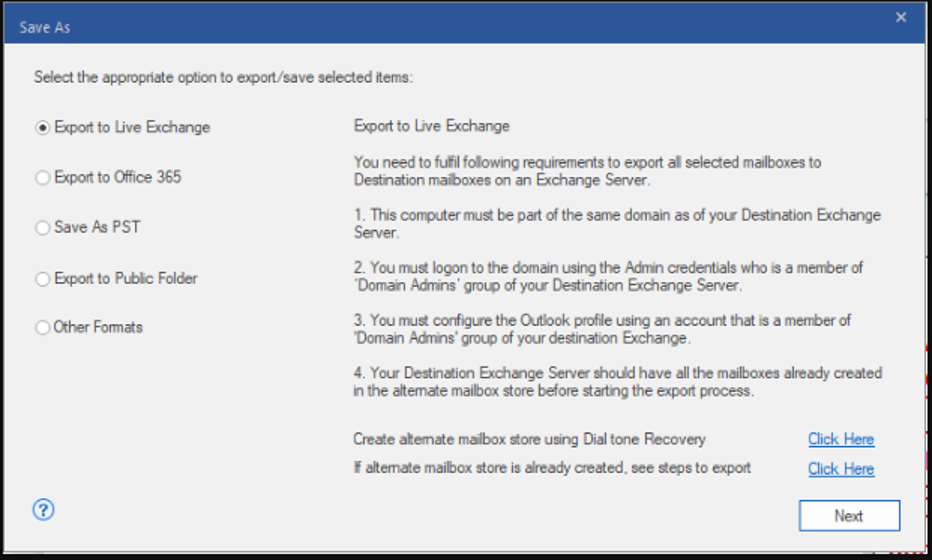
Multiple Saving Options:
Export Recovered mailboxes to Live Exchange
Step 4: Next, click ‘Export to Live Exchange’ option from the Save As options and click ‘Next’ to export recovered mailboxes.
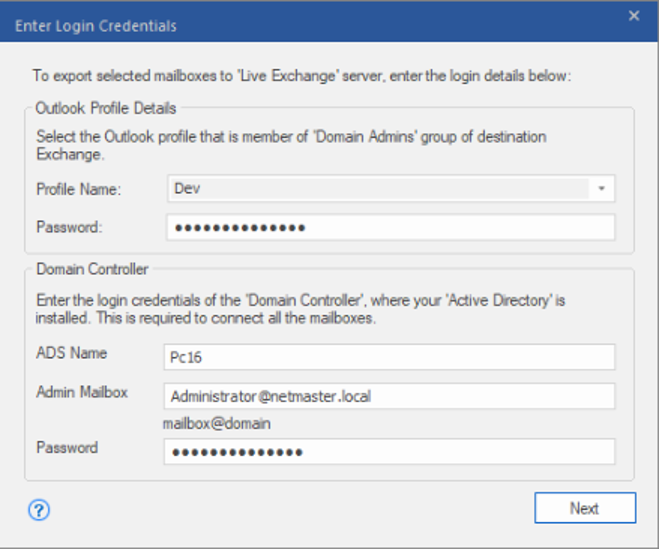
Step 5: Now select the Outlook profile which has Administrator privileges. When prompted, enter the password and provide details of ‘Domain Controller’ where AD is installed. Once that is done, click ‘Next’ to export recovered mailboxes to the destination server.
Step 6: In the Map Mailboxes window, create Mailbox or apply Filters before export.
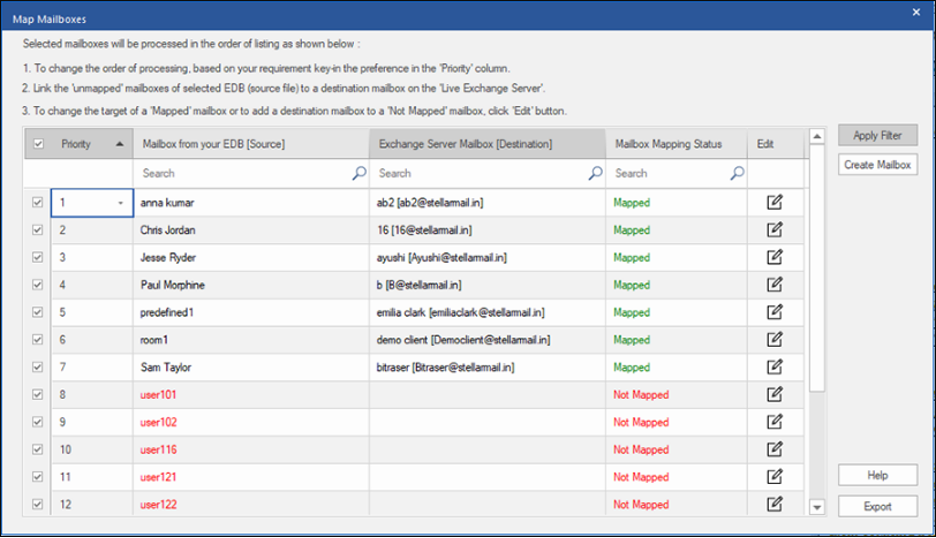
• You can set the priority for critical mailbox recovery
• You can also change the destination mailbox using “Edit” option.
• You can also create a new user mailbox on the destination server using “Create Mailbox” option.
• You can also “Apply Filter” such as
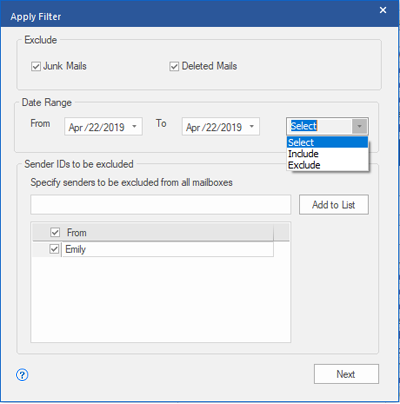
1. Exclude: Exclude mails from Junk Mail Folder and Deleted Mail Folder.
2. Date Range: Add starting and ending date for which Admin wants to include/ exclude mails for recovering.
3. Sender IDs to be excluded: Admin can exclude the emails from a list of specified senders. You can enter Sender E-mail addresses & click on Add to List. Now Click Next.
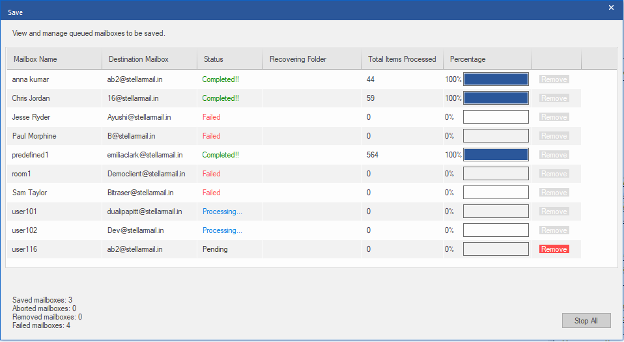
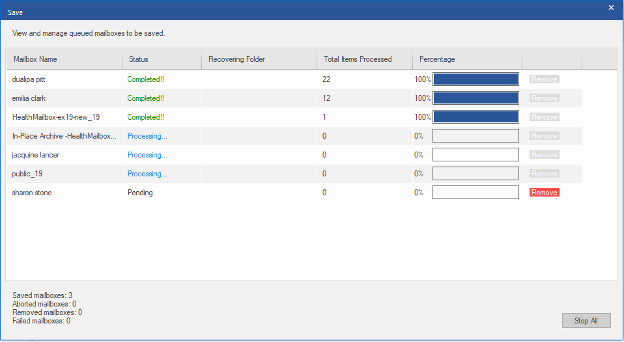
Step 7: In the ‘Save’ window, you can view and manage the queued mailboxes. You can also optionally stop them from repairing or click on ‘Stop All’ to terminate the recovery process.
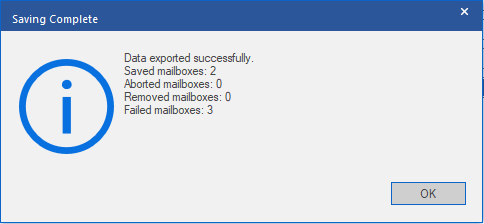
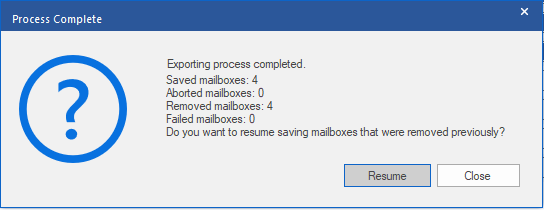
Step 8: A Process Complete dialog box displays export summary should you wish to check that.
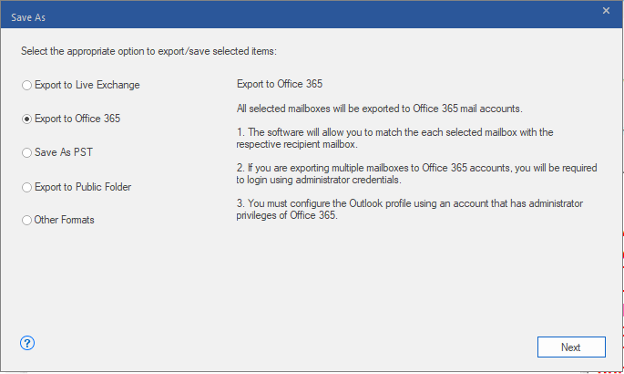
Export Recovered Mailboxes to Office 365 – Step 1 to Step 3 would be same
Step 4: Now select the Export to Office 365 option from the Save options and click ‘Next’. This will enable you to export recovered mailboxes to Office 365.
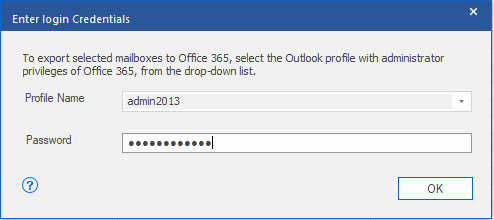
Step 5: Next, you need to select the Outlook Profile with Administrator privileges and enter the password. Simply click ‘OK’ to export the recovered mailboxes.
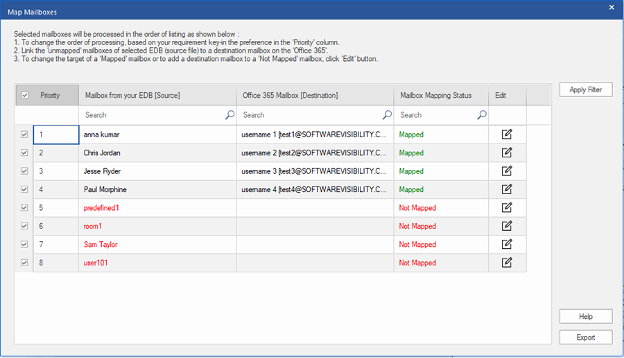
Step 6: In the Map Mailboxes window, the software automatically maps users’ mailboxes on the destination Exchange or Office 365 server for export.
Step 7: In the ‘Save’ dialog box, you can view and manage the queued mailboxes. You can click on the Remove button beside pending mailboxes to stop them from repairing or click on ‘Stop All’ to terminate the recovery process
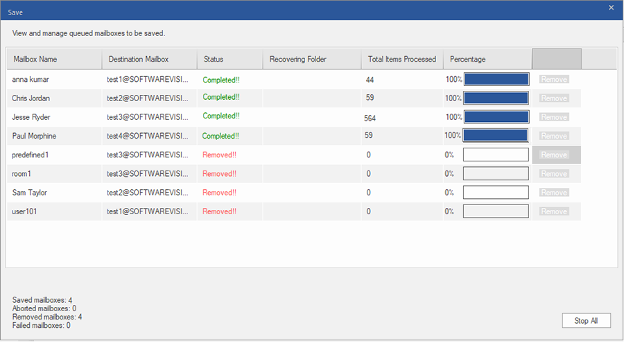
Step 8: Now a Process Complete dialog box with summary of saved mailboxes will appear.
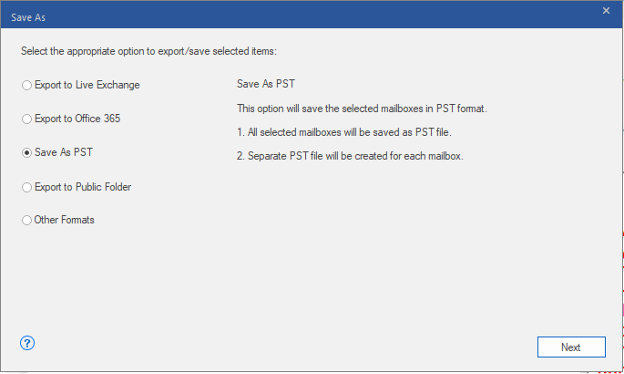
Export Recovered Mailboxes to PST – Step 1 to Step 3 would be same
Step 4: Simply ‘Save’ from the Home menu to save the recovered mailboxes in the supported formats. Make sure you select PST to save the recovered mailboxes.
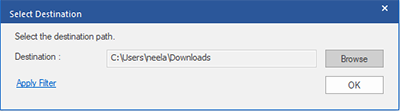
Step 5: Next, click on ‘Browse’ to select the location where you want to store the recovered file & Click ‘OK.’
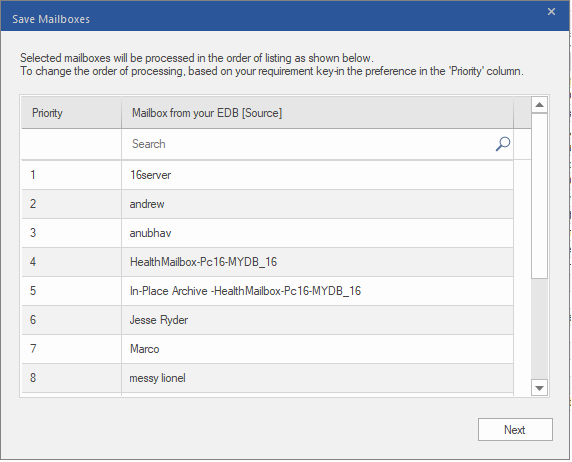
Step 6: In ‘Save Mailboxes’ window, you can set or change the priority of mailboxes to repair critical or required mailboxes first.
Step 7: Next you will see a Save window with 6 columns displayed. Here you can remove a mailbox in pending status from the list using the ‘Remove’ Action button or stop the entire mailbox saving process by clicking on Stop All button.
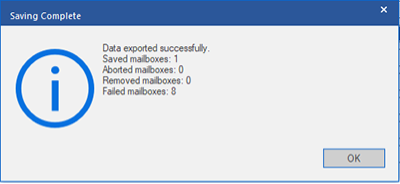
Step 8: Now once again a Process Complete dialog box should appear now with a summary of saved mailboxes. If a mailbox was removed, it displays a ‘Resume.’ Otherwise, you can click ‘OK’ to complete the saving process.
And that is it!
Pricing
Stellar Repair for Exchange pricing is as follows:
- Corporate 1 year license $399
- Technician lifetime license $599 | Previously: $799
- Toolkit lifetime license $999 | Previously: $1,999
Verdict/Rating
Stellar Repair for Exchange provides an impressive features for ensuring a quick and painless Exchange database recovery. It’s a very useful application in the event of an Exchange Server failure so that Admin is able to repair corrupt database with minimal disruption to service. Here is my rating:
Installation: 9.5
Features: 9.0
Ease of Use: 10.0
Administration: 10.0
Documentation: 8.5
Overall Rating: 9.4
Key: 1: Virtually inoperable or nonexistent 5: Average, performs adequately 10: Exceptional
You may also like to check out:
- Download: iOS 16.1 Beta 4 Released As Public Launch Nears
- How To Fix Bad iOS 16 Battery Life Drain [Guide]
- Jailbreak iOS 16.0.3 On iPhone And iPad Status Update
- iOS 16 Compatible And Supported iPhone, iPad, iPod touch Devices
- iOS 16 Hidden Features: 100+ Changes Apple Didn’t Tell Us About
- Download: iOS 16.0.3 OTA Profile File, IPSW Links Released
- Download iOS 16 Final IPSW Links And Install On iPhone 13, Pro, 12, Pro, 11, Pro, XS Max, X, XR, 8, Plus [Tutorial]
You can follow us on Twitter, or Instagram, and even like our Facebook page to keep yourself updated on all the latest from Microsoft, Google, Apple, and the Web.
