Here’s a step by step guide on how to clean install macOS Mojave 10.14 final version on your Mac the easy and the right way for those who want a fresh start and a fresh installation to really make Mojave “pop.”
After going through a period of beta testing, both internally and externally, Apple has finally released macOS Mojave into the wild.
In the post below, we’re going to take a look at how you can get a brand new fresh installation of the desktop operating system on your treasured Mac hardware.
Requirements
- Make sure that all important data and any files or documents are backed up so that they aren’t lost in the process. You can find how to backup your Mac with Time Machine in our post here (look under “Backup”).
- You’re obviously also going to need a Mac that supports the installation of macOS Mojave. To find out if your Mac hardware is supported by this release, check here: macOS 10.14 Mojave Compatibility: Full List Of Compatible Macs.
How to Clean Install macOS Mojave
Step 1: First and foremost, you are going to need to download macOS Mojave 10.14 from the Mac App Store. This will give you the installer file that you require. Once that downloader is downloaded, if it tries to walk you through the installation process then quit out of it.
Step 2: You now need to create a bootable USB drive that allows you to boot and install macOS Mojave directly from it. The creation of that drive is beyond the realms of this walkthrough but we have a complete separate guide on it which you can follow here.
Once that process has been completed, jump right back in here.
Step 3: Make sure the Mac is turned off and the USB drive is plugged into one of the USB ports. Turn the Mac on and make sure that you have the Option key pressed during the boot process. You will be taken into a new menu that asks you where you want to boot from so make sure that you select the inserted USB drive.
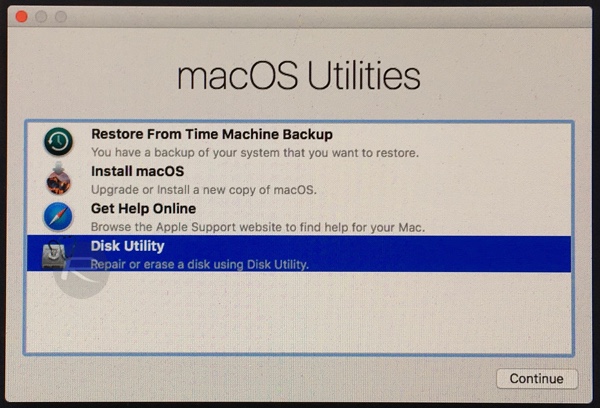
Step 4: The machine will then go through a process of checks. Once completed, you will be given the macOS Utilities menu. Select the Disk Utility option and select Continue.
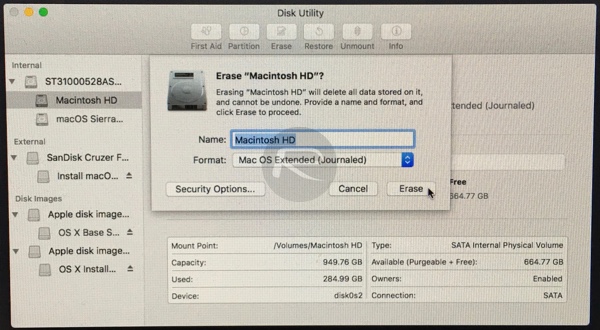
Step 5: Make sure that the main Mac hard drive is selected from the menu on the left-hand side and then select the Erase button at the top of the interface. Keep the name of the hard drive as “Macintosh HD” and ensure that the Format drop-down is selected as either “APFS (Encrypted)” (if you have a modern Mac with faster SSD) or “Mac OS Extended (Journaled)” if you have a older Mac with mechanical hard drive. Hit the Erase button to proceed, but be aware that this will erase all content on the machine.
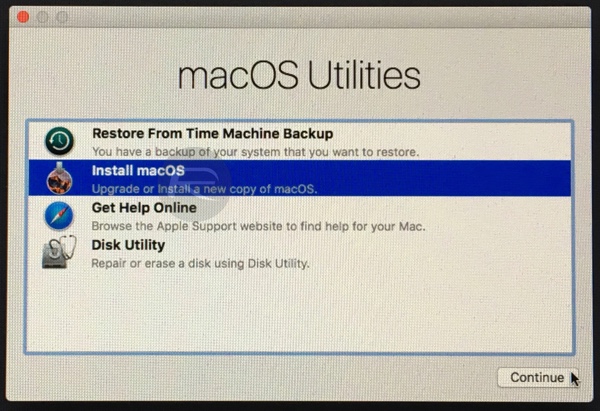
Step 6: Congratulation, you have now erased everything off your Mac and you have no active operating system. You will be taken back to the previous macOS Utilities menu. Select Install macOS and then Continue.
You will be taken through a new installation process. Make sure that Macintosh HD is selected as the install drive, accept the terms of the installation, and then select Install to continue through the process.
And there you go! Once the process is complete you will be left with a brand new fresh installation of macOS Mojave.
Keep in mind that this is a bit advanced way to get Mojave installed. Installing from the Mac App Store over the top of your existing macOS installation will likely be fine for most. However if clean or fresh start is what you are after, then this is the way to do it.
You may also like to check out:
- Create macOS Mojave 10.14 Bootable USB Flash Drive Installer, Here’s How
- iPhone XS Max Ultra Thin Case For Minimalistic Experience? Here’s A List Of Best Ones
- Fix iOS 12 Battery Life Issues And Percentage Drain, Here’s How [Guide]
- Jailbreak iOS 12 / 12.0.1 / 12.1 On iPhone And iPad [Status Update]
- Downgrade iOS 12 To 11.4.1 Final Version On iPhone Or iPad, Here’s How
- Download iOS 12 Final IPSW Links And OTA Update
- Download iOS 12.1 Beta 1 IPSW Links, OTA Update For iPhone, iPad
- Download iOS 12 IPSW Links & Install On iPhone X, 8, 7, Plus, 6s, 6, SE, 5s, iPad, iPod [Tutorial]
You can follow us on Twitter, add us to your circle on Google+ or like our Facebook page to keep yourself updated on all the latest from Microsoft, Google, Apple and the Web.
