Here’s how to downgrade iOS 12 final version to iOS 11.4.1 on your compatible iPhone, iPad or iPod touch the right way.
Now that iOS 12 is out and in the wild, it’s very understandable that lots of people will want to give it a try in order to see what they think about the new features that have been added. However, there is also plenty of scope for someone who might update their iPhone or iPad to iOS 12 and then wish that they hadn’t, for a number of reasons.
That may end up being something relating to jailbreaking, an app that refuses to behave or simply a preference for something being the way it used to be. Whatever the reason, downgrading is often the only solution, and it’s eminently doable, at least for now.
With Apple continuing to sign iOS 11.4.1 there is thankfully still time to get the downgrade carried out. If you’re in need of a method for removing iOS 12 and installing iOS 11.4.1, here’s what you need in order to get started:
- A functioning PC or Mac with the latest version of iTunes installed.
- The iOS 11.4.1 IPSW file for your specific device, which can be downloaded from here.
- An understanding that you can only downgrade as far back as iOS 11.4.1 from iOS 12 as Apple is no longer signing any additional firmware.
With that all covered off, here’s how you go about performing the downgrade.
Step 1: First off, make sure that you’ve downloaded the iOS 11.4.1 IPSW file as we mentioned above. That’s, understandably, pretty crucial.
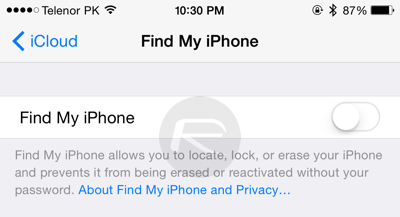
Step 2: Next up, on your iOS device head to Settings > iCloud > Find My iPhone and make sure that the feature is disabled. This is vital.
Step 3: On your Mac or PC, open iTunes and connect your iOS device. You’ll need to put your device into DFU mode which can be done by following these guides:
- iPhone 8, iPhone 8 Plus, or iPhone X owners: DFU Mode On iPhone X / 8: Here’s How To Enter It
- iPhone 7 or iPhone 7 Plus owners: Enter DFU Mode On iPhone 7 Or iPhone 7 Plus, Here’s How
- If you have an older device, then follow the instructions here.
Step 4: With your device in DFU mode and back in iTunes, hold down the Option key on a Mac or the Shift key on a PC and click on the Restore iPhone/iPad button. You’ll be asked to select your IPSW file which is the one you downloaded earlier.
Once the file is selected, let iTunes do its thing which will involve a device restart. Once that’s done, you’re all up and running with iOS 11.4 installed.
And that’s all there is to it!
You may also like to check out:
- 150+ iOS 12 Hidden Features For iPhone And iPad [Running List]
- Jailbreak iOS 12 / 12.0.1 / 12.1 On iPhone And iPad [Status Update]
- iOS 12 Compatibility List For iPhone, iPad, iPod touch Devices
- Download iOS 12 IPSW Links & Install On iPhone X, 8, 7, Plus, 6s, 6, SE, 5s, iPad, iPod [Tutorial]
You can follow us on Twitter, add us to your circle on Google+ or like our Facebook page to keep yourself updated on all the latest from Microsoft, Google, Apple and the Web.
