Here’s how to use Finder within macOS 10.15 Catalina to backup and restore iOS without iTunes on a connected iPhone or iPad.
Let’s dive right in and take a look at the relatively simple process.
Step 1: First and foremost, connect your iPhone or iPad to your Mac with a USB cable. The device will ask you to provide permission or trust the machine by entering the passcode.
Step 2: Launch the Finder application on your Mac. You will see your device listed in the sidebar. Select it to get information and more options for your device.
NOTE: This is a good time to actually choose the ‘Back Up Now‘ option to go through the process of creating a backup. You can also use iCloud Backup to create a backup just as long as you are sure that you have your information secure.
Step 3: If you have performed a backup above – and you should have- then you can use the ‘Manage Backups‘ button to ensure that it is saved correctly with today’s date on it.
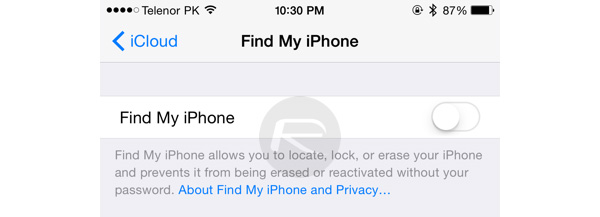
Step 4: Before restoring the device, turn off Find My iPhone by going to Settings > iCloud on the device and ensuring that Find My iPhone is turned off.
Step 5: Now, with Find My iPhone turned off, back in Finder, ensure that your device name is still selected and choose the Restore iPhone/iPad button. Keep in mind that this will restore your device to the very latest available version of iOS or iPadOS. If you want to restore or downgrade to a very specific version of iOS or iPadOS, then you will need to have the IPSW file and do a manual restore.
Step 6: Now, you will need to let the process complete, which doesn’t actually require much, if any, interaction from you. Just ensure that your device isn’t disconnected from the Mac.
Step 7: Once complete, the Finder instance will tell you and give you confirmation of a successful restore.
Step 8: You will then be given an option within Finder to either set the device up as a new device or restore it from a backup. If you performed a backup, then you will be able to select that option and choose the requisite backup from the drop-down menu. Select Continue.
And that’s all that she wrote! You shall be left with a restored device running your latest backup information!
You may also like to check out:
- Download: iOS 13.2 / iPadOS 13.2 Beta 1 IPSW Links, OTA Profile File Released
- iOS 13.2 Beta 1 Profile File Download Without Developer Account, Here’s How
- Download: iOS 13.1.2 / iPadOS 13.1.2 IPSW Links, OTA Update Released For iPhone And iPad
- Downgrade iOS 13.1.2 / iPadOS 13.1.2 To iOS 13.1.1 / 13.1 / 13.0 / 12.1.4, Here’s How
- Best iPhone 11, 11 Pro Max Case With Slim, Wallet, Ultra-Thin Design? Here Are Our Top Picks [List]
- iPhone 11 / 11 Pro Max Screen Protector With Tempered Glass: Here Are The Best Ones
- Best iPhone 11, Pro Max Tripod For Night Mode Long Exposure Photos [List]
- Install WhatsApp Web On iPad Thanks To iOS 13 And iPadOS 13.1
- Jailbreak iOS 13 / 13.1 Status Update [Continuously Updated With Latest Info]
- iOS 13.1 Jailbreak Update: Security Content Fixes And Patches Detailed By Apple
- Best iPhone 11, Pro Max Tripods For Night Mode Long Exposure Photos [List]
- Download Kodi 19 IPA / DEB For tvOS 13 Apple TV
You can follow us on Twitter, or Instagram, and even like our Facebook page to keep yourself updated on all the latest from Microsoft, Google, Apple, and the Web.
