Here’s how to fix error code -20 after checkra1n iOS 13 to iOS 13.2.2 jailbreak on an iPhone or iPad device the right way.
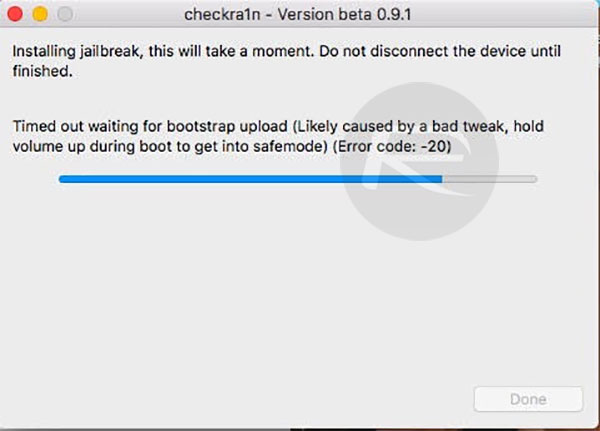
If you are experiencing ‘Error code: -20′ when attempting to jailbreak your compatible device using Checkra1n, then rest assured that you are not the only one.
We can’t give you the exact location in code which throws this error, but we can give you some pointers and tips on how to jump that hurdle and get your device jailbroken. We certainly aren’t going to be able to diagnose the root cause of this issue. In fact, it would be frivolous for us to try. So instead, let’s simply jump in and take a look at the potential solutions on the table, one of them is likely to help fix the problem for you.
Use Lightning to USB-A Cable Instead of USB-C to Lightning
The first thing that you can try to rectify this situation is to use a Lightning to USB-A cable instead of a USB-C to Lightning cable. This may not seem like a huge change to you but it has been proved to work and resolve this issue. If you have a newer MacBook Pro and are using the USB-C port, then you may have to find yourself a USB-C dongle or adapter that exposes a USB-A 3.0 port. We recommend using following cables or dongles for using checkra1n jailbreak:
Backup & Restore iOS With A Fresh Install
If the above doesn’t work, then it could be necessary to do a full backup of your device and then restore iOS to the iPhone or iPad so that you have a brand new fresh installation. We recommend installing iOS 13.2.2 which you can download from here. Once that has been processed, you can then run through the Checkra1n process again and keep your fingers crossed that the ‘Error code: -20‘ no longer happens and you get left with a fully liberated device.
Granted, this one is a bit of a pain and time consuming but if it works then it is definitely worth it.
Give Full Disk Access to Checkra1n
If all of the above fails to give you any solace from your nasty Checkra1n error, then you can try following the steps below on your Mac:
- Launch the System Preferences app
- Select System & Security and then select Full Disk Access
- Add Checkra1n to the list
- Exit Systems Preferences and try the process again
If none of those things work for you, then it will likely be a case of waiting to see if the Checkra1n team addresses this issue in a subsequent release.
If you haven’t jailbroken yet, check out our video tutorial below on how to jailbreak iOS 13.2.2:
Subscribe to our YouTube channel for more videos.
You may also like to check out:
- Fix iOS 13 Apple Notes App Sync Not Working With Catalina And Other Devices, Here’s How
- Download: iOS 13.2.2 / iPadOS 13.2.2 IPSW Links, OTA Update Released
- Jailbreak iOS 13.2.2 Using Checkra1n On Mac, Here’s How [Tutorial]
- Download Checkra1n iOS 13 Jailbreak IPA For iOS 13.2.2 On Mac [0.9 beta]
- Checkra1n Windows Download Release Date: Here’s How To Jailbreak Now
- iOS 13 / 13.2.2 Jailbreak Tweaks Compatibility List For Checkra1n
- Fix Cydia Crashing On Checkra1n iOS 13 Jailbreak, Here’s How
- Gold iPhone 11 Pro Max: Case, Lightning Cable, Wireless Charger, Band, Speaker, More
- Red iPhone 11 Accessories: Case, Lightning Cable, Wireless Charger, Band, Speaker, Much More
- Yellow iPhone 11 Accessories: Case, Lightning Cable, Qi Wireless Charger, Band, Speaker, Much More
- Purple iPhone 11 Accessories: Case, Lightning Cable, Qi USB Charger, Band, Speaker, Much More
- Green iPhone 11 Accessories: Case, Lightning Cable, Qi USB Charger, Band, Speaker, Much More
- Midnight Green iPhone 11 Pro Max: Case, Lightning Cable, Wireless Charger, Band, Speaker, More
- Apple Watch ECG App Hack: Enable Outside US In Unsupported Country On Series 5 & 4 Without Jailbreak
You can follow us on Twitter, or Instagram, and even like our Facebook page to keep yourself updated on all the latest from Microsoft, Google, Apple, and the Web.
