Here’s a guide on how to sideload iTransmission 4 torrent client for iOS without jailbreak on iPhone, iPad or iPod touch.
The official iOS App Store generally has apps to suit all needs and requirements. But if there’s something you want to install that is not allowed by Apple on the App Store? That’s where sideloading comes in, thanks to Xcode and Apple’s allowance for sideloading using Xcode since mid-last year.
Installing and getting up and running with the iTransmission 4 torrent client for iOS definitely falls into that category. We’re going to take a look at how to sideload that experience onto an iPhone or iPad.
Requirements:
It isn’t even worth proceeding with the process if you don’t have all of the necessary components. Take a look below to see what’s required.
- A Mac running latest version of OS X. Windows user? You may want to look into hackintosh option: Install OS X El Capitan Hackintosh On PC, Here’s How [Guide].
- The latest version of Xcode install on the Mac. This is available free-of-charge from the Mac App Store and can be downloaded from here.
- A copy of the iOS App Signer utility. Download it from here.
- An iOS device and relevant sync cable.
- An active Apple Developer account assigned against an Apple ID. If you don’t have one, it can be easily created for free at developer.apple.com.
- The relevant .deb files for the iTransmission 4 torrent client. Download from here.
How to sideload iTransmission 4 torrent client on iOS without jailbreak:
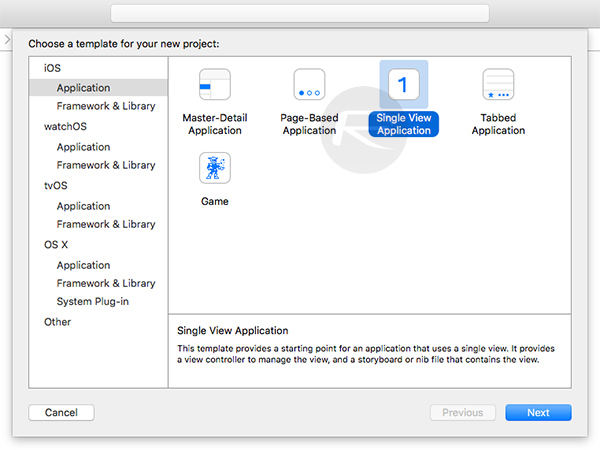
Step 1: Launch Xcode and create a new iOS app. To do this select Create a new Xcode project from the main Xcode screen. Make sure that iOS > Application is selected in the left pand, followed by selecting Single View Application on right, and then click Next.
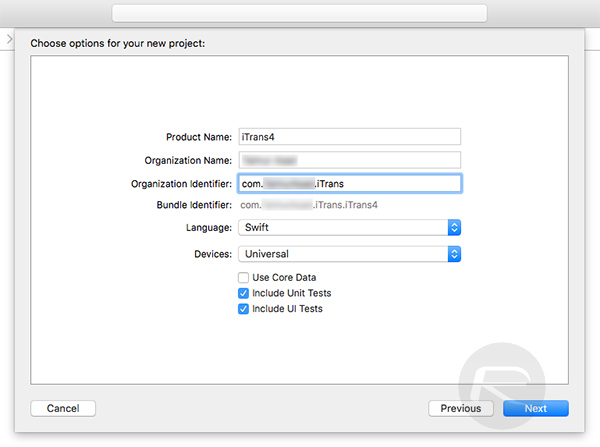
Step 2: When asked to “choose options for your new project”, fill in all of the relevant details. You can name the project whatever you like and give it any unique identifier. The identifier usually takes a reverse domain format, so something like com.yourname.itransmission would work nicely.
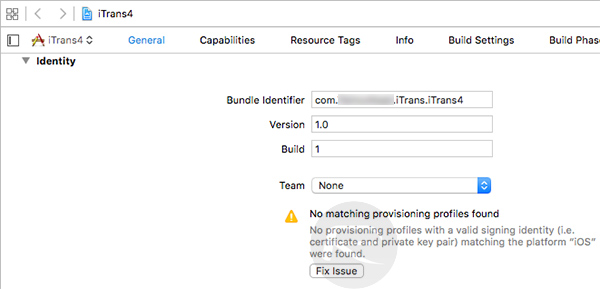
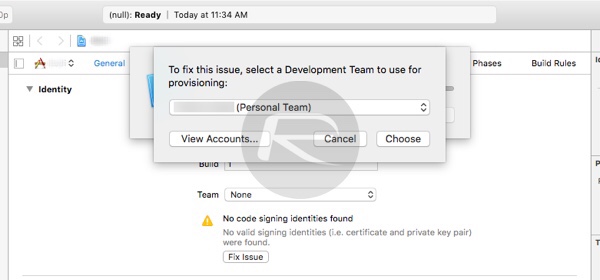
Step 3: When accepting that information, and moving into the main section of Xcode, the software will complain about an erroneous provisioning profile. Click the Fix Issue button to proceed.
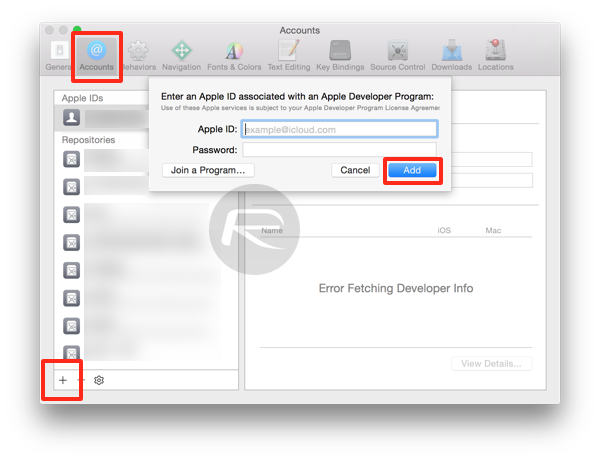
Step 4: If there is no Apple ID set in Xcode, it will request you to enter details of your active Apple Developer account. Click the Add button and sign in using your Apple ID. If it asks for the Apple ID once again, simply select your account from the drop-down box and click the Choose button to proceed.
If the Apple Developer account is already set in Xcode, it will simply ask you to choose a Development Team to use for provisioning. Simply choose the relevant team for the drop-down menu and click Choose to proceed.
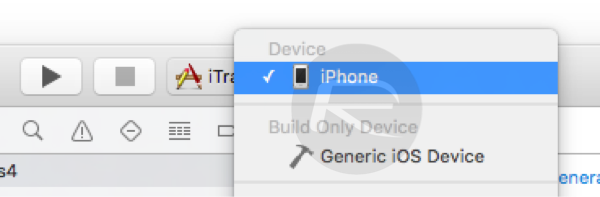
Step 5: Next, connect your iPhone or iPad to the Mac. In Xcode, make sure that your connected iOS device is selected from the drop-down found alongside the ‘play’ and ‘stop’ buttons on the top left of Xcode.
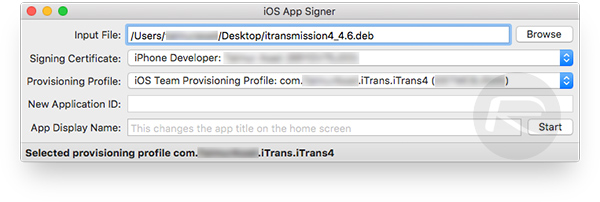
Step 6: Now launch the iOS App Signer utility that you downloaded earlier, and select the relevant Signing Certificate and Provisioning Profile from the drop-down selections. The Input File option will be the ‘iTransmission.deb’ file, ano so for that, click Browse, locate the downloaded file, and select it to continue. If you don’t wish to change the name that appears for the app on the home screen, keep that field blank.
Step 7: Once everything is set, hit the Start button.
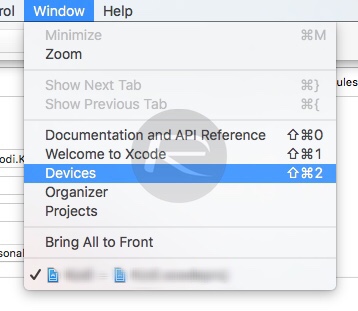
Step 8: When the iOS App Signer has complete and produced an output in the form of an .ipa file, head back into Xcode and navigate to Window > Devices from the menu bar.
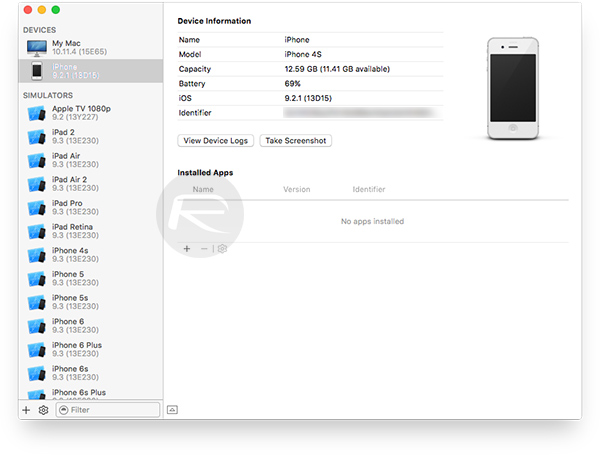
Step 9: Select your connected iOS device from the left pane under the Devices header. In the main interface, click the “+” button and select the .ipa that was created using iOS App Signer. Xcode will then sideload the app onto the connected iOS device.
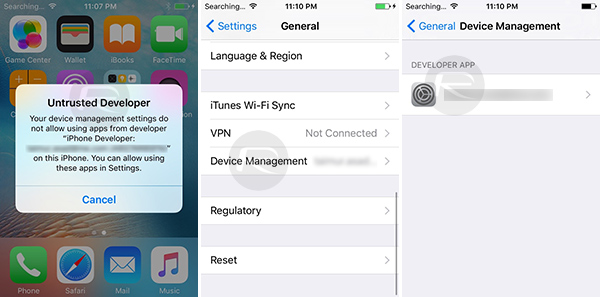
Once done, you will see the iTransmission app sitting nicely on your device’s Home screen. Now if you try and run it, you will be prompted that the app cannot be run since it’s from an untrusted developer.
Step 10: To fix this, launch the Settings.app on the device and navigate to General > Device Management and then tap on your developer account under the DEVELOPER APP header.
Step 11: Next, tap Trust “your-developer-id”, followed by hitting the Trust button when prompted.
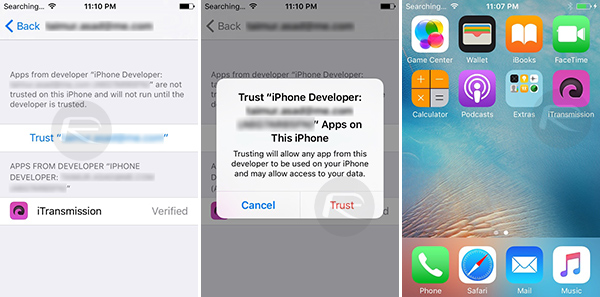
That’s it. You can now go ahead and launch the app once again, and voila it works!
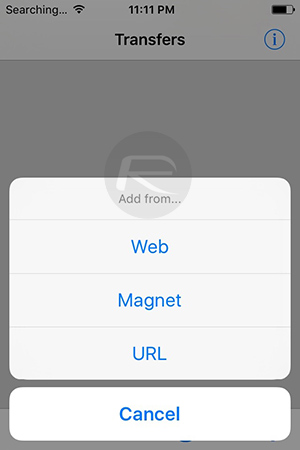
Enjoy downloading torrents directly on your device using iTransmission 4 app on your non-jailbroken device!
You may also like to check out:
- How To Sideload Apps On Apple TV 4 [Tutorial]
- How To Sideload Kodi On iOS Without Jailbreak [Tutorial]
- How To Sideload / Install Kodi On Apple TV 4
- How To Sideload iOS Apps Without Jailbreak Using Xcode 7 For Free
You can follow us on Twitter, add us to your circle on Google+ or like our Facebook page to keep yourself updated on all the latest from Microsoft, Google, Apple and the Web.
