When it comes to the world of DNS, most people will likely be using the servers which are provided by their Internet service provider. Others may be taking advantage of Google’s own free servers, but while everyone needs DNS few people are really clear on what it does or which service or servers to use for the best possible results.
Cloudflare recently started offering its own free DNS servers, and they might just be the ones to plump for.
DNS, for those unfamiliar, is the mechanism by which computers take something like a web URL and turn it into the IP addresses that web servers and services use. This is a relatively quick conversion but some options do make it quicker. While your ISP’s servers may work, they are not going to translate URLs into IP addresses as quickly as, say Google’s servers.
However, when it comes to speed, Cloudflare has both licked which may make it the choice to go for. Add in the fact that Cloudflare promises that it will not keep logs of your Internet activity beyond a 24 hour period, and things start to look really good for the Cloudlfare solution.
So all that being said, how do you use it? If you’re using an iOS device or a Mac, the methods differ slightly but neither are complicated processes to follow. We’re going to cover both for you now, so here goes.
iOS:
Step 1: Open the Settings app, followed by selecting Wi-Fi.
Step 2: Tap the “i” button located next to the name of the network that you are connected to.
Step 3: Scroll down to the bottom of the screen and select the Configure DNS option before tapping Manual.
Step 4: To use the Cloudflare servers, enter 1.1.1.1 and 1.0.0.1 as the two addresses.
Step 5: Save and exit the Settings app and you’re all done!
Mac:
Step 1: Open System Preferences – typing the name into Spotlight is usually the quickest way.
Step 2: Select Network before selecting the network interface that you are using. That will likely be either WiFi or a LAN of some sort. Essentially, whichever says Connected beneath it.
Step 3: Click Advanced before clicking the DNS tab.
Step 4: Click the ‘+’ button under DNS Servers and enter Cloudflare’s DNS address: 1.1.1.1. Next, click the ‘+’ button again and this time enter 1.0.0.1 as the DNS server address.
Step 5: Press OK and then close System Preferences.
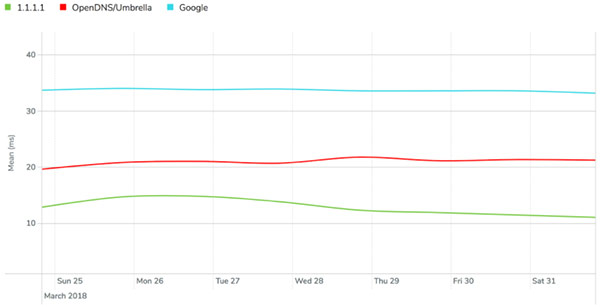
DNSPerf now ranks 1.1.1.1 as the fastest DNS resolver when querying non-Cloudflare customers (averaging around 14ms globally)
While the speed increase associated with the Cloudflare DNS servers may not be huge, if you make a lot of DNS lookups by browsing lots of web pages then you may just notice the difference in your day. Remember, every little speed increase helps!
You may also like to check out:
- PUBG Mobile 0.6.3 APK Beta Update Rolls Out Featuring FPS Mode And More In China
- PUBG Mobile 0.5.0 Patch Notes Released In Full For English Global Version
- PUBG Mobile 0.5.0 APK Download, iOS Update Out As Season 2 Begins [English Version]
- iOS 11.4 Beta 5 Release Notes And Changes: What’s New In This Release?
- Download iOS 11.4 Beta 5 IPSW Links And OTA Update [Testers Only]
- Jailbreak iOS 11.3.1 Update: Details On Exploiting iBoot Released Which Could Lead To Untether On Older Firmwares
- Jailbreak iOS 11.3 / 11.3.1 / 11.2.6 On iPhone And iPad [Status Update]
- Download iOS 11.3.1 IPSW Links, OTA Update With Fix For Third-Party Screen Repair Issue
You can follow us on Twitter, add us to your circle on Google+ or like our Facebook page to keep yourself updated on all the latest from Microsoft, Google, Apple and the Web.
