Here’s how to restore iOS 10.2 without updating or losing jailbreak capability using OSRestoreX, complete with step by step tutorial.
One of the wonderful things about the Cydia Eraser tool offered by Jay Freeman was the ability to restore back to a stock version of iOS without actually having to upgrade from a firmware that was able to be jailbroken. Alas, Freeman is taking quite a long time to make Eraser compatible with the latest iOS 10 firmware versions, so of course, something has stepped into the gap which essentially offers the same functionality.
If you are experiencing difficulties with your jailbreak, and have progressed past being able to troubleshoot, then this tutorial will show you exactly how to remove the jailbreak and kind of restore to iOS 10.2 without having to update to latest version, or losing jailbreak capability.
Step 1: First of all, make sure that you’ve been through a full backup of the device that you are going to be working on. It’s extremely important to understand that when we are talking about anything to do with jailbreaking, things can, and do, go wrong. Better to be safe than sorry. In this instance, as we are restoring to a clean version of the firmware, all content will be removed so you do need an iCloud or iTunes backup of data.
Step 2: Once done, launch the Cydia Installer app. When the app launches and refreshes, navigate to Sources > Edit and then hit the Add button. Add the following repository URL: http://coolstar.org/publicrepo and then tap Add Source.
Step 3: Repeat that process, but this time add the following repository URL: http://repo.jailbreakhub.org
Step 4: Head into the Search functionality within Cydia and search for the package named Stashing. This will show up as a package named Stashing for iOS 9.2 – 10.2. Install it.
Step 5: Head into Sources and tap on the recently added jailbreakhub source, then tap on All Packages. Scroll down until you find a package named OSRestoreX. Installing this package will instantly set it to work erasing the necessary files. Only proceed and install if you are sure. Once completed, the display will show some red and yellow text before crashing Cydia, which is understandable cause Cydia has just been erased even though you will still see the app icon on Home screen.
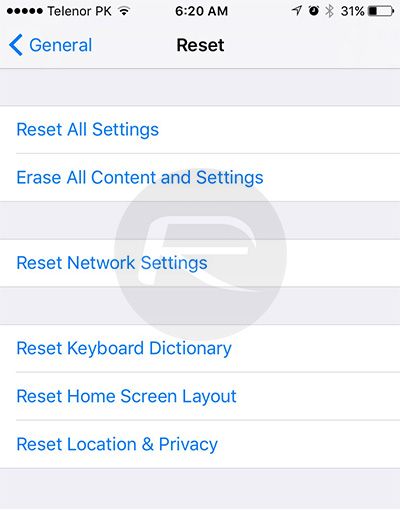
Step 6: Launch Settings and navigate to General > Reset > Erase All Content & Settings. Select Erase iPhone and then Erase iPhone again.
Once that process has completed, you will find yourself on the familiar looking stock iPhone setup screen. You can follow through the wizard and get access to your device where you will find that you are still be on the same firmware version but with stock setup without losing jailbreak ability as you are on same firmware version which you were previously jailbroken. What this basically means is that you can get back to jailbreaking once again if you so wish.
You might also like to check out:
- Sideload / Install Kodi On Amazon Fire TV Stick The Easy Way [How-To Tutorial]
- Jailbreak iOS 10.3.1 / 10.3 / 10.2.1 For iPhone And iPad [Latest Status Update]
- Download iOS 10.3.1 / 10.3 Final IPSW Links For iPhone And iPad
- SemiRestore Lite For iOS 10 / iOS 10.2 Jailbreak Released
You can follow us on Twitter, add us to your circle on Google+ or like our Facebook page to keep yourself updated on all the latest from Microsoft, Google, Apple and the Web.
