If you find yourself in a situation of having upgraded your iPhone, iPad, or iPod touch to iOS 12.3 but want to downgrade it again, this is the guide for you.
Upgrading to the latest and greatest release that Apple offers is something that’s surprisingly easy to do by accident, or at the very least, end up regretting. Your iOS device may be configured to update automatically, and there may be issues that you don’t want to live with after the update. Sometimes it’s a case of staying on an older version of iOS to preserve jailbreaking possibilities.
But whatever the reasons for you wanting to downgrade, it’s fairly easy to do. You just need a few things before you get started.
- A Mac or PC with iTunes installed, and a USB to Lightning cable for connecting your device.
- The iOS 12.2 IPSW file for your particular device. You can download the correct one from here if you need it.
- Remember that you can only downgrade as far as iOS 12.2 at this time. Apple does not allow older versions of iOS to be installed.
With that said, let’s get on, shall we?
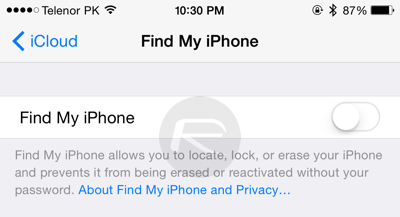
Step 1: You need to make sure that Find My iPhone is disabled. To do that, head to Settings > iCloud > Find my iPhone and toggle it off.
Step 2: Next, you need to put your device into DFU mode. You can find instructions on how to do that below:
- iPhone 8 / 8 Plus, or iPhone X / XR / XS / XS Max owners: DFU Mode On iPhone X / 8: Here’s How To Enter It
- iPhone 7 or iPhone 7 Plus owners: Enter DFU Mode On iPhone 7 Or iPhone 7 Plus, Here’s How
- If you have an older device, then follow the instructions here.
Step 3: With your device connected to your PC or Mac, and iTunes open, hold down the Option (Mac) or Shift (Windows) key and click on the Restore iPhone/iPad button. Then select the location of the iOS 12.2 IPSW you downloaded earlier.
Step 4: iTunes will now do its thing and restore your device. Once it restarts, you will have a fresh version of iOS ready to go.
You may also like to check out:
- Download iOS 12.3 Final IPSW Links And OTA Update For Your iPhone Or iPad
- Download: Final Version Of macOS 10.14.5, tvOS 12.3, watchOS 5.2.1 Released [Update: HomePod OS 12.3 As Well]
- iOS 12.3 Final Release Notes, Changelog And Features You Need To Know About
- iOS 12 / 12.1.2 iPhone XS Max Jailbreak Update Provided By Unc0ver Lead Developer
- iOS 12.2 Jailbreak Status: Here’s What You Need To Know
- Jailbreak iOS 12 / 12.1.2 / 12.1.2 Beta 3 With Unc0ver And Install Cydia, Here’s How [Tutorial]
You can follow us on Twitter, or Instagram, and even like our Facebook page to keep yourself updated on all the latest from Microsoft, Google, Apple, and the Web.
