Here’s a full tutorial on how to downgrade iOS 10.1 or iOS 10.1.1 on your iPhone, iPad or iPod touch device quickly and easily.
If you’ve somehow gotten caught up in the iOS 10.1 / 10.1.1 excitement, and are regretting leaving your old firmware in favor of Apple’s latest release, then it’s still possible to rectify that decision by rolling back to an earlier version of the iOS platform on your iPhone or iPad. Thankfully, decisions made in the heat of the moment aren’t always the final decision, meaning it is possible to roll back firmware, but this does of course come with certain considerations and restrictions.
First up, it’s worth taking into account just how far you can actually roll back, and what firmware versions are actually available for downgrade. With iOS 10.1.1 now being the latest publicly available version of iOS, roll backs are limited to versions of Apple’s mobile platform that are still being signed by the Cupertino-based company.
At the time of writing this, there are two options available to device owners; either rolling back to iOS 10.0.3 on iPhone 7 and iPhone 7 Plus, or taking it a notch down by going back to iOS 10.0.2 on all the other compatible devices. This limitation is because Apple only just recently stopped signing iOS 9.3.5 and iOS 10.0.1 for compatible iPhones and iPads, completely killing the downgrades to iOS 9 firmware in the process.
It’s also worth noting that the last version of iOS that has a public jailbreak available for it is iOS 9.3.3, which no longer has an active signing window of course, and therefore means that iPhone and iPad owners cannot downgrade to that particular verison. In short, there’s no jailbreak advantage in downgrading from iOS 10.1.1.
So that leaves us really with the only reason to downgrade from iOS 10.1.1; the potential that Apple’s latest version of iOS has introduced some niggles, performance or battery issues onto the installed device. If that is the case, and you’ve almost instantly noticed that having iOS 10.1/10.1.1 installed on your device – especially an older but still supported iPhone or iPad – is causing degraded battery life, or any other issue, then it’s extremely comforting to know that a downgrade is still actually possible.
If you are adamant that a roll back of firmware is necessary, and you want to get up and running with that process immediately, then allow us to walk you through that process. Here’s what you need to do:
Note: Before you begin, make sure you have all of your important data backed up somewhere. This is important cause this process will wipe off your device clean. It is also important to note that full backups made on iOS 10.1.1 using iTunes or iCloud won’t be restorable on older firmwares like iOS 10.0.2/10.0.3.
Step 1: To begin, make sure you are running the latest version of iTunes on your Mac or Windows PC. You can download it for free from apple.com/itunes/download.
Step 2: Next up, you need to download iOS 10.0.2 or download iOS 10.0.3 (iPhone 7/7 Plus only) IPSW file for your iPhone, iPad or iPod touch model.
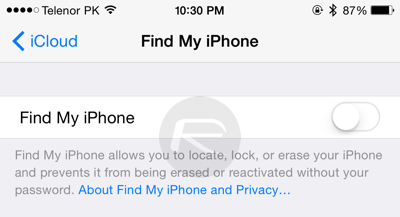
Step 3: Now you need to turn off Find My iPhone, so launch the Settings.app and navigate to iCloud > Find My iPhone and make sure that the Find My iPhone toggle is set to the Off position.
Step 4: Connect the iOS device to your Mac or PC and launch iTunes.
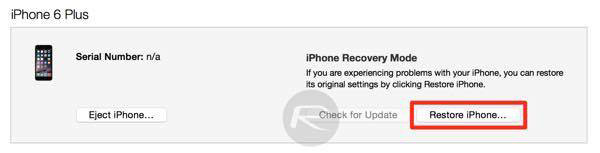
Step 5: Now comes the tricky part. You need to put the device in DFU mode. iPhone 7 users should follow our guide here for instructions on how to put the phone in DFU mode. Non-iPhone 7 users need to hold down both the Power and Home/Touch ID buttons on the device for 10 seconds, and then release the Power button only and keep holding down the Home button till it enters DFU mode. This will trigger an alert from iTunes informing that a device has been discovered in recovery mode.
Step 6: In iTunes, in the connected devices section, hold down the Shift key on Windows / Option key on Mac, and click the Restore iPhone… button.
Step 7: You will now be prompted to browse and select the IPSW file for your iOS device that was downloaded earlier as part of Step 2. Once done, the downgrade process will initiate.
Let iTunes run through the entire process which will take a few minutes, so sit back patiently till the software confirms the restore and the iPhone, iPad or iPod touch has rebooted into the welcome screen.
UPDATE: Apple has now stopped signing iOS 10.0.2 and iOS 10.0.3 firmwares, killing the downgrade from 10.1.1/10.1 to 10.0.x in the process. Only iOS 10.1.1 and iOS 10.1 are being signed now.
You may also like to check out:
- Download iOS 10.1 IPSW Links For iPhone And iPad [Final Version]
- Download iOS 10.1.1 IPSW Links For iPhone, iPad, iPod touch
- Jailbreak iOS 10 / 10.1.1 / 10.0.2 / 10.2 For iPhone, iPad, iPod touch [Latest Status Update]
- Download iOS 10, 10.1.1, 10.2, 10.0.2 Links & Install On iPhone 7, 6s, 6, Plus, SE, 5s, 5c, 5, iPad, iPod [Tutorial]
You can follow us on Twitter, add us to your circle on Google+ or like our Facebook page to keep yourself updated on all the latest from Microsoft, Google, Apple and the Web
