Google’s Android is coming along nicely these days, and with version 6.0 Marshmallow now available to download, if you own a Nexus flavored device, there has never been a better time to be an Android fan, especially if you’re carrying around a Nexus 6 or one of the Nexus tablets. What’s better than getting your hands on a lovely new version of Android before the rest of the Android community?
Downloading the Android ROM is a matter of downloading the right file depending on the hardware that you will be installing it on. We have that list already set for you, so all you need to do is click the one that corresponds to your Nexus smartphone or tablet and wait for the magic to happen.
Once the file is downloaded, though, you’re going to need to jump through a couple of hoops in order to get the thing onto your hardware. Doing that on a PC or a Mac differs slightly, but in the typical RP way, we have a handy guide that should do away with all of the confusion and have you running Android 6.0 Marshmallow sooner rather than later.
Before we get started, remember that this process will wipe your device so be sure to have a backup or two before you do anything. You’re going to need it. Also, download Android 6.0 for your Nexus device from this post: Download Android 6.0 Marshmallow Final Factory Images For Nexus Devices. Nexus 6, Nexus 5, Nexus 7 (2013) and Nexus 9 are supported.
So let’s get things underway.
OS X
Step 1: Extract the downloaded Android 6.0 Marshmallow package.
Step 2: You’re going to need ADB and Fastboot on your Mac, so if you don’t already have those, then paste the following into a Terminal window:
bash <(curl https://raw.githubusercontent.com/corbindavenport/nexus-tools/master/install.sh)

Step 3: Next, you need to either navigate to the folder to which you downloaded the Android 6.0 ROM or open System Preferences -> Keyboard -> Shortcuts, select Services and check that ‘New Terminal at Folder’ is enabled.

Step 4: Right-click on the folder that you just extracted Android 6.0 to and click New Terminal at Folder.

Step 5: If your device has an unlocked bootloader, then you can skip to Step 7, but if not, you need to connect it to your Mac via USB and paste the following into the newly opened Terminal window before pressing Return:
adb reboot bootloader
Step 6: Next, run the following command from within the ADB tool:
fastboot oem unlock
Step 7: Next, turn your device off and then press and hold Volume Up, Volume Down and Power buttons simultaneously to start the device in Fastboot mode.
Step 8: Make sure your device is still connected via USB and paste the following into Terminal before pressing Return:
sudo ./flash-all.sh
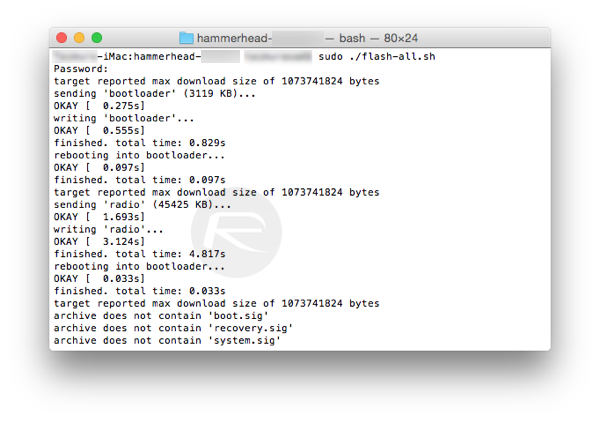
Step 9: Sit back and watch as Android 6.0 is installed on your Nexus device. When it’s done, you’ll find yourself on the bleeding edge of Android. How’s it feel?
Windows
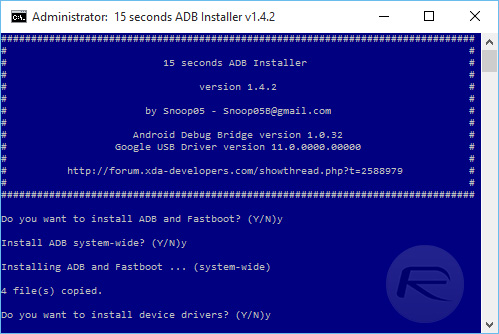
Step 1: Download the ADB installer from here, right-click it and select Run as administrator.
Step 2: Follow the on-screen instructions, which consist of entering ‘Y’ and pressing Return to install ADB, Fastboot and ADB device drivers. Remember to enter ‘Y’ when the tool asks you if you want to install ADB system wide.
Step 3: Once complete, open a Command Prompt window and enter the following before pressing Return:
adb reboot bootloader
Step 4: Once that action is complete, do the same again after entering the following:
fastboot oem unlock
Step 5: Extract the downloaded Android 6.0 Marshmallow package and run the flash-all.bat file inside.
Step 6: Sit back and relax. If ADB returns an error stating that you’re missing the system.img file, unzip the image.zip file inside the package to the same location, Shift + right-click inside the extracted folder and select Open command window here. Flash the contained files individually via the following commands:
fastboot flash bootloader <bootloader_name>.img
fastboot reboot bootloader
fastboot flash recovery recovery.img
fastboot flash boot boot.img
fastboot flash system system.img
fastboot flash cache cache.img
fastboot flash vendor vendor.img
And you’re done. It’s not a big job to perform, and when you’re finished you should have a clean install of Android 6.0 at your fingertips. That’s got to be worth your time!
You can follow us on Twitter, add us to your circle on Google+ or like our Facebook page to keep yourself updated on all the latest from Microsoft, Google, Apple and the Web.
