Here’s how you can have multiple Kodi portable mode installations on a single PC device or a USB flash storage drive.
This, as you might expect, can be used to run multiple instances of Kodi on one machine, or to take it and run it on a different machine which doesn’t have Kodi installed through a external or a portable drive. If that’s something that you are interested in, carry on reading below on how to go about achieving this kind of setup.
Step 1: First and foremost, you are going to need to download the Kodi installer for the platform. In this particular instance, we are looking at this as a Windows-based installation. Download that installer directly from the Kodi site: kodi.tv/download.
Step 2: Double-click on the Kodi installer and go through the process of skipping through the pages and agreeing to the terms of use. When you get to the Change Install Location window choose a location for it, such as the root of the C: drive. Click Next and then Install.
Step 3: When the installation has completed, make sure the Run Kodi checkbox is left unticked, then click on Finish.
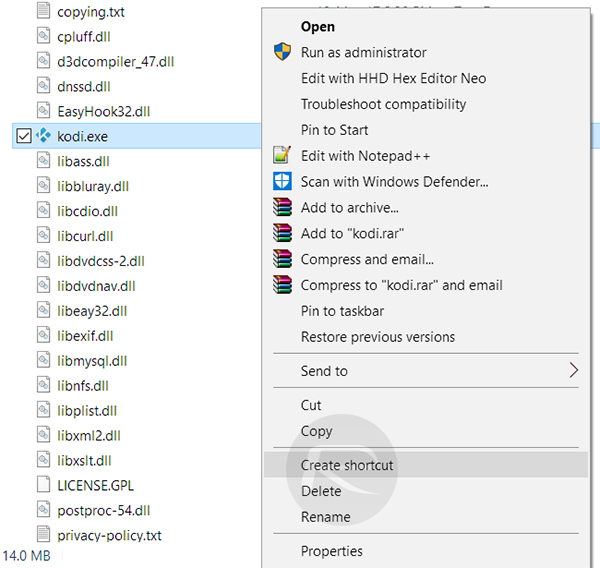
Step 4: Launch File Explorer on the machine and browse to the C: drive to find the Kodi folder. Locate the Kodi executable file in that directory and right-click on it.
Step 5: When the contextual menu appears, head down toward the bottom and select Create shortcut. This will create a new shortcut in the same folder.
Step 6: Right-click on that new shortcut file, select Rename and name it whatever you like. We recommend something like Kodi – Portable or Kodi – Thumb Drive. Right-click again when the file has been renamed and select Properties.
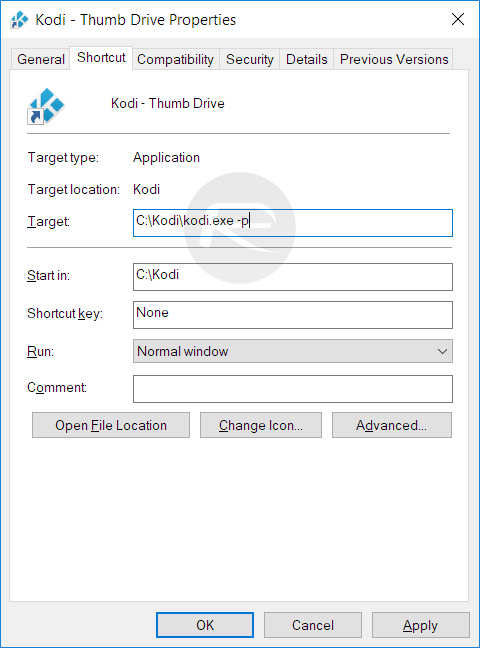
Step 7: In the text field titled Target under Shortcut tab, you will have a destination. Alter the text from C:\Kodi\Kodi.exe to make it read C:\Kodi\Kodi.exe – p. We are basically adding a “-p” onto the end of the string of text for portable mode. Select OK to continue.
Step 8: Double-click on the newly renamed shortcut. This will now launch Kodi and also create a new “portable_data” folder and set of files for that particular installation. Once it has launched, use the standard power menu to exit out of the installation back to the desktop.
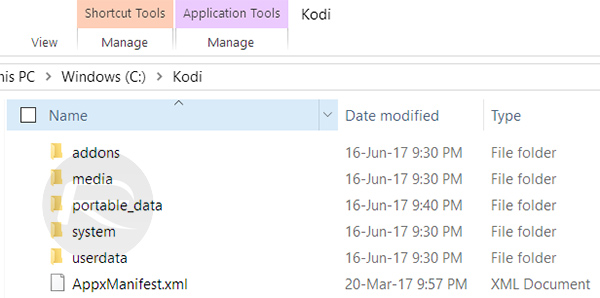
Step 9: Make sure the external hard drive or USB thumb drive is plugged into the machine. Now simply copy all of the files and folders found in the root of the Kodi folder on the C: drive, over to the connected portable storage device. You can also copy and paste these files in a different location on the same hard drive in case you want to have multiple instances of Kodi running on the same machine.
That’s it! You should now be able to take that USB or external drive anywhere, plug it into a friend’s computer, and launch the Kodi portable installation. One thing to note is that you may actually have to right-click the created shortuct, select Properties, and edit the Target location to match the drive letter of the portable drive as it shows on the computer it’s connected to.
You may also like to check out:
- Fix Kodi 17 Unable To Connect Network / Couldn’t Retrieve Directory Information Error, Here’s How
- Fix Kodi 17 Unable To Create GUI Error On Windows 10, Here’s How
- How To Downgrade iOS 11 Beta To iOS 10.3.2 / 10.3.3 [Tutorial]
- Download 10.5-Inch iPad Pro Wallpapers In All Colors For Any Device
- Download iOS 11 Beta 1 & Install On iPhone 7, 7 Plus, 6s, 6, SE, 5s, iPad, iPod [Tutorial]
- Jailbreak iOS 11 On iPhone And iPad [Status Update]
- Jailbreak iOS 10.3.2 / 10.3.1 / 10.3 / 10.2.1 For iPhone And iPad [Latest Status Update]
- Download iOS 11 Beta OTA Configuration Profile Without UDID / Developer Account [How-To Tutorial]
You can follow us on Twitter, add us to your circle on Google+ or like our Facebook page to keep yourself updated on all the latest from Microsoft, Google, Apple and the Web.
