I have received loads and loads of emails regarding all the issues people are facing when trying to unlock and jailbreak iPhone OS 3.0. I have tried my best to answer them by email, and to all the comments in my guides here and here. Here is compilation of all the fixes for the issues that you may be getting when unlocking and jailbreaking iPhone OS 3.0 using redsn0w:
Fix for Problem 1: If you are stuck at the “Waiting for reboot” screen. Try the following solutions:
Solution A: (Windows 7 & Windows Vista users): Right click on redsn0w.exe and then click on “Properties”. Switch to “Compatibility” tab and make sure you check “Run this program in compatibility mode for: Windows XP (Service Pack 3)”. Now simply start the application by right clicking on the .exe file and then click on “Run as administrator”.
Solution B: If “Solution A” doesn’t work for you then make sure that you downloaded the correct firmware version file for your device.
- Firmware OS 3.0 (iPhone1,2_3.0_7A341_Restore.ipsw) for iPhone 3G
- Firmware OS 3.0 (iPhone1,1_3.0_7A341_Restore.ipsw) for iPhone 2G
Solution C: If “Solution B” doesn’t work then try this when you are stuck on “Waiting for reboot”: Press and hold both the “Power” and “Home” buttons for about 10 seconds then release only the “Power” button only while continue to hold the “Home” button for another 10 seconds. Your process should continue now.
Solution D: Make sure that you place all the required downloaded files in one single location (i.e. in same folder) as redsn0w:
- redsn0w.exe
- iPhone1,2_3.0_7A341_Restore.ipsw (iPhone 3G) OR iPhone1,1_3.0_7A341_Restore.ipsw (iPhone 2G)
- bl39.bin (for iPhone 2G only)
- bl46.bin (for iPhone 2G only)
Make sure you have kept all these files in one location under same folder.
Fix for Problem 2: If redsn0w.exe crashes during jailbreaking. Try the following solutions:
Solution A: Make sure that you places all the required downloaded files in one single location (i.e. in same folder) as redsn0w:
- redsn0w.exe
- iPhone1,2_3.0_7A341_Restore.ipsw (iPhone 3G) OR iPhone1,1_3.0_7A341_Restore.ipsw (iPhone 2G)
- bl39.bin (for iPhone 2G only)
- bl46.bin (for iPhone 2G only)
Make sure you have kept all these files in one location under same folder.
Solution B: redsn0w may crash for some users running Windows Vista & Windows 7. To get around freezing and crashing of redsn0w, right click on redsn0w.exe and then click on “Properties”. Switch to “Compatibility” tab and make sure you check “Run this program in compatibility mode for: Windows XP (Service Pack 3)”. Now simply start the application by right clicking on the .exe file and then click on “Run as administrator”. This should solve your problem on Windows 7.
Solution C: If both “Solution A” and “Solution B” didnt work for you then try this(Thanks to joey): Choose not to install “Icy” when redsn0w gives you an option to install it. You can install “Icy” manually later when your are done with the jailbreak by following instruction under “Fix for Problem 5”.
Fix for Problem 3: If you are using a custom firmware 3.0 to update/restore using the guide here and getting 1604 error:
Solution A: You must make sure that you are updating from 2.2.1 in unlock and jailbroken condition.
Solution B: You must also make sure that you connect your iPhone directly to usb port on the backside of the computer. Avoid using usb ports in front and usb hubs.
Fix for Problem 4: You are stuck with firmware 3.0 and want to downgrade to 2.2.1: (Thanks to shoaib)
Most importantly you will have to set your iPhone into DFU mode NOT recovery mode, i tried recovery mode and got an error.
I’m sure most of you out there are just hitting shift + restore in iTunes and hoping it will work. But that method doesn’t set the phone into DFU mode.
1. Connect your iPhone and Press the home button for 5 seconds.
2. Press sleep/wake button for 10 seconds (do not release home).
3. Release sleep button but continue holding down the home button for an additional 30 seconds (your computer will start reinstalling drivers DO NOT RELEASE HOME BUTTON UNTIL 30 SECONDS ARE OVER)
4. iTunes will detect your phone in recovery mode (dont worry it will say “recovery” but is infact in DFU, you can make sure by checking the screen of your phone:
Recovery mode= logo of USB connecting to iTunes
DFU mode = Blank screen
5. Press and hold left shift and click “restore”
6. Browse to folder containing the 2.2.1 firmware restore file. it should look like this
iPhone1,1_2.2.1_5H11_Restore
7. Double click it and iTunes will start restoring.
8. Once that is done iTunes will say INVALID SIM (if you are not using the legitimate SIM card).
9. Now you have a choice, you can either set the phone back into DFU mode (remember NOT recovery mode), or jailbreak using quickpwn 2.2.5 (old version).
I decided to jailbreak so that the “restore” option appears like how it is normally suppose to when you connect your iPhone. although setting the device back into DFU mode should also work.
10. Again press and hold shift and click on restore to browse to the custom “cooked” 3.0 firmware.
11. Voila! iTunes restores a fully functional 2G iPhone running on firmware 3.0
IMPORTANT REMINDER: Recovery mode can also be activated by holding the sleep and home button for 10 seconds, then releasing the sleep button while holding the home for additional 30 seconds… THIS IS WHAT U ***MUST NOT*** DO!!!!
Remember that throughout the process we are using DFU mode (I am emphasizing on this fact simply because recovery mode did not work for me).
PROBLEMS I(shoaib) FACED:
The shift + restore method was not functioning as it was suppose to. So if you face the same problem, tell me. i will show you how to bypass that.
Fix for Problem 5: You have successfully jailbroken your device but you cant find “Icy” (formerly Installer) on your iPhone:
Those of you who have jailbreaked your iPhone using redsn0w method above may have noticed no Icy(formerly Installer) on your iPhone. To install “Icy”, simply start “Cydia” on your jailbroken iPhone. It will prompt you to install upgrades, choose “Complete Upgrade” and then confirm the installation. Once this upgrade is done, restart “Cydia” and then follow the following steps:
1. Click on “Manage” and then click on "Sources”.
2. Click on “Edit” and then click on “Add”.
3. Enter “http://apt.ripdev.com” and then click on “Add Sources”. It will upgrade some files.
4. Now click on “Done” and then click on “Search” to search for “Icy”.
5. Find “Icy” (Only the word “Icy”) and install it.
6. You should now have “Icy” installer on your iPhone home screen.
Fix for Problem 6: You have successfully jailbroken your device but you are now unable to install jailbroken apps on iPhone OS 3.0:
Those of you who have updated to iPhone OS 3.0 (jailbroken) might have noticed that your jailbroken apps (Apps installed outside from App Store) have stopped working. Even if you have tried reinstalling them they wont work because these apps require a patched version of MobileInstallation file on your iPhone. To get around this issue, follow the guide here to patch the MobileInstallation file on your iPhone to get all the jailbroken apps working on your iPhone with OS 3.0.
Fix for Problem 7: You seem to have downloaded the correct iPhone OS firmware 3.0 .ipsw file but your Windows identifies it as a “.Zip” folder for extraction:
Some people have encountered this problem when downloading .ipsw file from Apple only to find it as an extraction(.zip) folder with a bunch files. To get around this issue:
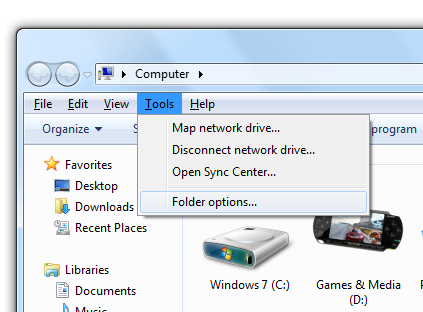
1. Go to “My Computer” in Windows.
2. Press “Alt” button on the keyboard and then select “Tools” from the file menu and then click on “Folder options…”.
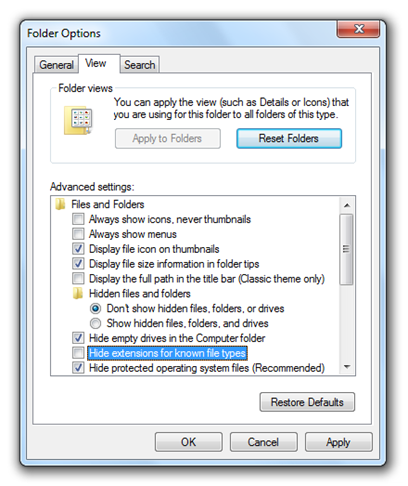
3. In “Folder Options”, switch to “View” tab and uncheck “Hide extensions for unknown file types” and then click ok.
 4. Now simply go to the folder which contains that “.ipsw” file. You will notice that the extension for that file will now be reading as “.ipsw.zip”. Rename this file by removing the “.zip” extension from the end of the file so that the extension for the file becomes “.ipsw” only. Example: iPhone1,2_3.0_7A341_Restore.ipsw
Windows should now be able to read the file as valid “.ipsw” file for iTunes.
UPDATE 1: redsn0w 0.7.2 is now available for both Windows & Macs. It adds support for PPC and comes with Icy(formerly Installer) as pre-installed. Direct Download links can be found here.
Please share if you know solution to any problem that you may have encountered. Also let me know if any of these solutions fixed your problem. I’m open to any questions. Cheers!
