Ever since jailbreaking became popular, people have wanted to record the screen of their iOS device. Apple made the requirement for jailbreak tweaks a little less urgent by bringing QuickTime iOS screen recording to the table with iOS 8+ and OS X Yosemite+, but that means you obviously need a Mac to make the magic happen. With jailbroken devices, that isn’t the case thanks to Cydia apps the likes of Ryan Petrich’s Display Recorder, which is arguably the best app to use and it’s compatible with the latest versions of iOS 9.
Available from Cydia and costing $4.99, Display Recorder is a great choice for recording the screen of your iOS device and then having that video saved to your Camera Roll for sharing or further manipulation using something like iMovie. It may not be free, but at this price, it’s worth every penny.
Here’s what you need to do to get your very own copy and start recording your screen today.
Step 1: Launch Cydia on your iOS 9.0.x jailbroken device. If you haven’t jailbroken your device yet, check out our iOS 9 jailbreak tutorials here:
- How To Jailbreak iOS 9.0.2 On Any iPhone, iPad, iPod touch Using Pangu 9 [Tutorial] (Windows)
- Jailbreak iOS 9 – 9.0.2 With Pangu 9 On Mac OS X, Here’s How (Mac)
Step 2: Search Cydia for Display Recorder. You don’t need to add any extra sources.
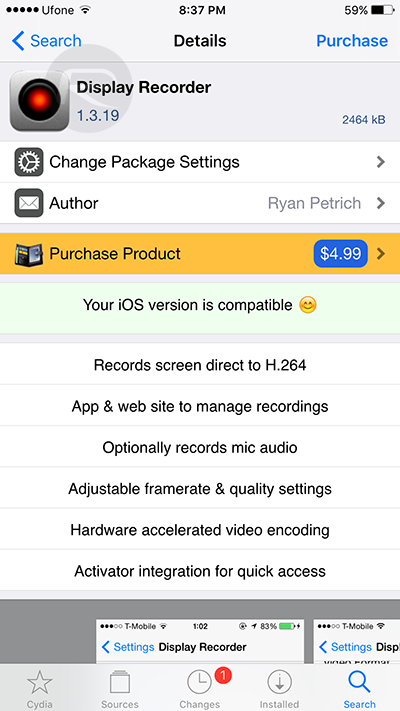
Step 3: Install the Display Recorder app.
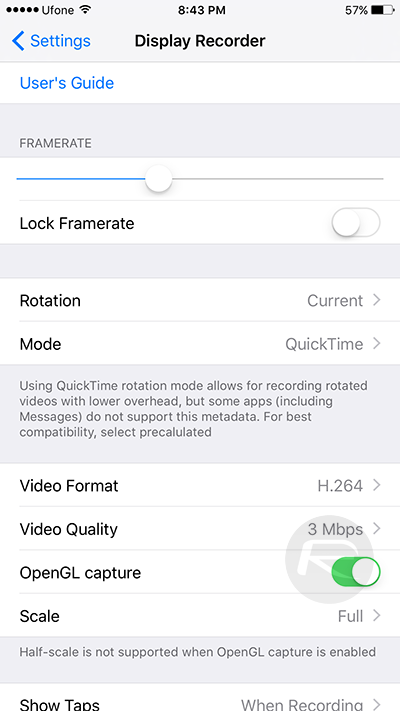
Step 4: Once the installation is complete and your device has resprung, head into Settings and tap Display Recorder to start configuring the app. Here, you can change the frame rate and screen orientation to suit your needs. You can even change the video quality and include the audio from the device’s microphone should you so wish.
Step 5: When configured, exit Settings and open the Display Recorder app, then tap the red camera icon in the top-left corner of the screen.
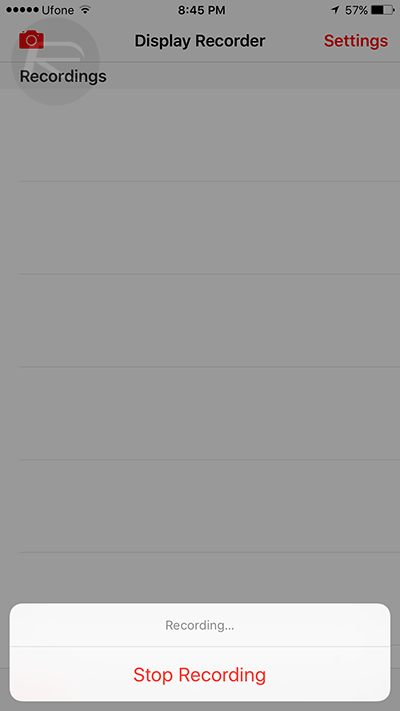
Step 6: Do whatever it is you want to record!
Step 7: When ready, open the Display Recorder app again and tap Stop Recording. The resulting video will be saved within the app, and you can tap it and then choose the option to save it to your Camera Roll if you want to use it elsewhere.

Step 8: Think of some more cool things to record!
There. That beats using your Mac to record your iOS device’s screen, doesn’t it?
You may also like to check out:
- The Best New Jailbreak Tweaks For iOS 9 On Cydia
- Jailbreak iOS 9, 9.0.2, 9.0.1 With Pangu 9 On iPhone And iPad [Updated]
You can follow us on Twitter, add us to your circle on Google+ or like our Facebook page to keep yourself updated on all the latest from Microsoft, Google, Apple and the Web.
