Windows Live SkyDrive is Microsoft’s service that lets you store any file on a virtual online folder that can be as large as 25GB, all completely free of charge, and then access it from anywhere from any browser, PC or Mac. While Microsoft’s implementation works fine, there isn’t a clear way to get to those files from Windows 7 Explorer, but it is possible.

This method works by mounting your SkyDrive as a network drive from within Windows 7 Explorer by obtaining a specific URL. Of course, you could always get a SkyDrive alternative that integrates right into Windows Explorer, as well as Mac OS X and Linux, such as DropBox, but Microsoft’s service has the advantage of integrating right into your Windows Live account.
You’ll need the following:
- A computer running Windows 7. It might work on previous versions of Windows, although we haven’t tested it.
- An Internet connection.
- A Windows Live ID.
- If you don’t have Windows Live Essentials installed, you need the Windows Live Online ID Provider. (get it from here).
- SkyDrive Simple Viewer for WebDav (get it from here).
Once you’ve got what it takes, all you need to do is to follow the steps below, which should take no longer than 5 minutes to perform.
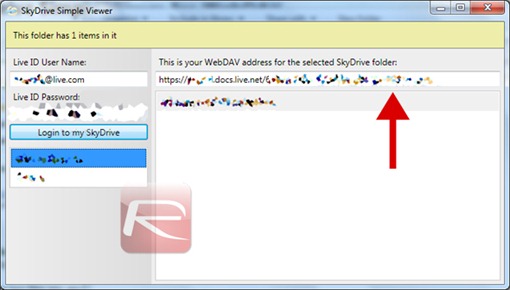
Step 1: Before you get started, you must first obtain your unique SkyDrive ID, which in no way looks like your Windows Live logins credentials. In order to do this, fire up SkyDrive Simple Viewer for WebDav, which we linked to earlier, and enter your Windows Live credentials.
Step 2: You should now see a list of the folders stored on your SkyDrive. Select the one you want to mount on your hard drive and copy the URL that should show up on the right, as shown below.
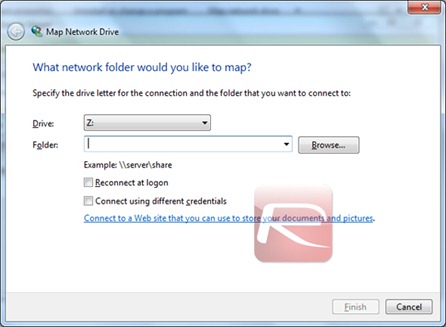
Step 3: Now here comes the easy part; bring up the Start menu, right-click on Computer and select Map Network Drive. From there, paste in the URL you copied earlier and adjust the settings to your liking. Hit Next and wait a few seconds. Before you know it, the SkyDrive folder you’ve picked will now show up as a hard drive inside Windows 7 Explorer, which can be managed just like any other drive/directory.

Tip: if you want to display all the contents of your SkyDrive, not just a particular folder, you can do that if the domain of the URLs displayed on SkyDrive Simple Viewer for WebDav are identical. For example, if the URLs of all your folders are https://umfo4b.docs.live.net/xxxxxxxxxxxxxxxxxxx/ , you can simply set the main URL as a Network drive like we demonstrated in Step 3.
To Unmount SkyDrive: just head to Computer, right-click your SkyDrive network drive and select Disconnect. The drive should be immediately unmounted.
As with any unsupported solutions, there are several drawbacks. For one, there’s no way to set permissions for each one of your files, which might end up requiring you to often bring up the SkyDrive web page either way. Nonetheless, this trick might provide you with some quick (and free) storage when you need it the most.
(via PocketNow)
You can follow us on Twitter or join our Facebook fanpage to keep yourself updated on all the latest Microsoft, Google and Apple.
