Windows Home Server is one of the most under rated product of Microsoft which has got great potential for homes with multiple-connected computers. Based ![]() on Windows Server 2003 codebase, Windows Home Server is intended to be a solution for homes with multiple connected PCs which offers file sharing, automated backups, and remote access. So if you have multiple PCs in your house, you can easily manage them by having one centralize computer, that does it all for you!
on Windows Server 2003 codebase, Windows Home Server is intended to be a solution for homes with multiple connected PCs which offers file sharing, automated backups, and remote access. So if you have multiple PCs in your house, you can easily manage them by having one centralize computer, that does it all for you!
Most of homes these days have got multiple computers. I for one have 8 computers in my home which is a mixture of Media Center PC, a few Windows based notebooks and a macbook to go with it. Management of all these computers for regular backups was a huge issue for me until I got my hands on Windows Home Server that now does it all for me. Not only did Home Server solved my backup woes, it also helped me create a centralized share for my data which includes pictures, movies, music & tv recordings so that all the other computers in my home can access them locally when they are in home, or remotely when away from home. All said, the main issue that I have with my Home Server is that it only integrates with Windows XP and Windows Vista based computers through a software installation for backups & file sharing which means that if you have a Mac or a Linux based computer then you are out of luck.
Our friend Long Zheng recently digged out a job application that hinted towards a possible integration of Windows Home Server with Time Machine which might become a part of Windows Home Server v2 release but then that release is far away and unfortunately as of now, there is no way to backup your Mac on Home Server. But you might be wondering what about the centralized shares on my Home Server? Can my Mac access them just like all my home computers with Windows does? Fortunately you can, and I am going to show you exactly how to setup your Mac to access all the shares on the Home Server.
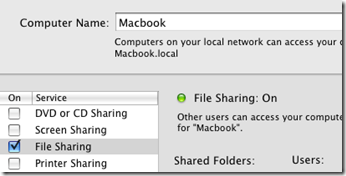
Step 1: First make sure all your home computers are in the same workgroup. You will also need to assign a name to your Mac and set "File Sharing" to set to on. To do this on OS X Leopard, navigate to System Preferences->Sharing. Type a name for your Mac and check the option to turn on "File Sharing".
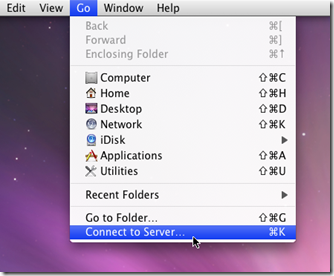
Step 2: Now we will point our Mac to look for Home Server shares. To do this, On Finder, navigate to Go->Connect to Server..
It will now prompt you to enter the local IP address for your Home Server. If you dont know the local IP address to your Home Server then you can find it out by:
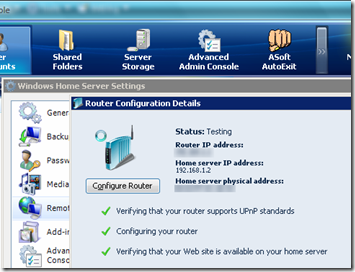
1. Remotely login into your server using WHS Console on a PC already connected with your Home Server.
2. Click on Settings tab and then click on "Remote Access". In Router section, click on "Details…". Here you will find your Home Server’s local IP as also illustrated by the screenshot below:
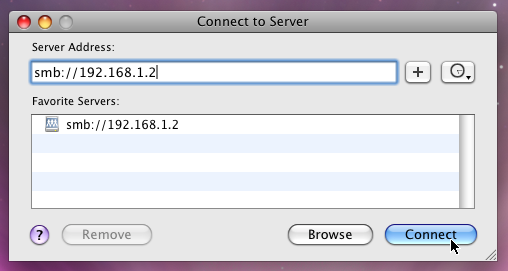
Step 3: Back to your Mac. Now enter your Home Server IP address preceded by smb:// e.g. smb://192.168.x.x. Click on "+" sign to add the server to your favorites and finally click on "Connect".

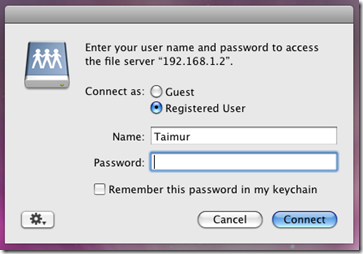
Step 4: Now you will get a prompt to enter your username and password on the Home Server to access your shares.
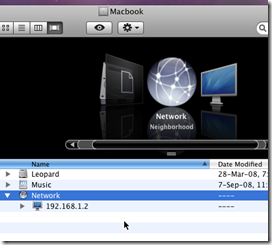
Step 5: Select the folders on your server which you want your Mac to mount to and you are done. To access them: on Finder, navigate to Go->Network. Double click on your server’s IP address and you will see all your shares on you Home Server.
If you want any other computer (most probably Windows based) in your home network to access shares on the Mac: On a Windows based computer, simply create a desktop shortcut. Right-click on it and go to its "Properties". Target it to the network name of your Mac e.g. \\MyMacbook and you are done.
