You may have recently read about the exciting project which brought a Game Boy emulation experience directly to the small-screen of the Apple Watch. It’s amazing what developers get up to in their spare time, and the type of side projects that they choose to work on, and even more amazing that they openly share those projects with the community for free.
One of the best things about the Giovanni emulator is how the developer has made it an open-project, inviting improvements in case it feels a bit off to some.

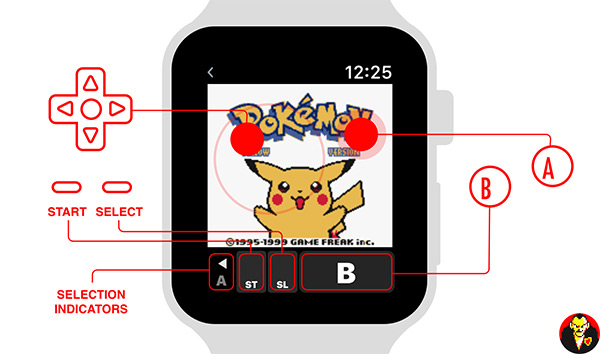
That said, in its current form it does offer quite the experience on your wrist, and the fact that it has the potential to include a number of games and not just one – being an emulator – is an idea some Apple Watch users may look to tinker with. So If you own an Apple Watch, and fancy playing some Pokemon Yellow on your device, then you can get the Giovanni emulator installed in a few minutes.
We show you how you can do that in this step-by-step guide below.
Requirements:
- A MacBook or iMac running OS X/macOS.
- Apple’s Xcode 8.0 or higher installed on that Mac. This is a free-of-charge development environment offered by Apple and can be downloaded for free from Mac App Store.
- An Apple Watch with watchOS 3.o or above installed.
- An Apple Developer Account. This can be a free or paid account.
- An active GitHub account.
Installing Giovanni Game Boy emulator on Apple Watch:
Step 1: First of all, you will need to have Git installed on the Mac you will be using for installing the emulator on the Apple Watch. If you have development experience, or are a frequent Xcode user, then you will likely already have this installed and can move onto the next step. However, if not, then you can run the following command in the Terminal app to install Xcode tools, which in turn installs Git: xcode-select –install.
Step 2: Now you need to create an SSH key in order to clone the emulator. Still within Terminal app, run the following command:
ssh-keygen -t rsa -b 4096 -C [your_email_address].
Step 3: When the system asks you to enter a file, simply press Enter, and make sure to make a note of the generated passphrase.
Step 4: You now need to make use of that SSH key. Once again, when still in Terminal, use the following command:
eval “$(ssh-agent -s)” ssh-add -K ~/.ssh/id_rsa
Step 5: The key also needs to be added to the GitHub account. To do this, run the following command in Terminal to copy the key to the paste board:
pbcopy < ~/.ssh/id_rsa.pub
Step 6: Log into your GitHub account next and go to Settings > SSH and CPG Keys. Pressing the green button will allow you to add a new SSH key into the signed-in GitHub account. Since you previously copied the key to the paste board, all you now need to do now is hit Command + V to paste it into GitHub.
Step 7: With most of the boring administration and set up stuff out of the way, it’s time to actually clone the emulator. Once again, still within Terminal, run the following command:
git clone –recursive git@github.com:gabrieloc/GIOVANNI.git cd GIOVANNI open
Step 8: This should automatically download the Giovanni project and throw you into a Finder window in that directory. Launch the Giovanni.xcodproj file to launch Xcode on the machine. With the project opened in Xcode, and your iPhone connected via USB, you should now be able to build directly to device.
Step 9: Once installed on the iPhone paired with an Apple Watch, you should be able to grab set the app to install onto the Apple Watch via the Watch app on the connected iPhone.
And that’s it. To install ROMs, you will need a file explorer like iExplorer or iFunBox to drag ROM files into the Giovanni folder.
You might also like to check out:
- Download Popcorn Time IPA On iOS 10 [No Jailbreak Required]
- Jailbreak iOS 10.2.1 / 10.3 For iPhone And iPad [Latest Status Update]
- Download Windows 10 Pro ISO File Without Product Key From Microsoft
- Jbme102 iOS 10.2 Jailbreak Coming After iOS 10.3, Will Be Safari-Based, Won’t Require 7-Day Signing
- Super Mario Run Android APK Download Release Date Announced
You can follow us on Twitter, add us to your circle on Google+ or like our Facebook page to keep yourself updated on all the latest from Microsoft, Google, Apple and the Web.
