Here’s how to clean install macOS 11.0.1 Big Sur on Mac via USB drive the right way. By using this guide, of course!
It might have taken Apple longer than any of us expected to get here, but macOS 11 Big Sur is now available for download. There have been months of betas and at times they’ve been pretty bad, but Apple is convinced that macOS 11 Big Sur is ready for a public release. Now, you just need to install it.
You can, of course, just upgrade via the App Store but if you’re like us you probably like to go with a completely clean setup every once in a while. That could be for all kinds of reasons, but sometimes it’s just nice to know that all the cruft you’ve installed over the years is a thing of the past.
With that said, and now that you know you need to install macOS 11 Big Sur via a USB stick, here’s what you’re going to need.
Prerequisites
- Make sure everything is fully backed up. You can use Time Machine or make a clone of your drive. At the very least, make sure that you have all of your important documents saved somewhere that isn’t your Mac.
- You’ll need to have a Mac that supports macOS 10.11 Big Sur. You can check the compatibility of macOS 11 Big Sur with Mac models here: macOS 11.0 Big Sur Compatibility: Which Macs Are Compatible With Apple’s Latest Desktop OS?
With that all out of the way, let’s get started.
How To do A Clean Install Of macOS 11 Big Sur
Step 1: Before we begin, you need to have the installation file on you. You can download the the installer for macOS 11 Big Sur from here: Download: macOS Big Sur 11.0.1 Final Version Released, Update Now.
Step 2: Now we need to create a bootable USB drive. We have a guide for that – course we do – so make sure you follow it before moving on to the next step: How To Create macOS Big Sur Bootable USB Flash Drive Installer.
Step 3: With your USB stick ready to go, turn your Mac off and insert the stick into an available port. Turn the Mac back on while holding the Option key. That will take you into the boot menu and allow you to select the USB drive.
Note: If you have a T2-chip enabled Mac, you will first need to enable booting from external storage via macOS Recovery. Nothing is going to work otherwise.
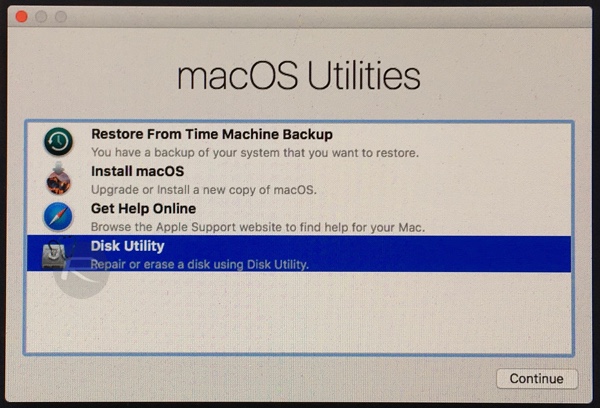
Step 4: Eventually, you’ll be greeted by the macOS Utilities menu. Select Disk Utility and then click Continue.
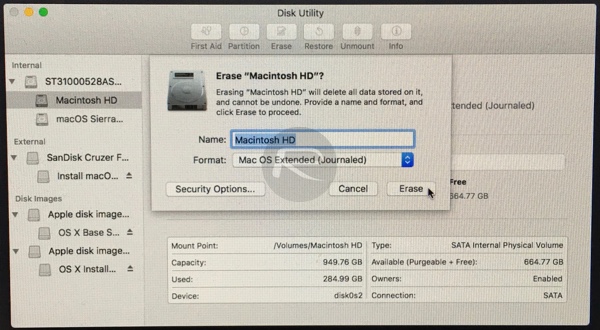
Step 5: Ensure your Mac’s main drive is selected and then click Erase. Keep the name of the new drive as Macintosh HD and make sure that the format is set as either “APFS (Encrypted)” (if you have a modern Mac with faster SSD) or “Mac OS Extended (Journaled)”. Hit the Erase button to proceed.
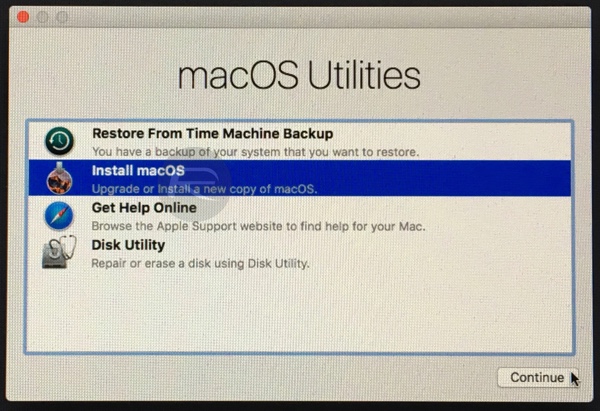
Step 6: Now you’ve completely wiped your drive. The next step is to fill it back up again. Select Install macOS and then click Continue. Make sure that your newly formatted drive is selected and follow the prompts.
That should be you done. Hopefully by the end of all that you’ll be running a clean installation of macOS 11 Big Sur on your Mac.
You may also like to check out:
- Download iOS 14.2 Final IPSW Links, OTA Profile File Along With iPadOS 14.2
- How To Fix Bad iOS 14 Battery Life Drain [Guide]
- Convert Factory Wired Apple CarPlay To Wireless Apple CarPlay In Your Car Easily, Here’s How
- iPhone 12 / Pro Screen Protector With Tempered Glass: Here Are The Best Ones
- Best iPhone 12, 12 Pro Case With Slim, Wallet, Ultra-Thin Design? Here Are Our Top Picks [List]
- Best iPhone 12 Mini Screen Protector: Here’s A List Worth Checking
- Best iPhone 12 Pro Max Screen Protector: Here Is A List Worth Checking
- Jailbreak iOS 14.2 Using Checkra1n, Here’s How-To [Guide]
- How To Downgrade iOS 14.2 The Right Way [Tutorial]
- Apple Watch ECG App Hack: Enable Outside US In Unsupported Country On Series 5 & 4 Without Jailbreak
You can follow us on Twitter, or Instagram, and even like our Facebook page to keep yourself updated on all the latest from Microsoft, Google, Apple, and the Web.
