Here’s how to fix Kodi 17 or 17.3 error ‘check the log for more information’ on a compatible platform Kodi is installed on.
The Kodi media center software is wonderful. There’s no real denying that, and you only have to look at its exponentially increasing popularity to understand how many people are starting to get onboard with it as a platform. However, the seemingly random and unsolvable errors that it throws up can be infuriating at times.
With this post, we are going to look at how we can fix the “Error Check The Log For More Information” on Kodi Krypton. If you are ready to dive right in and walk through the process of installing the necessary files to fix the check the log for more information error, then you will find the relatively simple steps below.
Step 1: In the first instance you are going to need to be in the Kodi Settings. You can get into there by clicking on the ‘Gears’ icon from the main Kodi landing area. When in Settings, select Systems Settings.
Step 2: When you are in System Settings, make sure that the Add-ons option is highlighted on the left-hand side. This will update the main interface to show settings pertaining to this area. Make sure the Unknown Sources toggle is put into the On position. Accept the Warning! alert that is popped up.
Step 3: Head back one step into the main Settings area and select File Manager. Select Add Source and add the following path into the relevant area: http://solved.no-issue.ca. Select OK to proceed. Enter an identifying name for the media source and select OK.
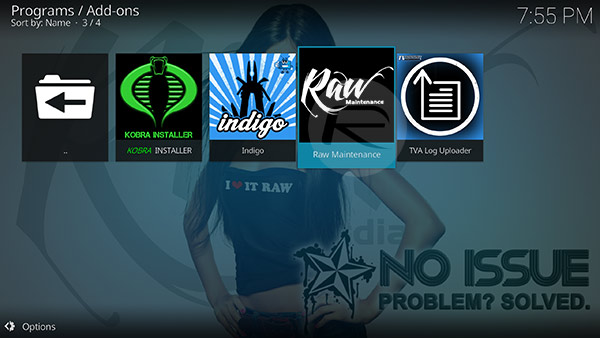
Step 4: Head back to the main Kodi dashboard and select Add-ons. From that main interface choose the add-on browser option denoted by a box icon on the top left.
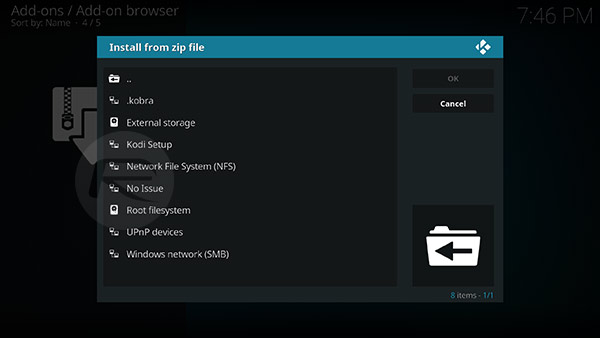
Step 5: Select Install from zip file before choosing the recently added repository. This will be listed under the name you provided it with earlier on.
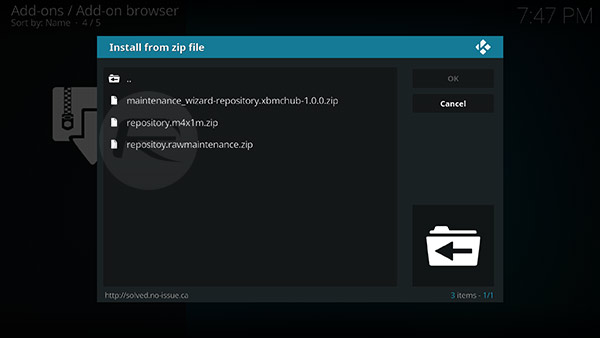
Step 6: Select the maintenance folder and then choose the repository.rawmaintenance.zip file and wait till you see a pop up telling you that the addon has been installed.
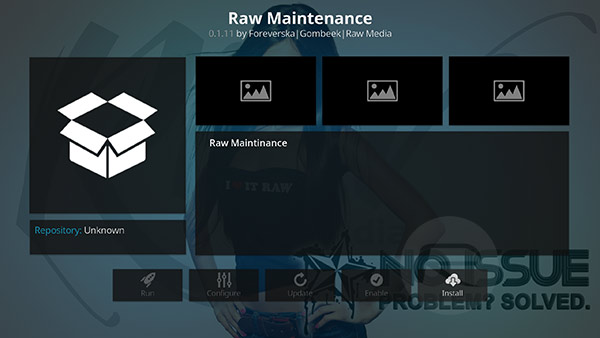
Step 7: Now select the Install from repository option and navigate to Raw Media’s Kodi Add-ons > Program add-ons > Raw Maintenance. When the new overview is brought up, select Install and wait for it to install.
Step 8: Head back into the root of the Add-ons menu, select Program add-ons menu and proceed to selecting the newly added Raw Maintenance add-on.
Step 9: Select the Maintenance folder and you will find three options. You are concerned with the Clear Cache and Purge Packages options. Select both of those options one after the other and accept the alerts that are presented.
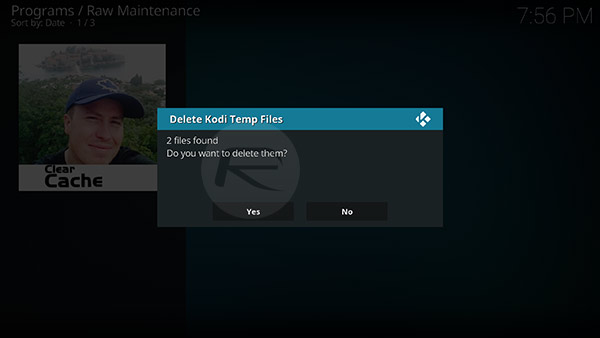
Once that process has been followed through, that particular error message should have disappeared.
You may also like to check out:
- Live Stream Apple WWDC 2017 Keynote On Windows, Android, iOS, Mac And More, Here’s How
- Download SoundCloud++ IPA On iOS 10 [No Jailbreak Required]
- Download: Phantom Lite For Snapchat 10.9.1.0 IPA Released, Bypasses DRM
- Snapchat++ Could Not Connect Error, Alternate Fix, And Reason Why You Are Getting The Error
- Jailbreak iOS 10.3.2 / 10.3.1 / 10.3 / 10.2.1 For iPhone And iPad [Latest Status Update]
You can follow us on Twitter, add us to your circle on Google+ or like our Facebook page to keep yourself updated on all the latest from Microsoft, Google, Apple and the Web.
