Here’s how to downgrade iOS 12.1.4 to iOS 12.1.1 beta 3 for jailbreak, or iOS 12.1.3, on your compatible iPhone, iPad or iPod touch device the right way.
If you want to make use of iOS 12.x.x jailbreak, then here’s how you can downgrade from iOS 12.1.4 to iOS 12.1.1 beta 3 or even iOS 12.1.3 on your iPhone, iPad, or iPod touch.
As you may already know, Apple has released iOS 12.1.4 which patches a fairly critical Group FaceTime bug that is capable of turning a device into an unwitting audio and video stream. But if for whatever reason this latest update causes any issue for you, you can downgrade back to iOS 12.1.3 while Apple is still signing that firmware. As far as jailbreaking goes, while Apple is no longer signing the jailbreak friendly iOS 12.1.2 and iOS 12.1.1, the good news is that Apple is still signing iOS 12.1.1 beta 3 which means you can downgrade to that firmware to take advantage of the jailbreak.
Before we carry on and go through the downgrade process, here are a couple of requirements that you need to be aware of. Failing to adhere to these could hinder your process:
- Access to a Mac or PC with the latest version of iTunes installed.
- Have possession of the relevant iOS 12.1.3 or iOS 12.1.1 beta 3 IPSW file that has been created and released for the device that you want to be downgrading on. You can download iOS 12.1.3 from here.
- An understanding and acceptance that you can only go as far back as Apple is currently signing a firmware, which in this case is iOS 12.1.3 or iOS 12.1.1 beta 3.
With all of the above in mind, let’s dive in and take a look at the process that you will need to go through.
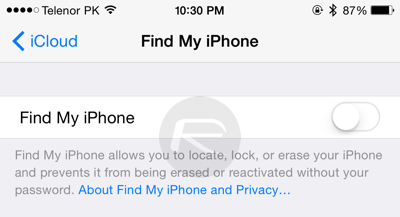
Step 1: You need to make sure that Find My iPhone is turned Off. On the device, launch the Settings app and navigate to iCloud > Find My iPhone. Toggle the switch to the Off position and make sure that you are ready with the device’s Passcode.
Step 2: Use your USB/Lightning cable to connect the iPhone, iPad, or iPod touch to the Mac or PC and make sure that iTunes is launched. If this doesn’t happen automatically then you can manually launch the app.
You now need to put the device into DFU Mode using the guidelines below depending on the type of device you have:
- iPhone 8 / 8 Plus, or iPhone X / XR / XS / XS Max owners: DFU Mode On iPhone X / 8: Here’s How To Enter It
- iPhone 7 or iPhone 7 Plus owners: Enter DFU Mode On iPhone 7 Or iPhone 7 Plus, Here’s How
- If you have an older device, then follow the instructions here.
Now that the device is in DFU Mode and picked up by iTunes, continue with the downgrade via the process below.
Step 3: Ensure that the connected device is selected in iTunes. Hold down the Option (Mac) key or Shift (Windows) key and click on the Restore iPhone/iPad button. When prompted, select the relevant IPSW file from your PC or Mac.
Step 4: And that is pretty much all that she wrote. Once iTunes has the relevant IPSW file it will go through the process of installing it to your device. Once complete, you should have iOS 12.1.3 or iOS 12.1.1 beta 3 installed back on the device.
You may also like to check out:
- Download iOS 12.1.4 IPSW Links, OTA Update With Critical FaceTime Bug Patch
- Jailbreak iOS 12.1.4 / iOS 12.1.3: Downgrade Now As Brandon Azad Has Released His iOS 12.1.2 Exploit
- Download iOS 12.2 Beta 2 IPSW Links, OTA Update Released To Developers
You can follow us on Twitter, add us to your circle on Google+ or like our Facebook page to keep yourself updated on all the latest from Microsoft, Google, Apple, and the Web.
