After months of hard work and continuous progress, OS X 10.11 El Capitan is finally out as a free-of-charge upgrade via the Mac App Store. If you’re intention is to migrate seamlessly across from an existing version of OS X then you can simply visit the Mac App Store and go through the El Capitan installation process. However, if you’re looking for an entirely fresh clean install of Apple’s latest desktop OS on your Mac, then you will need to create a bootable USB drive for El Capitan. We’re going to show you exactly how to do that.
Before we jump right into the process, there are a few prerequisites that are required to complete the process.
Prerequisites:
- Any computer running OS X.
- A USB flash drive with a minimum of 8GB capacity. Remember that this drive will be formatted as part of the process, so if it currently has anything important stored on it then you’ll need to make a copy of that in a safe location.
- Finally, you’ll need approximately 15-20 minutes of spare time and a little bit of patience.
How to make a OS X El Capitan 10.11 bootable USB flash drive:
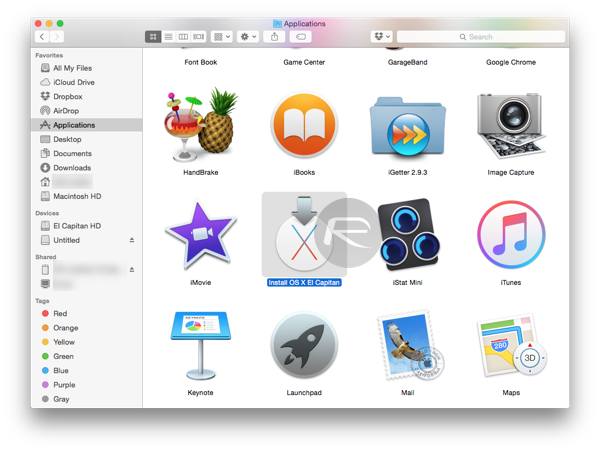
Step 1: First up, get OS X El Capitan from the Mac App Store: Download OS X El Capitan 10.11 Final Version For Your Mac Free Right Now. When the download has finished, make sure that you quit the installer rather than actually going through the process of upgrading over the top of your existing OS X installation. Make sure that the installer that downloads the El Capitan file is located in the /Applications folder under the name ‘Install OS X El Capitan.app‘.
Step 2: Next, we’re going to need to format the USB flash drive to get it into a state where it can accept the payload for the installation of El Capitan. Plug the USB flash drive into an available USB port and launch the ‘Disk Utility‘ application. Make sure that the USB flash drive is selected within the left sidebar, and then select the ‘Erase‘ tab from the main window interface.
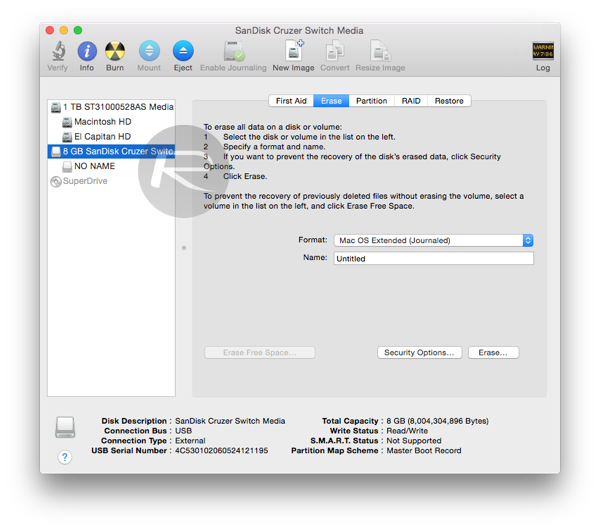
Step 3: In the main window ensure that the ‘Format‘ dropdown box is set to ‘Mac OS Extended (journaled)’, and the ‘Name‘ is set to ‘Untitled‘. Click on the ‘Erase‘ button at the bottom of the interface.
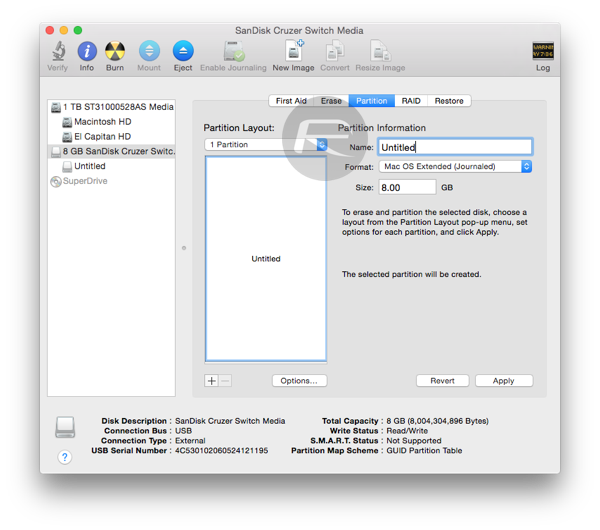
Step 4: Now, in the same window select the ‘Partition‘ tab. From within the ‘Partition Layout‘ dropdown, make sure that ‘1 Partition‘ is selected. Click the ‘Options‘ button at the bottom of the window and ensure that ‘GUID Partition Table‘ is selected as the chosen partition scheme. Check the name of the partition and clarify that it’s set to ‘Untitled’ and not ‘Untitled 1’ or anything. Click on Apply.

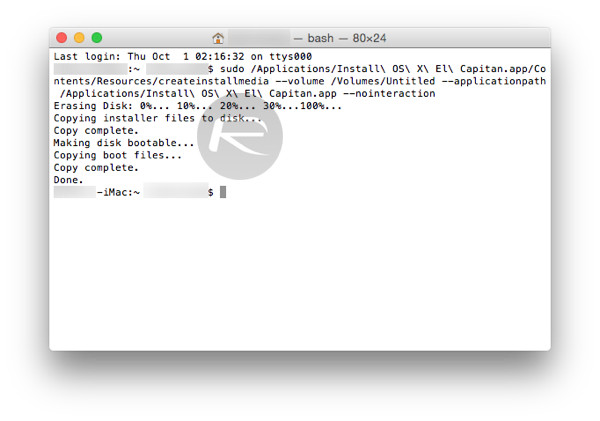
Step 5: This is where things get a little interesting. We’re going to dive into some command line foo. Launch the Terminal application. Type in the following command and hit ‘Enter‘.
sudo /Applications/Install\ OS\ X\ El\ Capitan.app/Contents/Resources/createinstallmedia –volume /Volumes/Untitled –applicationpath /Applications/Install\ OS\ X\ El\ Capitan.app –nointeraction
Tip: Don’t miss the double dashes, as shown more clearly in the screenshot below.

Because of the leading ‘sudo’ command, Terminal will ask you to enter your administrator password for the Mac. Type it and hit ‘Enter‘ on the keyboard.
Step 6: Terminal and the Mac will now set about going through the process of installing the OS X El Capitan installer onto the connected USB flash drive and then turn it into a bootable drive. As mentioned above in the ‘Prerequisites’ section, this could take approximately 15-20 minutes to complete. Please DO NOT remove the flash drive during the process. When the process is complete, Terminal will show ‘Done‘.
And you’re done! The newly created OS X El Capitan bootable flash drive is ready to be put to work to install fresh copy of El Capitan onto your Mac.
Now want to clean install El Capitan on your Mac? Follow the instructions here: Clean Install OS X El Capitan On Your Mac The Right Way, Here’s How [Guide].
You can follow us on Twitter, add us to your circle on Google+ or like our Facebook page to keep yourself updated on all the latest from Microsoft, Google, Apple and the Web.
