Update: Looking for iOS 4.3.5 jailbreak? Follow our complete step by guide posted here to jailbreak iPhone and iPod touch on 4.3.5 using Redsn0w. Info on untethered iOS 4.3.5 jailbreak can be found here.
Apple has just pushed out iOS 4.3.4 for the iPhone, iPad and the iPod touch. And thankfully, we have cooked custom PwnageTool bundles which allows you to jailbreak any device (except for iPad 2) running iOS 4.3.4, and at the same time preserve your baseband for an Ultrasn0w unlock later on.
")
We have tested and can 100% confirm that they are working. Keep in mind that the jailbreak is tethered for now, in other words, if your device loses power or restarts then you would have to boot it into the jailbroken state again. No matter how annoying it may sound, but its better than having no jailbreak at all.

Cydia, running on iPhone 4 GSM, iOS 4.3.4
The neat thing about PwnageTool is that it allows you to preserve your iPhone’s baseband, which aids in unlocking your iPhone later on using Ultrasn0w unlock. In this guide we’ll show you how you can jailbreak your iPhone on iOS 4.2.4, preserve your baseband and unlock it with Ultrasn0w, let’s get to it!
Things you’ll need:
- PwnageTool 4.3.3
- iOS 4.3.4 firmware
- iTunes 10.3.1
- Mac OS X
- PwnageTool bundles for iOS 4.3.4
- tetheredboot utility
Important note:
- There is no unlock for iOS 4.3.4’s baseband, hence do not hit the update button in iTunes if you rely on a carrier unlock.
- Your baseband will be preserved during the whole process.
- This jailbreak is semi-tethered.
- Hacktivation is fully supported
Modify PwnageTool
Step 1: Download the custom PwnageTool bundle for iPhone 4 from this link. (Please DO NOT hotlink this file. These bundles have been created by Redmond Pie. Credit the original source. Thanks)
Extract the .zip on your desktop, and inside it you should see a .bundle file. For this guide we’re going to use the iPhone 4 bundle, you should choose the one that applies to your device. Move the .bundle file to your desktop.
Step 2: Download PwnageTool 4.3.3 and then copy it to the /Applications directory. Right click on the PwnageTool icon and then click on Show Package Contents. Refer to the screenshot below if you’re having confusion:
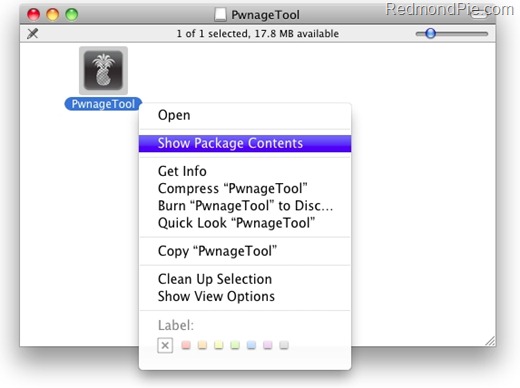
Step 3: Now you’re going to navigate to the following address: Contents/Resources/FirmwareBundles/ and paste the .bundle file which you copied to your desktop in this location.

Build Custom iOS 4.3.4 Firmware
Step 4: Download iOS 4.3.4 from this link tailored for your iOS device and save it on your desktop.
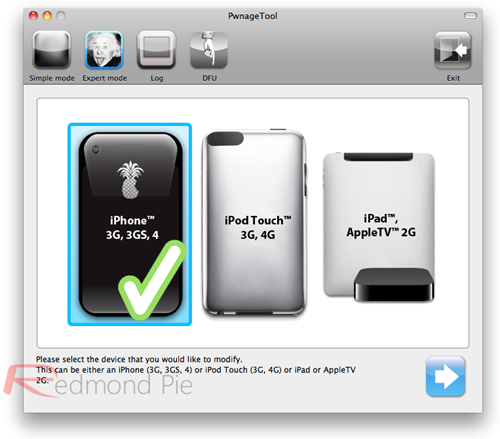
Step 5: Fire up PwnageTool in Expert mode and select your device as show in the screenshot below:
Step 6: Now you’re going to browse for the iOS 4.3.4 firmware for your device, direct it to the location where you downloaded the iOS 4.3.4 file.

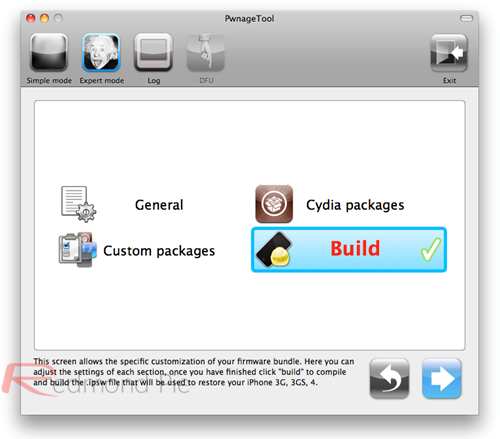
Step 7: Now click on Build.
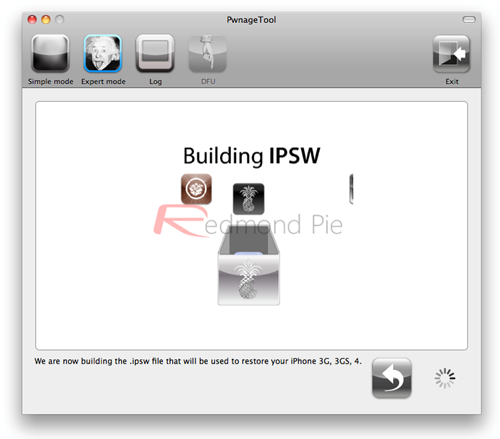
Step 8: PwnageTool will now create a jailbroken IPSW firmware file for your iOS device.
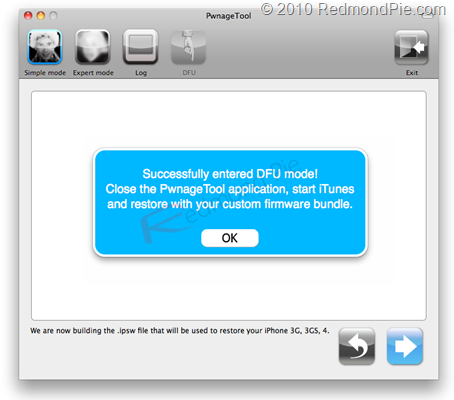
Step 9: Now you’re going to put your iOS device in DFU mode, follow the on screen steps on how to do so, they are as follows:
- Hold down the Power and Home buttons simultaneously for 10 seconds.
- Let go of the Power button but keep on holding the Home button for 10 seconds.
- If you followed the steps correctly, then you’re in DFU mode.
Restore Your Device to iOS 4.3.4 Using iTunes
Step 10: Start up iTunes on your Mac and select your device from the sidebar on the left. Hold down the “alt” key on your keyboard and click on “Restore”, do not press “Update” or “Check for Update”.
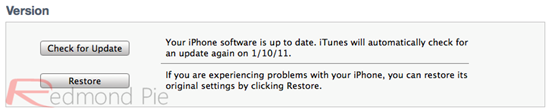
Now a pop up window will appear, simply guide it to the jailbroken custom iOS 4.3.4 file which was created by PwnageTool, then click Open.
Step 11: From this point onwards, iTunes will do its thing and restore your device to the jailbroken iOS 4.3.4 custom firmware file. Don’t do anything crazy at this point, just let iTunes complete its job. When everything is done, your device will boot up into a custom jailbroken version of iOS 4.3.4.
How to Boot Tethered?
Since this is not a tethered jailbreak therefore you have to boot into the jailbroken state every time your device loses power. Simply follow the steps given below on how to do so using “tetheredboot” utility.
Step 12: Download the tetheredboot utility from this link. Extract the zip file.
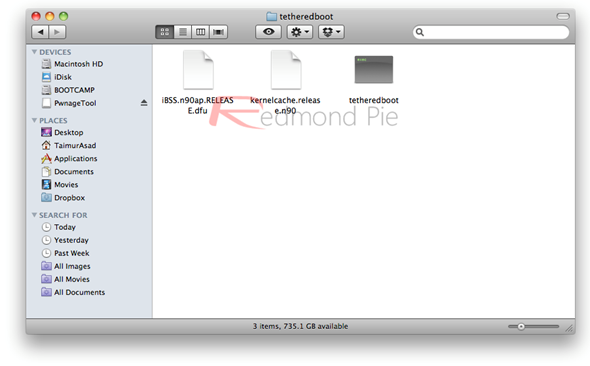
Step 13: Make a copy of the custom iOS 4.3.4 firmware file which you created, rename it to .zip instead of .ipsw. And extract the file. We need two files from the extracted zip file, kernelcache.release.n90 and iBSS.n90ap.RELEASE.dfu.
Copy both these files under the location /Firmware/dfu/ from the custom iOS 4.3.4 firmware file. Now move them to the directory where the tetheredboot utility is lying, refer to the screenshot below:
Step 14: Turn off your iPhone, start Terminal on your Mac and type in the following commands:
sudo –s
Enter your administrator password, whatever that might be, then type the following:
/Users/TaimurAsad/Desktop/tetheredboot/tetheredboot
/Users/TaimurAsad/Desktop/tetheredboot/iBSS.n90ap.RELEASE.dfu
/Users/TaimurAsad/Desktop/tetheredboot/kernelcache.release.n90
The commands might be a different on your Mac, replace “TaimurAsad” with the name of the user directory on your Mac accordingly.
Hit Enter key.
In case if the above doesn’t work, then try the following:
/Users/TaimurAsad/Desktop/tetheredboot/tetheredboot –i
/Users/TaimurAsad/Desktop/tetheredboot/iBSS.n90ap.RELEASE.dfu -k
/Users/TaimurAsad/Desktop/tetheredboot/kernelcache.release.n90
Quick tip: Drag and drop the tetheredboot file, the iBSS file and then the kernelcache.release file into Terminal.

You will now see some code running in Terminal and in a short while, it will ask you to put your device in DFU mode, you can do so by following the steps given below:
- Hold down the Power and Home buttons simultaneously for 10 seconds.
- Let go of the Power button but keep on holding the Home button for 10 seconds.
- If you followed the steps correctly, then you’re in DFU mode.
Wait for you device, and you should see “Exiting libpois0n” message on Terminal. In a short amount of time, your device will boot into the jailbroken tethered state, that’s it, you’re done.
Want to downgrade back to iOS 4.3.3? Check out our full guide here.
Have an iPod touch 4th-gen? Want to tether jailbreak it on iOS 4.3.4? Follow the complete step by step instructions posted here.
Have an iPad 1st-gen? Want to tether jailbreak it on iOS 4.3.4? Follow the complete step by step instructions posted here.
You can follow us on Twitter or join our Facebook fanpage to keep yourself updated on all the latest iPhone jailbreaking and unlocking releases.
