Microsoft created more than a bit of a stir last week with its BUILD Keynote conference in which it demonstrated some of the latest innovations and future products to be released over the coming year or so.

The main event was undoubtedly the introduction of Windows 8, the Redmond-based company’s latest installment in a series of operating systems which spans some 25 years. Microsoft went against the grain somewhat by releasing an early Alpha release, usually limited to developers, for the general public to mull over.
The response was rather impressive, with half a million downloads recorded in the first 24 hours alone. It looks even more impressive when taken into consideration that Apple’s Final, end-user release of OS X Lion shifted 1 million downloads in its first full day on the Mac App Store.
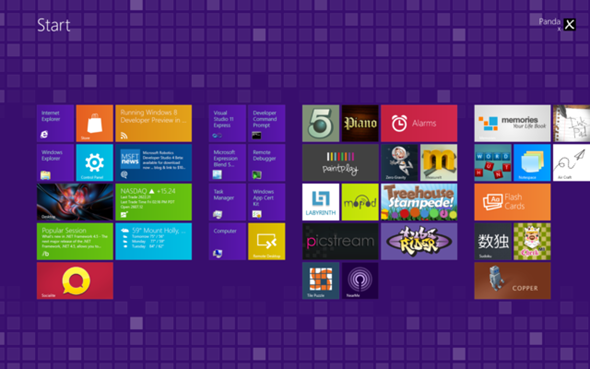
Windows has been severely overhauled, and the traditional format has been scrapped in favor of the new Metro design, which has, generally speaking, been a popular choice amongst those in and around the technology spectrum.
If you’re one of the many who decided to give Windows 8 a whirl, you may have been a touch disappointed to learn that changing the background isn’t quite as simple as a right-click. Here is a little tutorial to guide you through the process of customizing your Metro background, but please note, this only works with the 64-bit version of Windows 8 Developer Preview:
Step 1: First off, you will need a hex editor. If you have one, fantastic! If not, then you can use HxD, which can be downloaded here.
Step 2: Next we are going to need to open the command prompt. Navigate to your system32 folder (C:\Windows\System32\), and in the Ribbon click File -> Open Command Prompt -> Open Command Prompt as Administrator
Step 3: Type the following in the command prompt
takeown /f uxtheme.dll
icacls uxtheme.dll /grant Administrators:F
Step 4: Copy the file uxtheme.dll to your desktop
Step 5: Now use the hex editor you downloaded in Step 1 to open uxtheme.dll
Step 6: Navigate the hex location ‘Metro Customization – Hex Table.txt’. This can be achieved by hitting Ctrl+G if you are using HxD.
Step 7: Be sure to check that your hex editor is set to overwrite – this is very important in order for this tweak to actually work.
Step 8: This is the part where you actually get to customize the color of your background. Replace the colors as shown in ‘Metro Customization – Hex Table.txt’ with your own. The format is simply Red, Green, Blue, Alpha (RGBA). For a solid/opaque image leave the last byte as FF (e.g: FF0000FF would be solid red). Once you have established the color you want, hit Save.
Step 9: Finally, rename the original file in the System32 folder to uxtheme.dll.old, and copy your modified file into your System32 folder.
Once you’ve rebooted, you will notice the changes!

With the Redmond-based company bringing in a whole host of new features in Windows 8, we can be sure that it’s going to be more than just a pretty assortment of tiles. Microsoft seems to have really done its homework and improved and amended many of the common bugbears users can face on a daily basis. More detailed information on Windows 8 can be found here.
(via Neowin)
You can follow us on Twitter or join our Facebook fanpage to keep yourself updated on all the latest from Microsoft, Google and Apple.

