Here’s a guide on how to fix slow Internet problem after Windows 10 Anniversary Update that you maybe experiencing on your computer.
Have you updated your Windows 10 installation to Microsoft’s recently-released Anniversary Update? Are you actively enjoying all of the benefits and improvements that it brings, but have noticed that your Internet connection speeds have dropped drastically since the update?

With the introduction of Windows Vista, Microsoft brought a new feature called Auto-Tuning, which is essentially an on-by-default way of improving performance of TCP connections on a computer. This feature is still present in the latest version of Windows 10 and it does of course come with benefits by design, but can also be sometimes the inadvertent cause of slow Internet connections.
Here in this guide, we will show you how to go about turning this feature off and see if it helps in fixing the problem on your Windows 10 computer for good. Ready? Here we go.
Check if Windows Auto-Tuning is active:
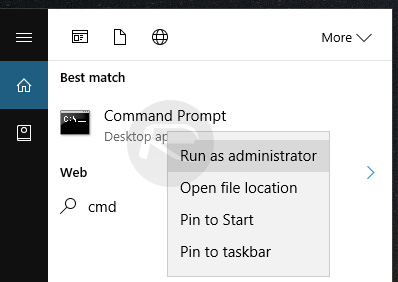
Step 1: First and foremost, we’re going to need to get into the command line (Command Prompt) interface to run some commands. Tap on the Windows flag/logo key and type cmd.exe.
Step 2: Right-click on it and then click Run as administrator. We’re attempting to run this with administrator privileges, so make sure that you accept the prompt that is shown to confirm the action.
Step 3: In Command Prompt, type the following command: netsh interface tcp show global.
Step 4: Command Prompt will show a list of information about the computer. Under the TCP Global Parameters header, locate the line that is titled “Receive Window Auto-Tuning Level“.
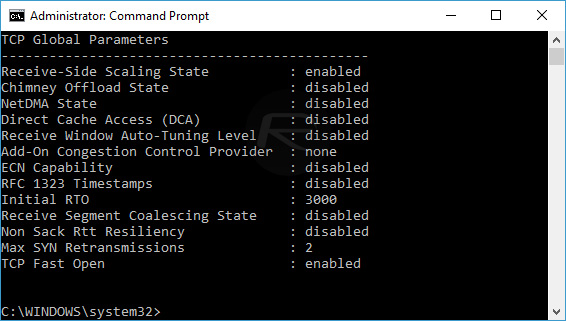
Step 5: If the corresponding value is set to anything but “disabled“, then it means that the installed version of Windows is using Auto-Tuning to monitor and optimize TCP connections. This could potentially be the cause of a slow Internet connection.
Disable Windows Auto-Tuning if active:
Step 1: Still in Command Prompt, run the following command to disable Windows Auto-Tuning: netsh int tcp set global autotuninglevel=disabled.
Step 2: Command Prompt should update with a very simple “ok” message underneath the command. This confirms that the request was processed correctly.
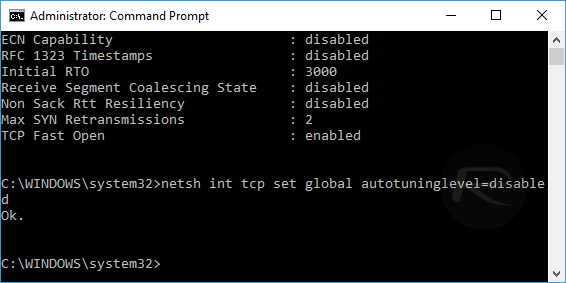
Step 3: You can now run the netsh interface tcp show global command again to check that the “Receive Window Auto-Tuning Level” is now set to disabled as per the above request.
Now that the feature is actually disabled, reboot your computer and then run some speed tests on the Internet connection to see if that was indeed the cause, and whether or not the received speeds have improved since it was disabled. Of course, there is no guarantee, and if you actually want to enable the feature again, you can use the following command: netsh int tcp set global autotuninglevel=enabled.
Of course, just because this feature exists, it doesn’t automatically mean that it’s the cause, or sole cause, of the problem. You may nor may not remember, but previously we informed our readership that Windows 10 actually uses Internet bandwidth in the background in order to push updates out to other users. An innovative and very handy little feature, but also a resource hog for those that don’t actually know what it’s doing. If you want to go that extra mile and turn that feature off, you can follow our guide here: How To Turn Off Windows 10 Update Delivery Optimization Feature. Turning this off should also help in increasing Internet speed.
You may also like to check out:
- Windows 10 Product Key And Activation: How To Find It And How It Works
- Download Windows 10 Pro ISO File Without Product Key From Microsoft
- Force Upgrade Windows 10 Anniversary Update, Here’s How
- Fix Windows 10 Anniversary Update Freeze Problem, Here’s How
- Pokemon Go Trick: Get Unlimited Incense & Lucky Eggs, Here’s How
You can follow us on Twitter, add us to your circle on Google+ or like our Facebook page to keep yourself updated on all the latest from Microsoft, Google, Apple and the Web.
