If you’ve ever wanted additional security for your existing Apple ID account, then you’ve probably come across something called “Two-Step Verification” as well as “Two-Factor Authentication” for Apple IDs. They both sound very similar, and both really exist in their own right to offer protection to an account, but it can leave some people in a state of confusion.
What’s the difference between the two? If one is active, can I enable the other? How do I actually get up and running with Apple’s Two-Factor Authentication? All valid questions, and of course, we’re going to answer them.
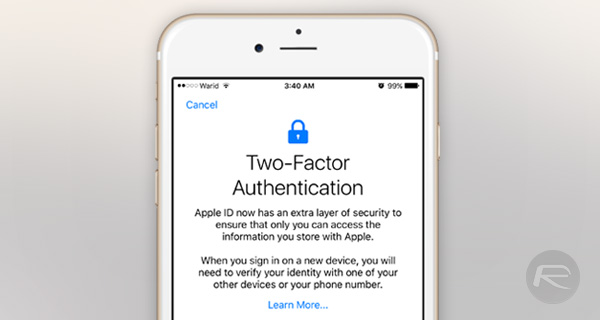
The real difference between Apple’s Two-Step Verification and Two-Factor Authentication is that the former was introduced in 2013 as an extra layer of security, and to add peace of mind to an Apple account, whereas the latter is a relatively new addition since 2015 that requires an iOS device running iOS 9 or above or a Mac running El Capitan or higher. Additionally, Apple’s Two-Factor Authentication also goes one step further in providing account security by adding an extra step into the process before a verification code is presented on the trusted iOS or Mac device, making it even more secure than Two-Step Verification process.
With Two-Factor Authentication, a dialog box is also presented that shows the approximate location of the sign-on attempt with a map. That sign-in then must be explicitly allowed by the individual with the trusted device before the verification code is displayed in the next dialog box. If the owner of the trusted device simply doesn’t recognize the location or the attempt, then it can be instantly denied, therefore blocking any access to that account.
How to Opt-out of Two-Step Verification
(If you don’t have Two-Step Verification enabled for Apple ID, simply skip to next section)
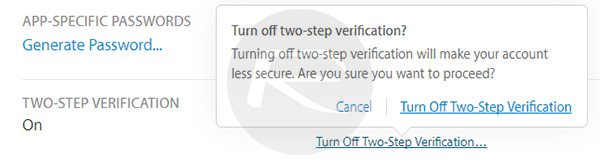
If the Apple ID or iCloud account in question already has Two-Step Verification in place, then it will first need to be disabled before Two-Factor Authentication can be enabled. You can opt-out of Apple’s existing Two-Step Verification by walking through the following steps:
Step 1: First and foremost, you’ll need to sign in to your existing Apple ID over at the account page on appleid.apple.com to be able to manage the account.
Step 2: In the “Security” section of the account website, click on Edit.

Step 3: Now click on the Turn Off Two-Step Verification option in the Security section. When prompted, create a set of new security questions and verify the date of birth linked to the account.
Step 4: Apple will issue an automatically generated email that confirms the changes made. If you receive one of these without actually going through the process above, then it is, of course, extremely important to contact Apple directly to resolve any potential unauthorized access to the Apple ID in question.
How to Enable Two-Factor Authentication
With Two-Step Verification now disabled, you can now enable Two-Factor Authentication on your Apple account. Two-Factor Authentication has been implemented by Apple as an extra layer of security for user accounts. It’s there by design to ensure that only a single account owner can access an Apple account, even if a secondary person knows the password of that account. Here’s how to enable it.
On an iPhone, iPad or iPod touch running iOS 9 or later:
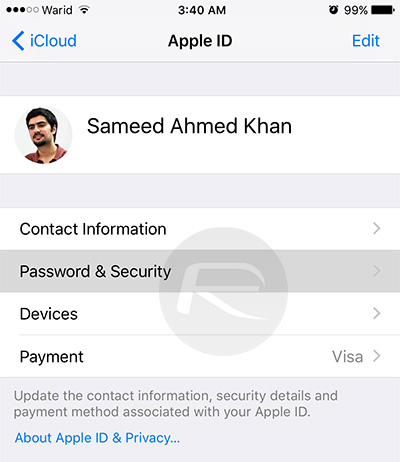
Step 1: Launch the stock Settings application. Tap the iCloud option and then tap on the Apple ID shown. Enter your iCloud password if prompted.
Step 2: Tap Password & Security.
Step 3: Tap the Setup Two-Factor Authentication option and follow the on-screen prompts to complete the process.

Now if you want to enable Two-Factor Authentication on your Apple ID using your Mac instead of an iOS device, here’s what you need to do (of course, if you already have Two-Factor Authentication enabled on your Apple ID using an iOS device, you don’t have to do it again using a Mac or any other device):
On a Mac running OS X El Capitan or later:
Step 1: Click on the Apple logo on the menu bar and launch System Preferences. You can, of course, just search using Spotlight for System Preferences to launch.
Step 2: Click on iCloud from the list of options, then choose Account Details.
Step 3: Select Security and then enter iCloud password when promoted.
Step 4: Now click on Setup Two-Factor Authentication and follow the on-screen prompts to complete the process.
You may also like to check out:
- How To Enable Two-Step Verification For Apple ID / iTunes / iCloud
- Download iOS 10 Beta 2 & Install On iPhone 6s, 6, Plus, SE, 5s, 5c, 5, iPad, iPod [Tutorial]
You can follow us on Twitter, add us to your circle on Google+ or like our Facebook page to keep yourself updated on all the latest from Microsoft, Google, Apple and the Web.
