Here’s a guide on how to install iOS 10.3 on your compatible iPhone, iPad or iPod touch device the right way.
Apple may have flicked the switch on the public availability of iOS 10.3, but that doesn’t automatically mean that device owners should instantly jump into an over-the-air update just because they can. iOS 10.3 comes with a decent sample of new outward-facing functionality, but it also offers up an entirely new internal file system (APFS), also known as Apple File System. which users need to take into consideration.

The inclusion of APFS definitely shouldn’t stop users from adopting iOS 10.3 as it happens all in the background automatically with no interaction required on the user end, but extra care should be taken to ensure that devices are backed up prior to the update. For those that are interested in the iOS 10.3 update, we’re going to show you the right way to go about the install in this step by step guide.
Backing up Device Prior to Install
This is an important aspect of any firmware installation, especially when there could be errors anticipated, but also a step which often gets overlooked or forgotten about until it is too late. However, with this move from HFS+ to APFS, it’s important to once again push the importance of either iTunes or iCloud backups for devices. Depending on your preferred method of backup, we’ll walk you through that:
Backing up your device with iTunes
Step 1: Simply connect your iOS device to the Mac or PC, and proceed to launch iTunes if it doesn’t automatically launch on detection of the connected device.
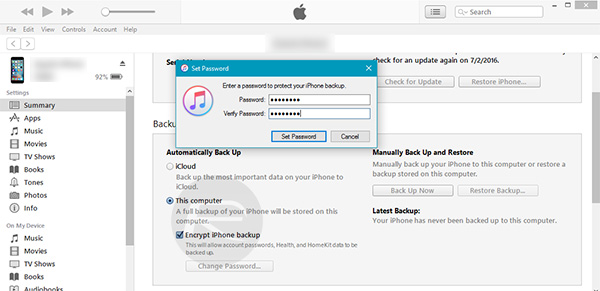
Step 2: Make sure you’re looking at the connected device’s Summary and proceed to select This Computer from under the “Backups” section. If you wish to secure your backup, which we do recommend doing, enable Encrypt iPhone backup proceeding to hit the Back Up Now button to begin backing up your iOS device’s date on the computer.
Backing up your device with iCloud
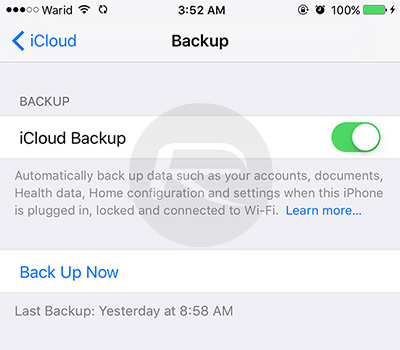
Step 1: Make sure you’re connected to WiFi and have more than 50% of battery charge, and then proceed launching the Settings app and heading over to iCloud > Backup.
Step 2: Make sure that the iCloud Backup option is switched to the On position, and then hit the Back Up Now button to begin backing up your iPhone or iPad data to iCloud.
Installing iOS 10.3 with iTunes
If you prefer to stick to the tried and tested traditional methods of installing firmware, then you may find yourself wanting to use iTunes for this iOS 10.3 installation. If so, you can follow the steps below.
Step 1: This may not seem important on first glance, but you will need to seriously consider performing a backup as highlighted above, as well as checking that the iTunes installation is the latest version. With iTunes open, click on the iTunes option in the menu bar and then select Check for updates. If there is an update available, then install it as per the instructions.
Step 2: Now, with the latest version of iTunes running on your Mac or PC, plug the device in via USB to the computer. iTunes should automatically connect to the device and recognize its existence. Now, in the main menu bar on the top-right side, click the device indicator to access the device itself and see the available options.
Step 3: When the iOS 10.3 update is available, iTunes will produce a popup letting you know that it is there. If you don’t automatically see that popup, simply hit the Check for Update button and you will be informed about the update.
Step 4: Once found, click the Download and Update button to start the process.
Installing iOS 10.3 Over the Air
If you don’t like using iTunes, or have struggled in the past with the software, then an over-the-update of iOS 10.3 is definitely the easiest way to get your hands on the latest version of Apple’s mobile OS.
Step 1: First of all, in the interests of safety and precaution, make sure you have performed a backup of your device using one of the methods outlined above. This is definitely for your own safety and peace of mind. With that done, ensure that the device is connected to a power source. This isn’t a necessary step, but it’s good housekeeping to ensure that the battery doesn’t drain and die during the update. Also, make sure the device is connected to Wi-Fi.
Step 2: On the device itself, launch the Settings app, then navigate immediately to General > Software Update. The iOS 10.3 update may already be showing, or it could take some time for the device to connect to Apple’s servers and validate that an update is available for that device.
Step 3: With the update showing, follow the prompts on screen to download and then ultimately install the firmware. If this hasn’t previously been downloaded to the device, then it will connect to Apple’s servers and grab the necessary components for install. This could take a while so prepare some patience.
Step 4: With the update downloaded, tap the Install Now button. Feel free to set the install away and then leave the device plugged in to go about its business.
You may also like to check out:
- iOS 10.3 Release Notes / Changelog [All New Changes In One Place]
- How To Downgrade iOS 10.3 On iPhone Or iPad
- Download iOS 10.3 Final IPSW Links For iPhone And iPad
- Jailbreak iOS 10.3 / 10.2.1 For iPhone And iPad [Latest Status Update]
- Download iOS 10, 10.3, 10.2.1 Links & Install On iPhone 7, 6s, 6, Plus, SE, 5s, 5c, 5, iPad, iPod [Tutorial]
You can follow us on Twitter, add us to your circle on Google+ or like our Facebook page to keep yourself updated on all the latest from Microsoft, Google, Apple and the Web.
