Here’s how you can downgrade from iOS 12.1.1 to iOS 12.1 on our iPhone, iPad, iPod touch the right way. With iOS 12.1.1 now out in the public domain and iOS 12.1 still being signed by Apple, it’s possible to safely downgrade with minimal fuss.
True to expectations, Apple has released iOS 12.1.1 out into the public domain, which inevitably means that a growing number of devices around the world will be, or will already have, taken the opportunity to move to the latest firmware in order to access the latest improvements.
For one reason or another, that firmware may not be working out leaving device owners in a position whereby the want to downgrade to iOS 12.1, which is the earliest firmware still being signed by Apple.
If you want to downgrade and meet the following requirements, then you will be good to go:
- A computer – either a PC or Mac – which has the latest version of iTunes installed
- Have the correct iOS 12.1 firmware file (IPSW) for your device type saved locally on your machine.
- Patience and understanding that you can’t go back any further than iOS 12.1 because Apple isn’t signing any firmware prior to 12.1.
With all of the above in mind, let’s take a look at the downgrade process:
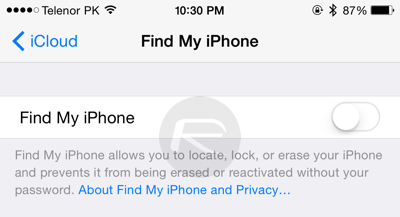
Step 1: Head into the device and launch Settings. Navigate to iCloud > Find My iPhone and make sure that the feature is toggled into the OFF position. This will need your passcode to confirm.
Step 2: Launch iTunes on your PC or Mac and connect the iPhone or iPad via USB cable. Make sure the device is then put into DFU Mode using the guides for your device listed below:
- iPhone 8 / 8 Plus, or iPhone X / XR / XS / XS Max owners: DFU Mode On iPhone X / 8: Here’s How To Enter It
- iPhone 7 or iPhone 7 Plus owners: Enter DFU Mode On iPhone 7 Or iPhone 7 Plus, Here’s How
- If you have an older device, then follow the instructions here.
With your device now in DFU Mode, carry on the process below.
Step 3: Select the device in iTunes and hold down the Option (Mac) key or SHIFT (Windows) key and select the Restore iPhone/iPad button. This will create a new dialogue box that will ask you to select your firmware file of choice. You should have already downloaded the relevant iOS 12.1 file for your device and have it stored locally. Point iTunes at that local file.
Step 4: Once selected, iTunes will then go to work and restore the device using the firmware file that has been provided. This may take a prolonged period of time so please wait patiently for the process to complete. Once the process has finished you will be left with a freshly restored device running iOS 12.1.
You may also like to check out:
- Download iOS 12.1.1 Final IPSW Links And OTA Update For iPhone And iPad
- Jailbreak iOS 12.1 / iOS 12 Update: Sandbox Escape Released To Public
- Jailbreak iOS 12.1.1 / 12.0.1 / 12 On iPhone And iPad [Status Update]
You can follow us on Twitter, add us to your circle on Google+ or like our Facebook page to keep yourself updated on all the latest from Microsoft, Google, Apple, and the Web.
