App Store updates and downloads are an extremely important part of the iOS device experience. Apple’s App Store clearly has its faults – a lot of which lie in the discovery of apps and behind the scenes algos that determine visibility – but on the whole, it’s generally a pleasurable experience that is interacted with by millions of people on a daily basis. The unfortunate thing is that a lot of the users regularly experience very slow download of apps and updates when accessing the App Store on an iPhone, iPad or iPod touch over a WiFi network.
There’s no “one size fits all” solution here, but we’re going to a take a look at some of the good housekeeping tasks and tips you can perform to speed up that download. So let’s get started.
Reboot Your Router
This one is really a no-brainer, but often one that people simply don’t think of doing. Whenever issues are encountered relating to an Internet connection or speed of downloads, then it’s prudent in the first instance to reboot the router/model that you have serving up that connection. Reboot through the routers settings, or by turning the power switch off and back again.
Hard Reboot Your iPhone Or iPad
![]()
The issue could lie with the iOS device that you’re actually using to download apps with from the App Store. That hardware is essentially the middle man between the Internet connection and the App Store itself, facilitating the whole process. Follow our simple guide below on how to reboot the iOS device properly:
Forget WiFi Network & Reconnect
Once again, this is done on the iOS device side. In the individual settings for each connected WiFi network it’s possible to “Forget This Network”. That’s essentially Apple’s way of forcing all settings pertaining to the network to be removed from the device. Head on over to Settings > Wi-Fi, and tap the little information button (“i”) to the right of the connected network. Simply tap Forget This Network to remove it from the device’s memory.
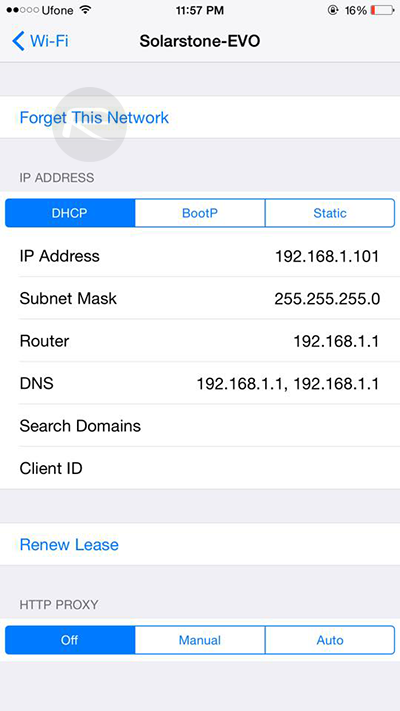
Now, connect to the network as you would connect to any new network, and things should hopefully be back to normal.
Reset Network Settings
Things are getting a little more serious now. Resetting the network settings on the iOS device essentially means that you are setting anything network related that has been customized back to manufacturer default. This won’t delete any personal data on the device, but you need to be aware you’re going to lose all that you’ve configured from a network settings perspective. To do this, launch the Settings app and navigate to General > Reset > Reset Network Settings.

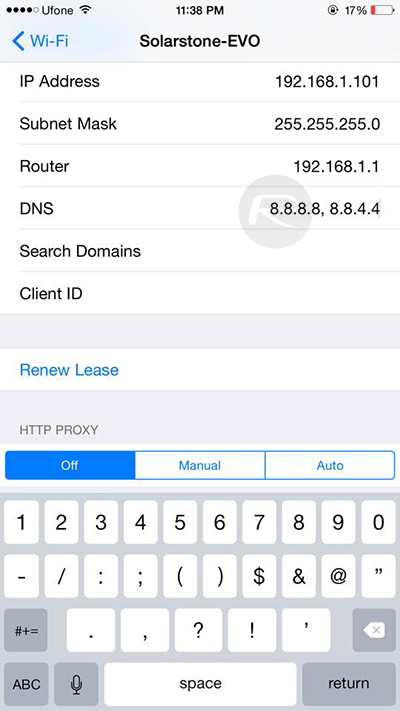
Use Google Or Open DNS Servers
Often enough, a bad DNS server would really botch down your entire Internet experience, but luckily your ISP’s DNS server can be dumped and you can switch to the faster Google’s or an Open DNS. Simply, head over to the details of your Wi-Fi connection (Settings > Wi-Fi > tap on “i” on the right side of the WiFi network name) on your iPhone or iPad and under “IP ADDRESS” files next to DNS label, enter any one the following addresses:
Google DNS: 8.8.8.8, 8.8.4.4
OpenDNS: 208.67.222.123, 208.67.220.123
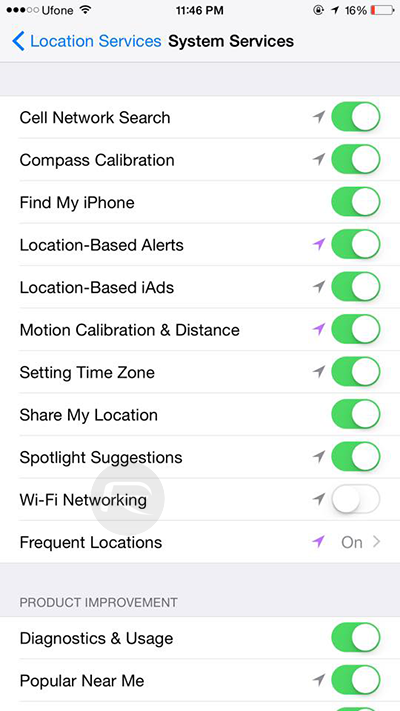
Disable Location Services For Wi-Fi Networking
iOS, along with a number of first and third-party apps, uses the location of a device to perform some pretty neat tasks. Some apps are actually just location specific, and therefore access to the device’s GPS location is actually required, but some aren’t. For one reason or the other, disabling Location Services for Wi-Fi Networking can help fix this issue. To disable Location Services for Wi-Fi Networking within iOS head on over to Settings > Privacy > Location Services > System Services and then turn off Wi-Fi Networking.
You may also like to check out:
- Tips To Fix iOS 9 Battery Life Issues On iPhone And iPad
- iOS 9.2.1 / 9.2 / 9.1 Jailbreak Status Update
You can follow us on Twitter, add us to your circle on Google+ or like our Facebook page to keep yourself updated on all the latest from Microsoft, Google, Apple and the Web.
