Here’s a step-by-step guide on how to sideload and install Provenance emulator on iOS 10. No jailbreak is required for this to work on iPhone, iPad and iPod touch devices.
Why would you go through the hassle of installing gaming emulation tools for different platforms individually when you can get them all in one single app? Step forward the ultimate Provenance emulator for iOS to ensure that multiple legacy gaming platforms can be emulated with ease on Apple’s iPhone and iPad devices using one single app. Best of all, it supports Apple’s MFi (Made for iPhone) compatible game controllers as well.
The installation of Provenance will give you emulation of the SEGA Genesis/Mega Drive, as well as the SEGA Master System, Game Gear and Mega-CD. In addition to support for SEGA platforms, Provenance supports Nintendo legacy platforms too like the NES, SNES, as well as handhelds like Game Boy, Game Boy Color, Game Boy Advance, and more.
So if you are an avid classic gaming fan, looking to unleash some retro and classic titles right on your iPhone or iPad without having to dig into the world of jailbreaking, you’ll be happy to know that Provenance can be easily installed on your iOS device without jailbreak. And yes, we have tested and can confirm that it works on all versions of iOS 10 released so far, including iOS 10.1.1 and iOS 10.2. Simply follow the steps below to get it working.
Requirements:
- First of all, you’ll need to have a Mac running the latest version of macOS. We understand that some people don’t have a Mac, or have no interest in purchasing the hardware, so for you guys, you can try and install a hackintosh on your PC: How To Install macOS Sierra Hackintosh On PC [Guide].
- Apple’s Xcode installed. We have tested and can confirm that this works on Xcode 8.1. Xcode can be downloaded for free from the Mac App Store.
- An iPhone or iPad running iOS 10.
- An active Apple Developer account. Access to full developer account will ensure that the the app is signed, and keeps functioning for 12 months. You can register for full version of developer account at developer.apple.com. However, you can use a free Apple ID account as well, but this will require you to re-sideload the app to your iOS device every 7 days. You can register free Apple ID at appleid.apple.com.
Instructions:
Step 1: On your Mac, launch the Terminal app.
Step 2: Type the following command in Terminal and press enter.
cd ~/Desktop
Step 3: Next, type this command in Terminal and then wait for it to download Provenance project files onto your desktop.
git clone https://github.com/jasarien/Provenance.git
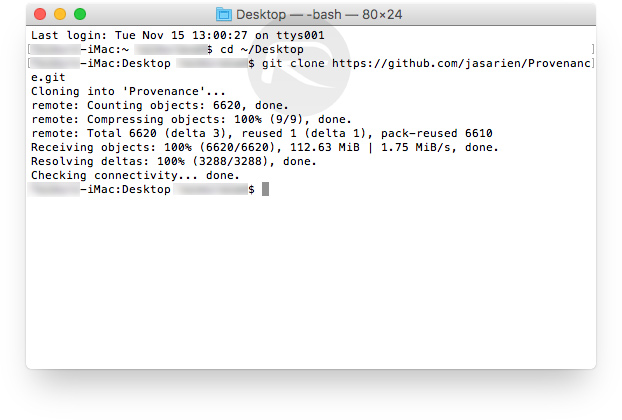
Step 4: Once Terminal screen shows the message “Checking connectivity… done.” (as also shown in the screenshot above), you’ll have a new folder on your desktop named “Provenance”. You can now close the Terminal window.
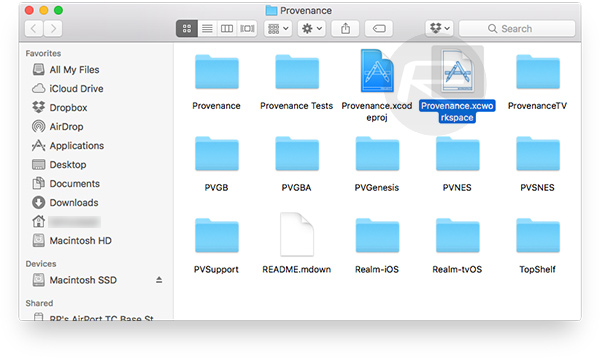
Step 5: Open Provenance folder on the desktop. Right-click on the Provenance.xcworkspace file and open it in Xcode.
Step 6: Now as shown in screenshot below, select Provenance from left most panel of Xcode, then select Provenance under TARGETS in second panel on the left. Make sure Display Name field is left blank. Set a custom Bundle Identifier name to anything you like just like how we have set com.redmond.Provenance in this example. Under dropdown for Team, sign in using your Apple Developer account ID (full or free) and then select it here. Keep Deployment Target to 8.0 even if you are running the latest version of iOS 10.
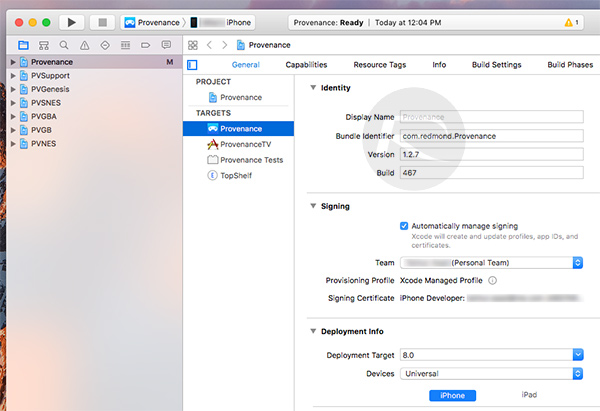
Step 7: Once everything looks exactly as shown in the Xcode screenshot above, you are pretty much set. Connect your iOS device to your computer. Select your device in Xcode (through buttons right next to “Play/Stop” buttons on top left of Xcode) and then click on run button denoted by the “Play” button to build the project.
Step 8: This will result in Xcode compiling the source code and then deploying it on the physical device itself. Once you see the following message in Xcode, you’ll know your deployment has been successful.

Step 9: Congratulations! You should now see Provenance app sitting on your iOS device’s Home screen, but all is not done just yet. If you try to launch the app, you will get an error prompt that the app comes from an untrusted source.
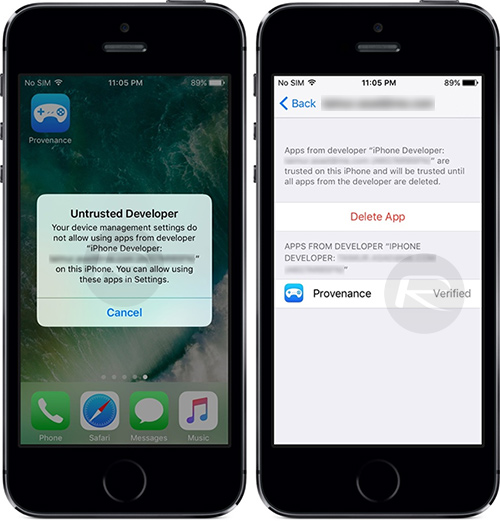
Step 10: To fix this error, simply launch the Settings.app and navigate to General > Profile(s) > [name of the developer], followed by tapping Trust and then Trust once again. On some iOS versions, this would be General > Profile(s) & Device Management or General > Device Management. Once the certificate is trusted, you should be able to run the app!
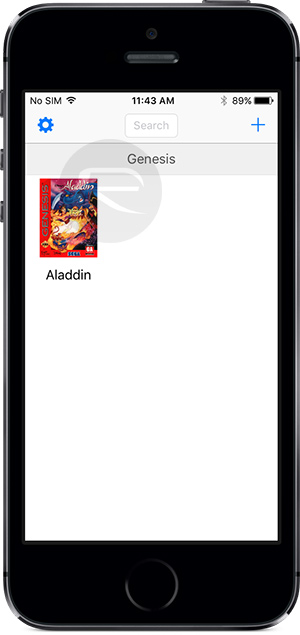
Step 11: Now to install games, like we have here installed Aladdin for SEGA Mega Drive/Genesis, simply head to your favorite rom site and download the rom for your desired game in .zip file. In Provenance, tap on the “+” button on top right to start a mini server on the device. Enter the IP address shown in Provenance on a desktop computer’s browser and upload the downloaded .zip rom file into roms folder. Thats’s it! You should now see the game installed on your iOS device.

Enjoy!
Have a question? Drop us a comment below!
You may also like to check out:
- How To Download iNDS Emulator On iOS 10 [No Jailbreak Required]
- Get NDS4iOS Nintendo Emulator On iOS 10 [No Jailbreak Required]
- Download GBA4iOS 2.1 For iOS 10 [No Jailbreak Required]
- Jailbreak iOS 10 / 10.1.1 / 10.0.2 / 10.2 For iPhone, iPad, iPod touch [Latest Status Update]
- Download iOS 10, 10.1.1, 10.2, 10.0.2 Links & Install On iPhone 7, 6s, 6, Plus, SE, 5s, 5c, 5, iPad, iPod [Tutorial]
You can follow us on Twitter, add us to your circle on Google+ or like our Facebook page to keep yourself updated on all the latest from Microsoft, Google, Apple and the Web.
