


Remember the Administrator account that was present in good old Windows XP days? The master Administrator account is not visible by default in Windows 7 or Vista.
However there is a simple way to enable it..
This account has complete access and permissions on the computer. It may be useful when you are in need of some serious troubleshooting.
The simple steps to enable and disable the master Administrator account in Windows 7 are as follows:
Enable the Administrator account:
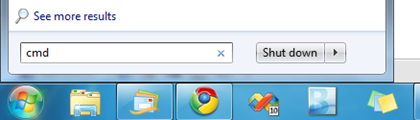
Step 1: Open the command prompt in administrator mode
- Type ‘cmd’ in the start menu search box:
- Right click on the Program ‘cmd’
- Select “Run as administrator”:
- Type in the command ‘net user administrator /active:yes’
And you are done ! 😀
Logoff and login again and you will now see an option for Administrator login!
Note: It is advisable to create a strong password for this account.
Disable the Administrator account:
- Login with your current user account.
- Open the command prompt in the administrator mode as in Step 1.
- Type in the command ‘net user administrator /active:no’
And you are done!