Mobile devices are not always safe from an outside attack, which can lead to your personal data being compromised. To say the least, non of the mobile software we’ve encountered so far is fully intruder-proof, and today, we’ve outlined a simple – but yet detailed guide – on how to make your iPhone more secure by putting in place certain security measures.
Once these measures are in place, you can rest assured that your iPhone is safe and secure, and even if you lose your cherished device, you’ll be in positive spirit that your data isn’t lost for good, and definitely isn’t in wrong hands.

1. Add a Passcode

This is perhaps the most important thing to do on an iPhone. The moment you get it out of the box and set it up, iOS asks you to put a passcode in place. Even if you skipped that rigmarole in the first place, you can still put it in place by going to Settings > Touch ID & Passcode then tap on Turn Passcode On.
It’s recommended that you choose a slightly complicated passcode rather than going with your year of birth, which is something that is really easy to guess. Also, don’t go with a numeric passcode, go with a text based one.
2. Enable Touch ID

If you have an iPhone 5s, and you’re not utilizing Touch ID, then you’re making a big mistake. Navigate to Settings > Touch ID & Passcode, and from there you can setup up to five fingers that can be used to unlock your device using the Touch ID fingerprint sensor that sits snuggly under the device’s Home button.
It’s recommended that you use at least four fingers for authentication, 2 from each hand, to make things more secure.
3. Enable Two-Step Verification On Your iCloud / Apple ID
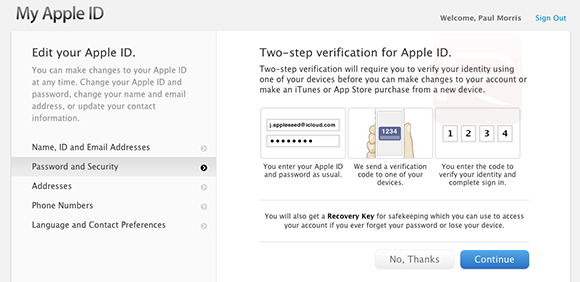
We use our iCloud / Apple ID not just on our iOS devices, but even on a PC or a Mac, if you’re planning to purchase music, apps, movies, TV shows etc. And since that very same Apple ID is scattered across different places, therefore it’s strongly recommended that you enable two-step verification for it, which will take security to the next level.
Simply follow our guide on: How To Enable Two-Step Verification For Apple ID / iTunes / iCloud to get things up and running.
4. Enable iCloud Backup

Backing up your device from time to time is always a good idea, which can be achieved in a number of ways. Either you can make a backup locally on your PC or Mac using iTunes, or you can simply enable iCloud Backup on your iPhone by navigating to Settings > iCloud then scrolling all the way down to Storage & Backup and turn iCloud Backup to On.
5. Enable Find My iPhone in iCloud Settings

An iPhone is a relatively small smartphone compared to other flagships out there in the market, and losing it can be as bad as losing your car keys, leaving you stranded and completely helpless at times. But don’t fret, even if you have lost your device, chances are that you can still find it, and if it’s not in your reach, erase it, and lock your device for good, until or unless you manage to grab hold of it by magic.
Simply navigate to Settings > iCloud and turn Find my iPhone on, and you’ll be able to locate, erase or ring your device from the convenience of the Find my iPhone app installed on another device or using iCloud.com.
6. Encrypt Your Data

Encrypting your data is fairly important, provided you have tons of personal info on your iPhone like credit card details, important phone numbers, photos etc. If you’ve already placed a passcode on your iPhone – as we’ve mentioned above – then you’re good to go. Navigate to Settings > Touch ID & Passcode, and then scroll all the way down to confirm if your data is protected, as outlined in the screenshot above.
7. Enable Automatic Data Wipe After 10 Failed Passcode Attempts
For an added security measure, flick the Erase Data switch to On in Settings > Touch ID & Passcode, which will automatically erase your iPhone’s data on 10 failed passcode attempts.
You can follow us on Twitter, add us to your circle on Google+ or like our Facebook page to keep yourself updated on all the latest from Microsoft, Google, Apple and the web.
