Is Maverick TV Kodi addon not working for you in 2017? Here’s how to install it the right way and get it to work.
Now that the final version of Kodi 17.6 has been released, which incidentally sees the Kodi Krypton series brought to an end, it’s only fitting that we celebrate with the installation of a wonderful add-on to compliment that Kodi experience.

As the name suggests, Maverick TV is a fairly decent resource through Kodi for TV shows, movies, and the streaming of sports and documentaries. Basically, if you like to consume visual media in any form, then this is an add-on that you will want to investigate. Let’s dive right in and take a look at the installation process for the add-on.
Enable Unknown Sources
Step 1: First of all, make sure the Kodi installation is up and running on the device. Select the ‘Settings’ icon from the main home screen before choosing System settings and then Add-ons. This is going to take us into the section pertaining to how add-ons function.
Step 2: Inside of the Add-ons setting, find the Unknown sources option and make sure that the toggle switch to the side of it is toggled into the On position.
Install Maverick Kodi Add-on
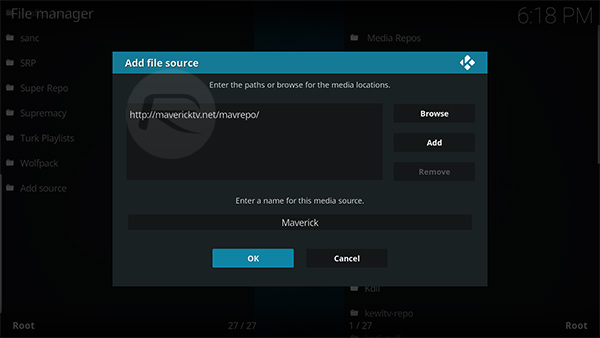
Step 1: Get yourself onto the Kodi home screen and select the ‘Settings’ icon and then File manager. Once that has loaded, select the Add source option to get into the interface where we can add additional sources.
Step 2: Click on the text field which has the <None> placeholder text already in it. Enter the following URL exactly as it appears here: mavericktv.net/mavrepo/
Select OK and then click into the text field to add a name for the source. We are going to call this Maverick for the sake of this guide.
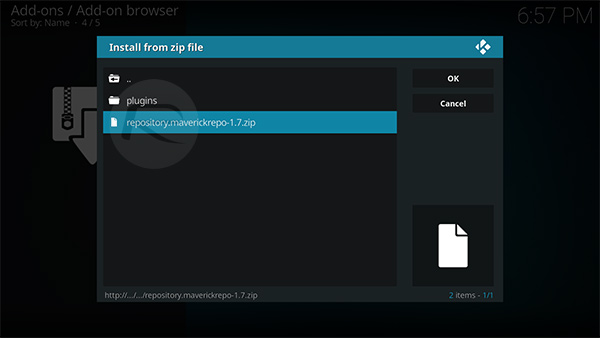
Step 3: Once the source has been added, head back to the main home screen, select Add-ons, and then the package browser icon which looks like an open box. Here, select the Install from zip file option.
Step 4: Navigate to the new Maverick source that was created above and select the repository.macerickrepo-1.7.zip. Select this and wait for it to complete. This is going to install the necessary repository for the add-on.
Step 5: Now, go a step back, and select the Install from repository option. Select the MaverickTV Repo and then Video add-ons.
Step 6: Locate the Maverick TV add-on and select it to view additional information. Once happy, click on the Install button to get it installed. Kodi will provide you with a notification when it’s installed.
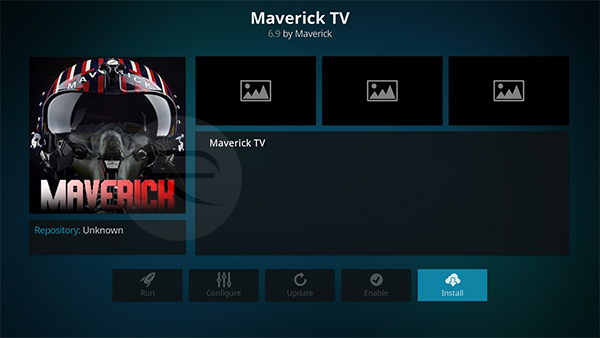
That’s it! Once installed, you can launch the Maverick add-on from the Add-ons section.
You may also like to check out:
- Kodi 17.6 APK, IPA Download Of Krypton Final Version Released, Here’s What Is New
- Fix Kodi 17.5 Krypton Buffering Issue, Here’s How [2017 Edition]
- Download: iOS 11.2 Beta 3 IPSW Links / OTA Update Is Out
- Download iOS 11.1.1 IPSW Links And OTA Featuring Bug Fixes For iPhone And iPad
- Downgrade iOS 11 / 11.1.1 On iPhone Or iPad [How-To Guide]
- Download iOS 11, 11.1.1, 11.1 Links & Install On iPhone X, 8, 7 Plus, 6s, 6, SE, iPad, iPod [Tutorial]
- Jailbreak iOS 11 / 11.1.1 / 11.1 On iPhone And iPad [Status Update]
You can follow us on Twitter, add us to your circle on Google+ or like our Facebook page to keep yourself updated on all the latest from Microsoft, Google, Apple and the Web.
