Is Kodi Fire TV Guru build not working for you? Here’s how you can download and install it the right way.
Some experienced Kodi users actually prefer to use customized Kodi builds to configure their Kodi media player experience.

For those that may not know, this is basically a customized build of Kodi which has already been pre-configured to look and behave a certain way, and which generally comes with a pre-installed set of add-ons and experiences. Let’s jump right in and start with Fire TV Guru build installing process.
Enable Unknown sources
Step 1: Select the ‘Settings’ icon from main Kodi menu and then choose System settings. Head into Add-ons.
Step 2: Inside of Add-ons, locate the Unknown sources option and make sure that the toggle to the right-hand side of it is toggled into the On position. You are now free to install unofficial sources to your Kodi installation.
Install Fire TV Guru Build
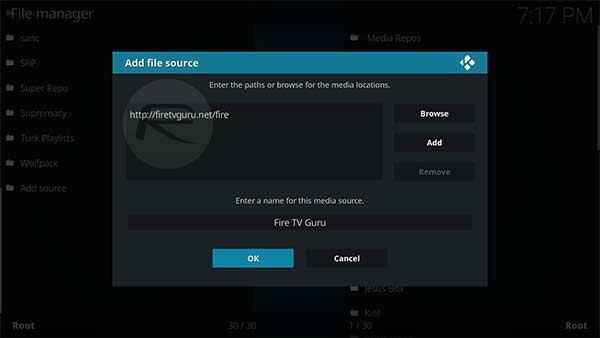
Step 1: From the main Kodi home screen, select the Settings gear icon and then choose File manager. Select the Add source option.
Step 2: You will then be presented with a box that lets you put new source information in. Click into the text field which has the <None> placeholder already in it and input the following URL exactly as it appears here: http://firetvguru.net/fire.
Select OK and then name the source Fire TV Guru. Select OK again to exit.
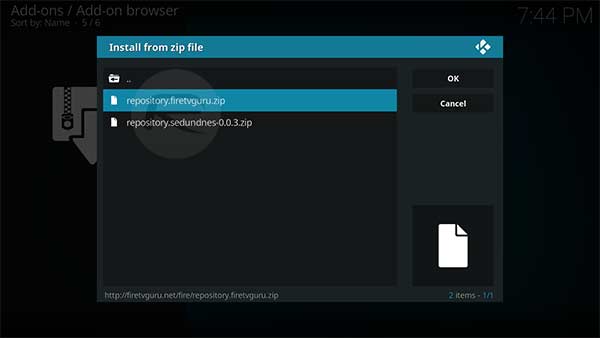
Step 3: Head back to the Kodi home page and select the Add-ons option. You now need to select the Add-ons browser which basically looks like an open box icon. Select the Install from zip file option.
Step 4: Look for the previously created Fire TV Guru source and locate the file called repository.firetvguru.zip. Select this ZIP file to install.
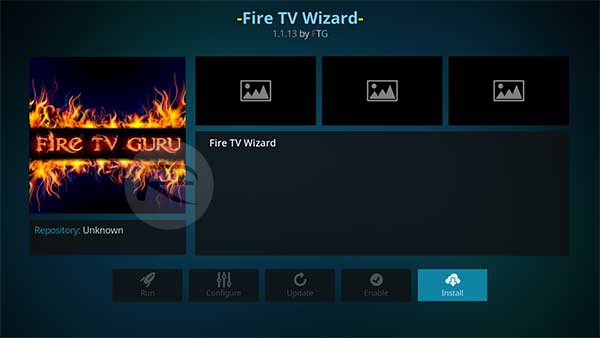
Step 5: Now, head back to the root of the Add-on browser and select the Install from repository option. Look for, and choose the Fire TV Guru Repo.
Step 6: Inside of the repository, choose the Program add-ons option and then select the -Fire TV Wizard- entry. Choose Install and wait for Kodi to let you know that it has been successfully installed.
Step 7: Head back to the Kodi home screen and select the Program add-ons option. Choose the newly installed Fire TV Wizard and select Builds. You will now need to choose the best build for your particular device.
Step 8: Launch the -Fire TV Wizard- to get your Fire TV Guru build. This wizard gives you the option of a Fresh Start then Install or a Standard Install. It’s generally best to go for the full fresh start as this wipes previous settings and configures the installation in the best possible way. However, the choice here is down to you.
Step 9: Navigate to Builds > [17.0] Fire TV Build Krypton (vx.x.x) and select either a Standard Install or a Fresh Start then Install, followed by hitting the Yes, Install button.
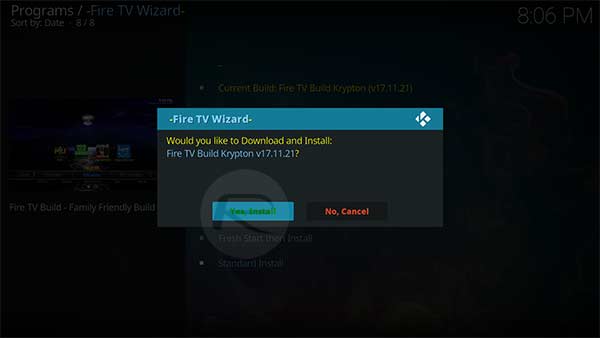
Step 10: You will then be prompted to select a server to download and install the build from, so go ahead and select one.
Once the build is installed, and Kodi has notified you, simply reboot Kodi. Once rebooted, you should see the changes reflected
You may also like to check out:
- iOS 11.1.2 Jailbreak FAQ: Here’s What You Need To Know
- Pokemon Go 1.55.1 IPA And 0.85.2 Hack Available To Download Now
- SoundCloud++ iOS 11 IPA Download On iPhone [No Jailbreak Required]
- Download: Pokemon Go 1.55.1 For iOS, 0.85.2 APK For Android Rolling Out
- Download iOS 11.2 Final IPSW Links And OTA For Your iPhone Or iPad
- Download iOS 11, 11.2, 11.1.2 Links & Install On iPhone X, 8, 7 Plus, 6s, 6, SE, iPad, iPod [Tutorial]
- Downgrade iOS 11 / 11.2 On iPhone Or iPad [How-To Guide]
- Jailbreak iOS 11 / 11.2 / 11.1.2 On iPhone And iPad [Status Update]
You can follow us on Twitter, add us to your circle on Google+ or like our Facebook page to keep yourself updated on all the latest from Microsoft, Google, Apple and the Web.
