At one point in time not so long ago, Dropbox was the definitive chosen method for users who required some kind of cloud-based storage for their documents, files or any sort of information. The Dropbox service gives away 2GB of free of charge cloud storage with the option to increase that said storage if required through the purchase of premium accounts, but it also has powerful native Mac, iOS and Android apps which make things a lot easier for users of the service.
Everything was going swimmingly great for its users and the company until Apple came along and introduced their iCloud service that gives iOS and Mac owners the ability to host their files within Apple’s cloud services. For consumers who regularly use an iPhone, iPad or their Mac, using iCloud makes perfect sense as everything can be seamlessly synced between devices and pushed around at will. The trade-off of using iCloud however is that users may find documents in two different cloud locations.

For those who are a little skeptical about Apple’s relatively new cloud service, or who just love the ability to review previous revisions of documents in Dropbox, it is possible to sync iCloud to Dropbox. The downside of this is that it is only a one-way synchronization, meaning it will take files from iCloud to Dropbox, but not vice versa.
Step 1: The first step is to make sure that your Mac in question has iCloud enabled. It may seem like a fairly simple step, but we are certain many users will sit scratching their heads as to why it doesn’t work.
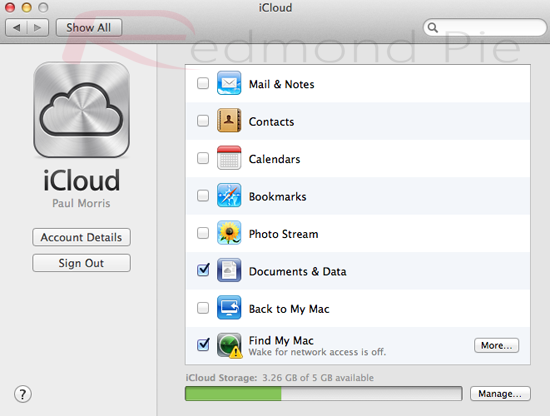
Step 2: Head over to ‘System Preferences >> iCloud‘ and make sure that the ‘Documents & Data‘ option is set to Sync.
Step 3: This process may differ a little depending on the app you are using to push data to iCloud. The underlying step is to push a document to iCloud using the specific app process. In certain apps it may be located in the ‘File >> Move to iCloud‘ structure.
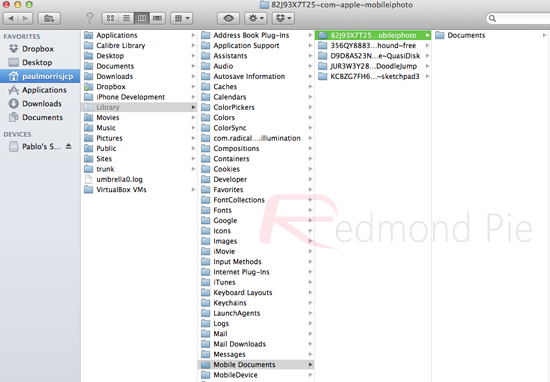
Step 4: The next step is to locate the local folder that is dedicated to iCloud on your Mac. The ‘Library‘ folder that is required has been hidden as default in OS X Lion, but there are a number of ways to get access to it. One way this can be done is by opening up Finder, highlight the ‘Go‘ menu option and then press the ‘Alt‘ key on the Mac keyboard. The Library folder should now be visible.
Step 5: As an alternative to step 4, users can also press ‘⌘CMD + Shift + G‘, then type in ‘~/Library/‘. Either way, look for a folder in the tree called ‘Mobile Documents’, and then find the ‘documents’ sub-folder that contains our precious pushed files.
Step 6: Using the new features within the Hazel software, it is now possible to perform certain synchronizations. This includes setting up a rule within Hazel to check a specific folder and then sync the contents to Dropbox which is how we get all of our iCloud files to Dropbox.
It may appear slightly confusing at first why you would want to do this, but for those who have built up trust with Dropbox over the years and love the fact that it is possible to see previous revisions of files, this could prove life-saving when using those apps that only allow iCloud storage options.
(via TUAW)
You can follow us on Twitter, add us to your circle on Google+ or like our Facebook page to keep yourself updated on all the latest from Microsoft, Google, Apple and the web.
