Here’s how to set WiFi priority in iOS for iPhone and iPad to get best possible wireless network performance.
If you move around a lot, and happen to take your iPhone or iPad, then the chances are that you have a number of WiFi networks and hotspots saved to your iOS device from the various places that you frequently visit. It’s also very likely that you have issues whereby two networks overlap one another and your iOS device simply doesn’t know which network to rank higher than the others.
If you’ve encountered that problem, which may manifest itself in the form of your iOS device clinging to a WiFi network in a lobby area of a larger building when you’d rather the device was intelligent enough to connect to the network of the room you are in, then the chances are that you have frantically searched through the iOS settings looking to find a way to add priority to specific networks.
You may be disheartened to learn that nothing exists to that effect, but that doesn’t mean it isn’t possible to achieve that level of prioritized WiFi connectivity with the help of a Mac.
Any experienced or hardcore Mac owner will probably already know that WiFi network or hotspot information saved on a Mac, or saved via an iOS device, are shared across multiple device types running the same iCloud account. That’s extremely beneficial when you consider that it becomes extremely easy to connect to a network on an iMac or MacBook and then easily access that same network from an iPhone or iPad without having to enter any additional details or network credentials. It’s also nice that it can be managed from a Mac machine.
What this also means is that adjusting priority of networks for an iOS device via macOS is possible. It’s simply a case of heading into the macOS System Preferences and making the correct adjustments to any stored WiFi networks or hotspots. It’s actually made even easier by the fact that Apple has bundled this into the system via a very simple drag-and-drop interface.
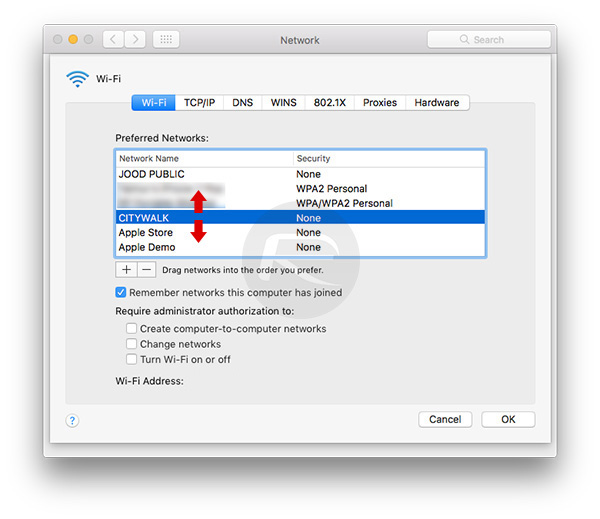
So, if you have suffered from the issues mentioned above, and are forever wondering why your iPhone or iPad just will not connect to what you perceive to be the strongest available network, then you can actually follow our previous guide on how to adjust the priority of networks via macOS here: Prioritize WiFi Networks On Mac To Make It Stay On Strongest One At All Times, Here’s How. Once you have set it on Mac, this priority will automatically shift over to your other iCloud-connected devices, including iPhones and iPads, which from then on will also connect to the network as set on priority on your Mac.
You may also like to check out:
- How To Fix iOS 10 WiFi Issues [Guide]
- Fix No WiFi Available After Windows 10 Upgrade Issue, Here’s How
- Jailbreak iOS 10 / 10.1.1 / 10.0.2 / 10.2 For iPhone, iPad, iPod touch [Latest Status Update]
- Download iOS 10, 10.1.1, 10.2, 10.0.2 Links & Install On iPhone 7, 6s, 6, Plus, SE, 5s, 5c, 5, iPad, iPod [Tutorial]
You can follow us on Twitter, add us to your circle on Google+ or like our Facebook page to keep yourself updated on all the latest from Microsoft, Google, Apple and the Web.
