
Apple’s new smartspeaker, HomePod, is now available to buy with pre-orders having been delivered today. That means that there will be plenty of people taking delivery of the latest hotness to come out of Cupertino, and it also means that some will be scrambling to get ahead of the game while they wait for their own HomePods to arrive in the mail. It never hurts to spend that time checking out just what is required to get a new toy up and running, and the HomePod is no different.
Thankfully, getting a HomePod from box to playing music is far from a complicated affair, and if you have ever configured either AirPods or something that connects to HomeKit, then this process will immediately feel familiar to you.

During the setup process, HomePod will link itself to a primary iCloud account to allow it to handle requests for messages, notes or reminders, and you will need an iOS device running iOS 11.2.5 or later to even begin the process at all. If you have an iPhone or an iPad to hand, the only other thing to factor in is the requirement to have iCloud Keychain and two-factor authentication activated.
All set? Let’s get into the meat of the setup process.
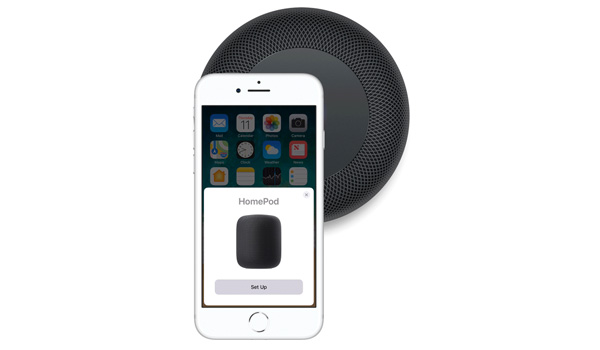
Step 1: Once you have plonked your HomePod in its new living area, make sure that the iPhone or iPad you are using as a setup device has Bluetooth turned on, and then bring it close to the speaker.
Step 1: A new pairing card should pop up; tap Set Up.
Step 2: If you use HomeKit, you will be asked which Home you want the HomePod associated with. Make your selection and tap Continue.

Step 3: Select which room of the house you have your HomePod located in. Again, tap Continue.
Step 4: If you want Siri to be able to access messages, reminders and notes whenever your iOS device is on the same network, select Enable Personal Requests. Otherwise, tap Not Now. Don’t worry; this can be changed later if required.

Step 5: If you enabled personal requests, you will now be asked whether you want to “Use This Device” when sharing your location. Make your choice, tap Continue once more.
Step 6: Tap Agree when presented with Apple’s terms and conditions. Read them!
Step 7: Tap the Transfer Settings button to use your iCloud account, WiFi credentials, Apple Music subscription, and other settings that are on your iOS device as a basis for HomePod’s own configuration.
Once that step completes, you should have a fully working HomePod. Go and listen to some music!
You may also like to check out:
- iOS 11.3 Public Beta 2 Download / OTA Update Released
- Download: iOS 11.3 Beta 2 IPSW, OTA Released For Testing
- iOS 11.3 / 11.2.5 Jailbreak: SEP Of Beta 2 Not Compatible With iOS 11.1.2 For Downgrading
- Download iOS 11.2.5 Final IPSW Links, OTA Update For Your iPhone, iPad, iPod touch
- Downgrade iOS 11.2.5 To iOS 11.2.2 For Potential Future Jailbreak, Here’s How
- Jailbreak iOS 11.2.5 / 11.2.2 / 11.2.1 On iPhone And iPad [Status Update]
- Jailbreak iOS 11 / 11.1.2 On iPhone X, 8, 7, iPad Using LiberiOS [Updated]
You can follow us on Twitter, add us to your circle on Google+ or like our Facebook page to keep yourself updated on all the latest from Microsoft, Google, Apple and the Web.