Here’s a step by step guide on how to prepare your Mac for the release of macOS Sierra 10.12 ahead of the release day.
As you may already know by now, starting September 20th, final version of macOS Sierra 10.12 will finally be available to download for free to everyone with a compatible Mac which is capable of running Apple’s brand new desktop OS. You can follow the guide below to see what you need to do to prepare yourself and your Mac in advance for the big upgrade.
Check Compatibility
Apple does a great job with both iOS and macOS in introducing new major versions of the platforms to as many devices as possible, but as you might expect, sometimes there has to be a limit because of which some of the Macs which were able to run last year’s OS X El Capitan are now not able to run macOS Sierra. To cut the long story short, if your Mac model is from year 2007 to mid 2009, you won’t be able to run macOS Sierra. But if your Mac model is from late 2009 or later, then you should be good to go. You can find the full Mac compatibility list for macOS Sierra here: List Of macOS Sierra 10.12 Compatible Macs.
Update All Apps
As part of any update it’s always a good idea to make sure that all installed applications are updated to the latest versions and offer compatibility with the platform you’re about to upgrade to, to avoid running into compatibility issues.
To update apps installed from the Mac App Store, simply launch the Mac App Store app and select the Updates tab from the top navigation bar. If you have a number of third-party applications installed from outside of the App Store environment then you’ll need to check the developer’s website for those apps, or utilize the built-in update feature to check for any available updates, if one exists.
Free Storage Space
Regardless of how organized and particular you may be about keeping everything tidy, any computer will contain redundant files and folders that have been accumulated over time. Upgrading your existing OS X El Capitan install to macOS Sierra will require approximately 20GB of free storage space on the Mac, so it’s the perfect time to delete those files and folders to ensure that enough space is available.
It also makes sense to take the time to visit your installed apps within the /Applications folder and remove any, that you no longer need, want, or that aren’t supported by macOS Sierra. You’ll be amazed at just how much precious storage space can be reclaimed by doing this.
Backup
In theory, upgrading to Sierra via the Mac App Store should be a fairly seamless process that will honor the data on the machine, unless you opt for a fresh install from a USB flash drive, of course. With that said, it’s always prudent to create a backup in case anything does go wrong. In this particular instance, we’re going to look at making a backup to an external hard drive using Apple’s Time Machine.
Step 1: Connect an external hard drive to your Mac via the USB, FireWire, or Thunderbolt port.
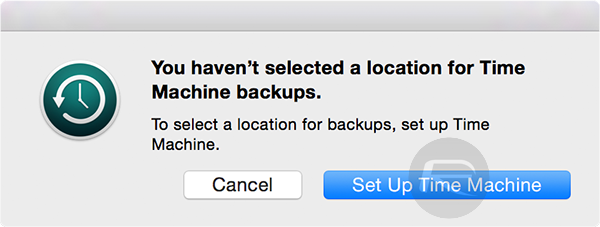
Step 2: Launch Time Machine on your Mac. If Time Machine has never been executed previously, OS X will produce an alert informing you that you haven’t selected a location for backups. If this happens, select the Set Up Time Machine option.
Step 3: On the left hand side of the Time Machine interface, toggle the Time Machine switch from OFF to ON. A new menu will appear asking you to select the location of the backups. You also have the option of choosing to encrypt backups at this point via a checkbox.
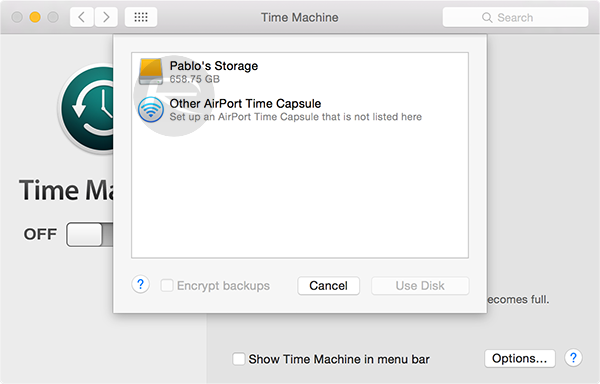
Step 4: Select the relevant backup location and click on Use Disk option.
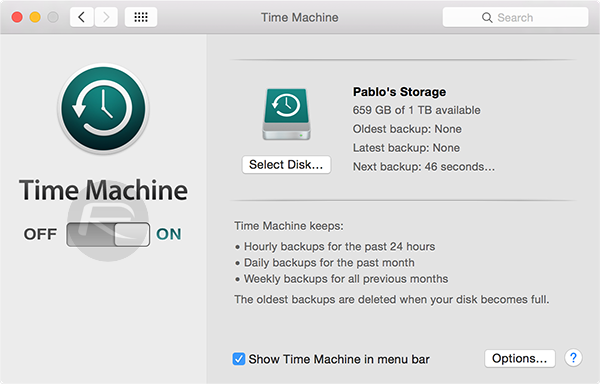
Step 5: The Time Machine settings will then display some information about the selected location, and a countdown to when the first backup will begin. If desired, you can select the Show Time Machine in menu bar option to have quick access to the backups. After the first backup, the process will then be automated. Be aware that the first one always takes the longest time, while subsequent backups are faster as they only involve the changes made.
Get A Flash Drive
If you plan on starting from scratch and installing macOS Sierra as an entirely clean new installation then you’ll need to create a USB bootable drive for this. You will need a USB flash drive with a minimum capacity of 8GB to be able to do this. It’s also worth noting that the drive will be formatted as part of the process so any data that is needed should be removed from the drive and kept safe.
Wait For Update
Now that you’re prepared, it’s time to wait till Apple flips the switch and makes it available for download via the Mac App Store. We’ll obviously post about it as soon as it goes live. In order to get as many people as possible upgrading to the latest platform it will once again be offered as an entirely free install for those with a compatible Mac.
You can follow us on Twitter, add us to your circle on Google+ or like our Facebook page to keep yourself updated on all the latest from Microsoft, Google, Apple and the Web.
