Want to install macOS Sierra hackintosh on your PC? Here’s a step by step guide on how to do just that!
If you hadn’t already heard the news, then it’s worth pointing out that Apple has already released macOS Sierra for compatible Macs, but as history has had it, why should PC owners miss out on all that the latest desktop OS from Apple has to offer? The popular UniBeast and MultiBeast tools have already been updated to support macOS Sierra 10.12.x installation on an Intel-based PC that would otherwise be running Windows. If you’re looking to enjoy everything that macOS Sierra offers, but on a PC, then follow our step-by-step tutorial below to get up and running with your Sierra-based hackintosh.
What you need:
- Access to a Mac to download the macOS Sierra installer from the Mac App Store, and of course, for preparing the UniBeast USB Drive.
- A USB flash drive with a minimum of 16GB of free storage. It’s important to note that the content on this drive will be erased since it will be formatted as part of the process. Make sure you have backed up any content that the drive may contain.
- A PC built on Intel processing power to install macOS Sierra.
- Not entirely necessary, but definitely recommended is a full backup of the system. This is in case anything goes wrong, you will be able to roll back to a working version.
Installing macOS Sierra hackintosh:
Step 1: This isn’t exactly rocket science, but in order to install macOS Sierra onto an Intel-based PC, you’re going to actually need to have macOS Sierra downloaded. On the aforementioned Mac that we said you would need, launch the Mac App Store, make sure that you are actually signed in with a valid Apple ID, and then download the macOS Sierra installer to your Mac for free. More details on downloading Sierra installer can be found here: Download macOS Sierra 10.12 Final Version For Your Mac.
Step 2: You’re now going to need to download the latest version of UniBeast tool. This is used to create the bootable macOS Sierra drive. You can download the tool from the tonymacx86 site here.
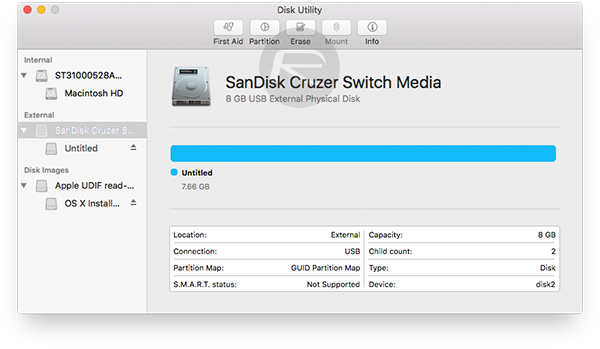
Step 3: Now with the USB drive plugged into any Mac, launch the Disk Utility app and make sure that the drive is selected in the information pane on the left.
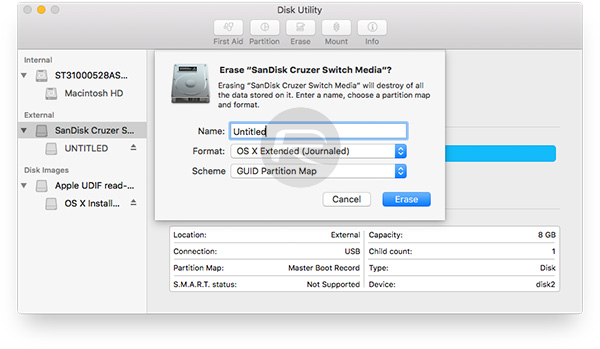
Step 4: You now need to erase and format the USB drive as mentioned earlier. With it selected, click on the Erase button on the toolbar atop, and enter a name for the drive. You can name this whatever you like, but make sure that “OS X Extended (Journaled)” is selected as the Format, and “GUID Partition Map” is selected for Scheme. Finalize the process by clicking the Erase button and then exiting out of the interface by clicking the Done button.
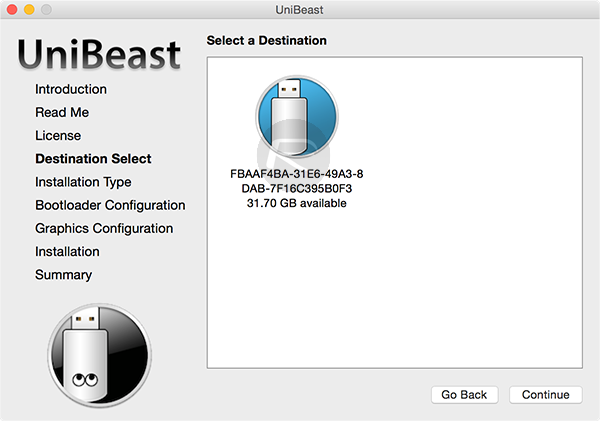
Step 5: Now run the downloaded UniBeast program and click on Continue a few times before you get to the part where it asks you to Select a Destination. Make sure that the recently formatted USB is selected, and then click on Continue again to progress.
Note: When UniBeast runs for the first time, it will look for the downloaded macOS Sierra installer file in /Applications folder, and if not found, it will prompt you with an error. Typically, macOS should have downloaded the file to that exact folder, but in case you get that error, make sure that “Install macOS Sierra.app” is within the /Applications folder or for that matter, the file name isn’t changed.
Step 6: When asked to choose on Select OS Installation screen, make sure you choose the Sierra option and click Continue.
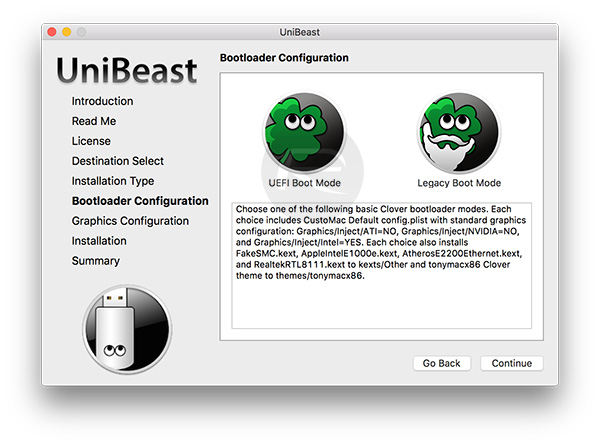
Step 7: When installer comes to Bootloader Configuration screen, either choose UEFI Boot Mode, or Legacy Boot Mode. Either one will be fine, so once selected, click on Continue to proceed.
Step 8: The next screen, Graphics Configuration, is optional, so if you wish, you can choose the appropriate graphics settings that will get the best performance out of the system that you are installing macOS Sierra onto.
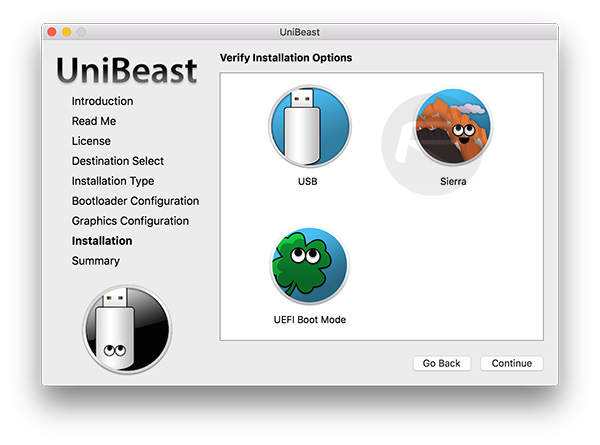
Step 9: Next, you will be asked to enter your Mac’s password for UniBeast installation to begin. Once entered, click on the Install button to continue. UniBeast will now run through the process of creating the bootable macOS Sierra installation drive for your hackintosh. This could take about 10 minutes depending on your system and drive’s speed.
Step 10: You’re now going to need to download the MultiBeast tool for Sierra from the same place you downloaded UniBeast tool in Step 2 above. Once downloaded, move the MultiBeast file onto your now UniBeast-ready USB drive.
Step 11: Once you are done with all that, it now comes to the main bit of actually installing the operating system onto a compatible Intel-based hackintosh PC. Plug the UniBeast USB drive you made above into your PC and turn it on. Hit the hotkey when booting to make sure that you get into the system boot menu that allows you to choose a source disk to boot from. This is of course different on different types of PCs but is usually accessed using F8, F10, F11 or F12 key on the keyboard.
Step 12: Once you are into the boot menu, make sure that your USB drive is chosen as the drive to boot system from. When you get to the Clover boot screen, make sure that you choose Boot Mac OS X from USB option. Yes, we know, it’s supposed to be macOS now and not OS X, but we’ll excuse the naming ignorance in this instance.
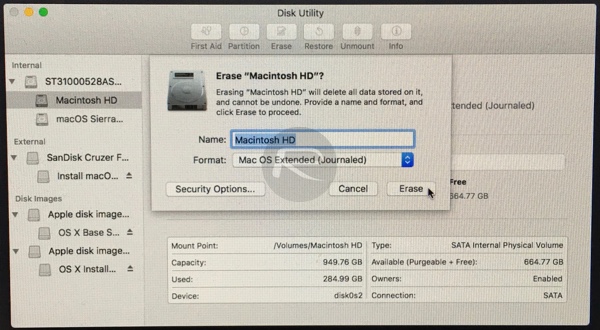
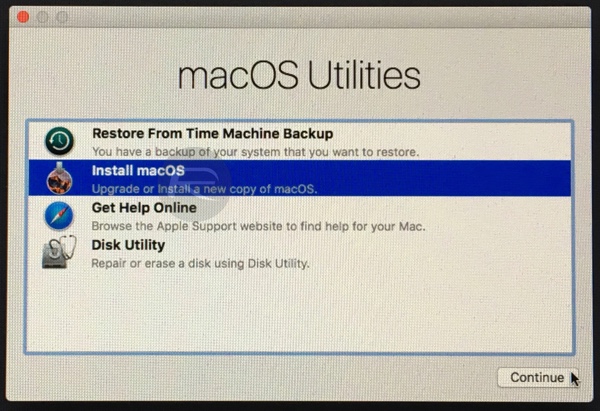
Step 13: Soon you will arrive into macOS installer screen. If this is a new installation of macOS, then you are required to format the main hard drive that it’s being installed on to. From the menu bar on the top, navigate to Utilities > Disk Utility. Highlight the target drive in the left pane, and then hit the Erase button. If this process is starting to sound a little bit familiar, it’s because it is basically what we did for the USB drive earlier in the process. Choose “OS X Extended (Journaled)” and “GUID Partition Map” for Format and Scheme. Hit the Erase button to complete the formatting process and then close Disk Utility.
Step 14: Now simply run through the process of actually installing macOS Sierra on your PC.
Step 15: When the installation is complete, the system will automatically restart. At boot, press the relevant hotkey on the keyboard to get into the boot menu again.
Step:16: Choose USB followed by selecting Sierra at the boot screen and let the setup of macOS Sierra complete.
Step 17: Once the setup is complete and you are into macOS Sierra desktop, run the MultiBeast tool to install the required missing drivers for networking, audio, graphics etc on your system.

And there you have it. Once required drivers are installed using MultiBeast, you should have a clean and fresh installation of Apple’s macOS Sierra on your Intel-based hackintosh PC.
You can follow us on Twitter, add us to your circle on Google+ or like our Facebook page to keep yourself updated on all the latest from Microsoft, Google, Apple and the Web.
