Here’s how you can bypass Do Not Disturb mode in iOS 10 for individual contacts in order to receive their texts and calls even with the aforementioned mode turned on.
Apple’s Do Not Disturb is an often underused feature of iOS, with many people unaware of its merits. If you work in an office or leave your phone on overnight but don’t want notifications and calls to disturb everyone or wake you up, then Do Not Disturb is a great way of keeping your iPhone turned on, ready to be used, but also keeping it nice and quiet so as to not, well, disturb anyone. You kind of see where the name comes from now, right?
With Do Not Disturb activated, nothing other than an alarm can generate any noise or vibration. But that’s not strictly true, because Apple has always offered a way to have Do Not Disturb be bypassed for important calls, allowing users to designate contacts as those from whom they still want to hear calls. It works well, but requires all of those contacts be added to a specific group, and it only applies to calls – iMessages are not included, or at least, they weren’t.
Starting with iOS 10 and kept rather quiet by Apple, users can choose on a per-contact basis whether they are notified of incoming calls or messages even when their iPhone is in Do Not Disturb mode. That’s a huge feature change and one that everyone should rejoice about. Unfortunately, the option is well hidden, but you needn’t worry; we’re here to help. In what follows, we’re going to walk you through putting the new feature to use.
Step 1: Open the contact you want to enable notifications for and choose to Edit it.

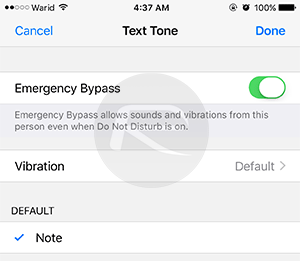
Step 2: Depending on whether you want to enable notifications for calls or messages, select either Ringtone or Text Tone.

Step 3: This is where you would normally choose the custom alerts you want for each contact, but there is now also an option for Emergency Bypass. Enable this and Do Not Disturb rules will not apply to the contact in question.
Step 4: Do this for all of the contacts that you want alerts for.
Apple hasn’t made a song and dance about the changes here, but they are important ones if you spend a lot of time with Do Not Disturb enabled. Now, you can tweak alerts to be just how you want them, and that’s awesome.
You might also like to check out:
- 100+ iOS 10 Hidden / Secret Features For iPhone And iPad [List]
- How To Set WiFi Priority In iOS For iPhone And iPad To Get Best Wireless Performance
- Jailbreak iOS 10 / 10.1.1 / 10.0.2 / 10.2 For iPhone, iPad, iPod touch [Latest Status Update]
- Download iOS 10, 10.1.1, 10.2, 10.0.2 Links & Install On iPhone 7, 6s, 6, Plus, SE, 5s, 5c, 5, iPad, iPod [Tutorial]
You can follow us on Twitter, add us to your circle on Google+ or like our Facebook page to keep yourself updated on all the latest from Microsoft, Google, Apple and the web.
