Windows 10 comes bundled with a host of new features, most of which appear to have been enabled by default. One such feature is the ability to scroll inactive windows vis-a-vis active ones – a feature that seems to have been borrowed from OS X. If you find it annoying or distracting to use, here are step-by-step instructions on how to disable inactive window scrolling in Windows 10.
Personally, I find the ability to scroll inactive windows by simply hovering the mouse over it without clicking it very useful, but in some cases, especially when you’re not used to it, it can get annoying too. Here we show you two methods for quickly disabling this feature.

Using Windows Settings
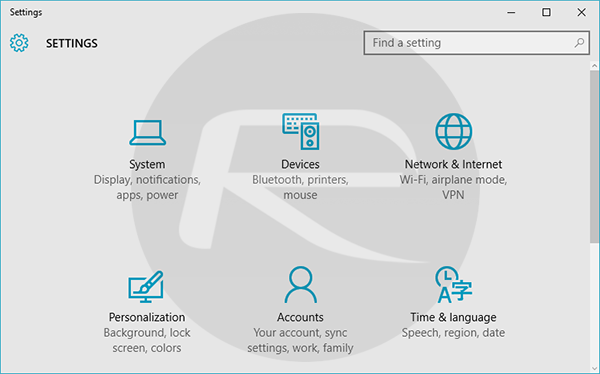
Step 1: To begin, launch the Settings app (Windows key + I), and click on the Devices icon.
Step 2: Next up, when the Devices window appears, click on Mouse & touchpad visible in the left panel.
Step 3: You should now see an array of options listed for your mouse and touchpad. Simply turn off the switch under Scroll inactive windows when I hover over them.
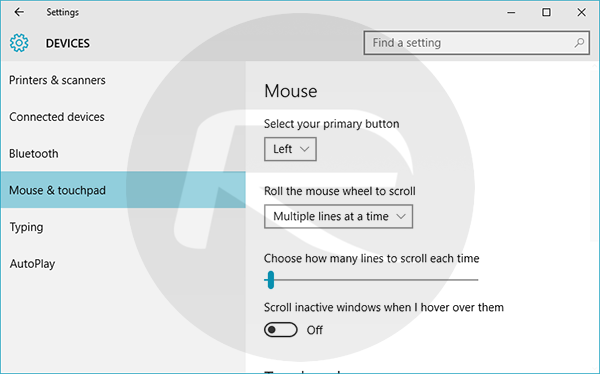
This should effectively disable scrolling in inactive windows from now on. If you wish to re-enable the feature, simply flip the same switch to turn it on.
Using Registry (advanced users only)
If for some reason the above mentioned method is not visible for you or if it does not work, you can do it the old fashion way by editing the Windows Registry. This method is for advanced users only.
Step 1: To begin, simply type in “regedit” in the Windows 10 search box and hit the Enter key. Alternatively, simply select ‘regedit’ from the results that appear by clicking on it.
Step 2: Windows UAC will prompt you with a dialogue box asking “Do you want to allow this app to make changes to your PC?” Select Yes.
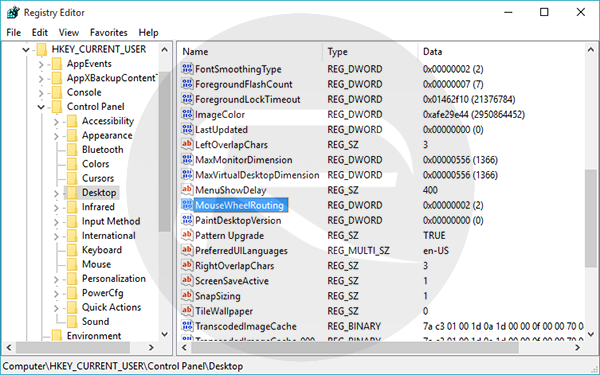
Step 3: In the Registry Editor, navigate to the following key:
HKEY_CURRENT_USER\Control Panel\Desktop
Step 4: Once there, you may need to scroll down in the panel on the right and look for MouseWheelRouting. In case it doesn’t exist, simply create a new DWORD (32-bit) Value and name it MouseWheelRouting in HKEY_CURRENT_USER\Control Panel\Desktop location.
Step 5: Now we need to modify the value for this key. Double-click MouseWheelRouting and change the value in Value data to “0”, and hit OK.
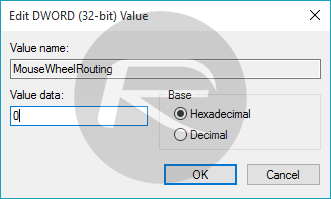
You can now exit the Registry Editor and test out if the feature has been truly disabled. To turn it back on, simply follow the same steps as defined above, but enter “2” in Value data.
You may also like to check out:
- How To Boot Into Windows 10 Safe Mode On Your PC [Tutorial]
- Downgrade / Uninstall Windows 10 To Windows 8.1 / 7, Here’s How [Guide]
You can follow us on Twitter, add us to your circle on Google+ or like our Facebook page to keep yourself updated on all the latest from Microsoft, Google, Apple and the web.
